Nsert, Nstallation, Surround panel installation – Avalon Firestyles B-Vent-1995 User Manual
Page 21
I
NSERT
I
NSTALLATION
(C
ONT
.) -
For qualified installers only!
P
AGE
21
Surround Panel Installation
+
The surround panels come in the variety of sizes and colors listed below
COLOR
PANEL SIZE
WIDTH
HEIGHT
PART #
Black (Paint)
8" x 10"
40-1/4"
28-3/4"
99300410
Black (Paint)
10" x 13"
44-1/4"
31-3/4"
99300420
Almond (Enamel)
8" x 10"
40-1/4"
28-3/4"
99300411
Almond (Enamel)
10" x 13"
44-1/4"
31-3/4"
99300421
Green (Enamel)
8" x 10"
40-1/4"
28-3/4"
99300412
Green (Enamel)
10" x 13"
44-1/4"
31-3/4"
99300422
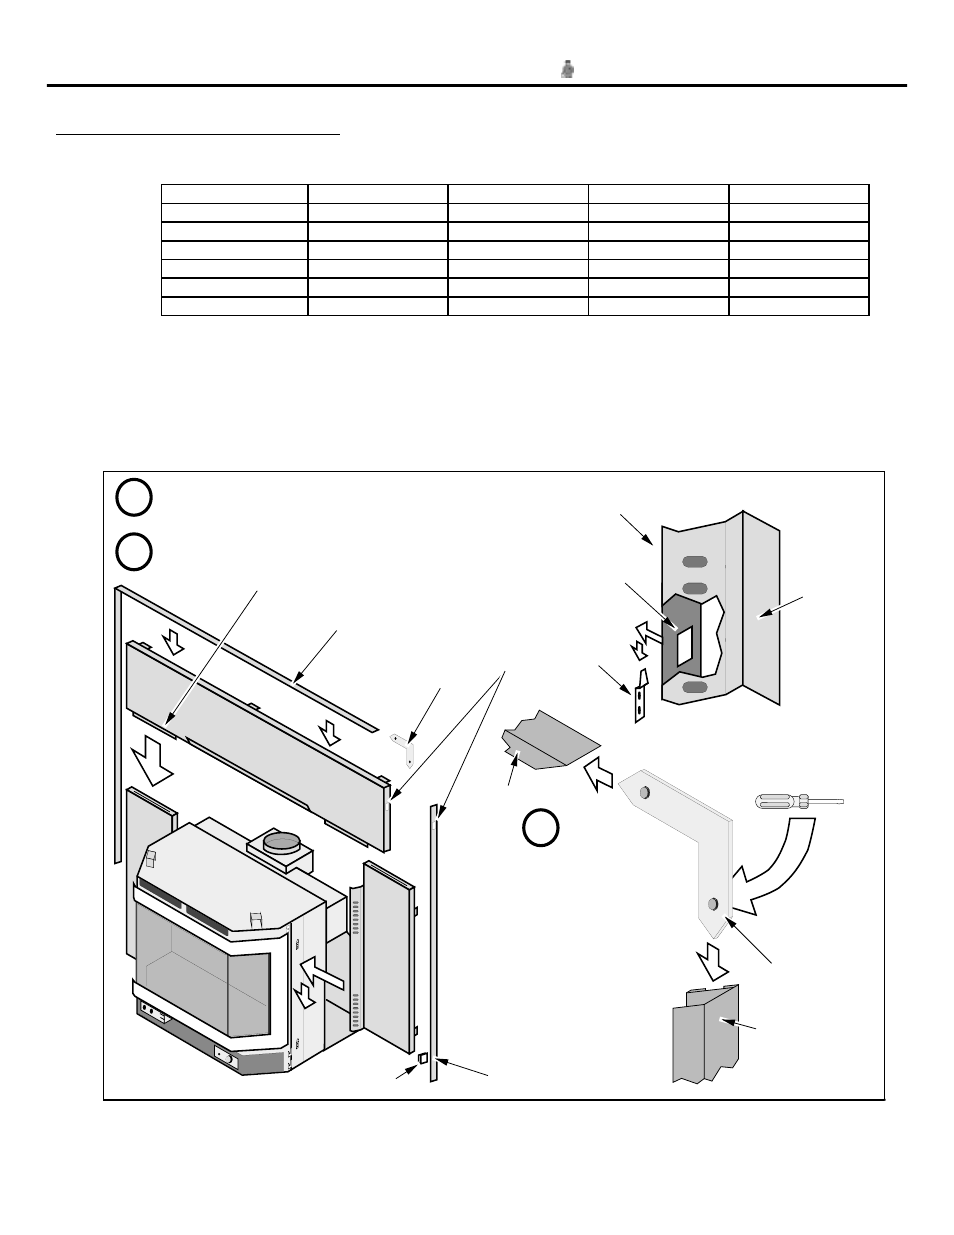
1
The insert must be in place with the gas line and vent attached prior to installing the panels. The rear
edge of the insert must be 12-5/8" behind the facing of the fireplace for the panels to fit correctly.
2
Run the power cord to either side of the insert along the facing.
3
Locate the two red wires leading to the on/off switch (they can be found on the right side of the
insert near the rear). Disconnect the on/off switch from the wires and run the wires to the right side
of the insert. Keep the green jumper wire attached to the on/off switch.
4
Follow the instructions below for installing the panels and trim.
Install each side panel by lining up the two tabs on the side of the insert with the two slots on the side
of the panel. Slide each panel over the tabs and downwards to lock in place.
Install the top panel so the two tabs on the bottom insert into
the slots on top of the side panels. The sides may need to be
pulled forward - do not flex panels, the enamel may chip.
Construct the panel trim. Insert
one leg of each "L" bracket into
the top and side trim piece.
Align the trim to form a precise
corner, then tighten the two set
screws with a small standard
screwdriver. Slide the trim over
the panels. Attach a piece of
included double-back tape to the
bottom of each side trim to keep
it from flaring at the bottom.
Side
Panel
Top
Panel
Top Trim
"L" Bracket
1
2
3
Double-Back Tape
Side
Panel
Tab
Slot
Tighten the set screws
from the back side with a
small standard screwdriver
"L" Bracket
Right Side
Trim
Top Trim
Right Side Trim
Hole for
On/Off
Switch