Service procedures, Return procedure, Replacement parts and accessories – UVP 81-0345-01 ChemiDoc-ItTS2 Imager User Manual
Page 27: Troubleshooting
GelDoc-It
TS2
and ChemiDoc-It
TS2
Imagers
27
Service Procedures
Return Procedure
A Returned Goods Authorization (RGA) number must be obtained from UVP Customer Service before
returning any product.
Replacement Parts and Accessories
To order accessories or replacement parts for the GelDoc-It
TS2
and ChemiDoc-It
TS2
Imagers, contact UVP’s
offices.
Part Description
Part Number
Epi UV Modules:
UV Module, 254/365nm, 4 watt (115V)
95-0021-12 (Qty. 2 Recommended)
UV Module, 254/365nm, 4 watt (230V)
95-0021-10 (Qty. 2 Recommended)
Fuses:
Fuse, 3.15A (for Darkroom)
56-0022-04 (Qty. 2 Required)
Fuse, 2A (for Transilluminators)
56-0002-01 (Qty. 2 Required)
Emission Filters:
Filter, Ethidium Bromide, 50mm Square
38-0220-01
Filter, SYBR Green, 50mm Square
38-0219-01
Filter, SYBR Gold, 50mm Square
38-0221-01
Transillumination Accessories:
LED White Light Plate
95-0476-01
White Light Converter Plate, 21x26cm
38-0191-01
Visi-Blue Converter Plate, 21x26cm
38-0200-01
Gel Accessories:
Gel-Cutter
85-0002-01
Gel-Ruler
85-0003-01
Gel-Scooper
85-0006-01
Gel-Tray, small
85-0007-01
Gel-Sentry DNA Preparation Plate
97-0076-01
Fluorescent Standard Step Tablet
33-0014-02
Protective Equipment:
Spectacles, UV Blocking (UVC-303)
98-0002-01
Goggles, UV Blocking (UVC-503)
98-0002-02
Faceshield, UV Blocking (UVC-803)
98-0002-04
Troubleshooting
No Power to the Darkroom or Transilluminator
1. Recheck the main power cord connection to the GelDoc-
It
TS2
/ChemiDoc-It
TS2
darkroom as well as the power cables
between the darkroom and transilluminator, LED White Light
Plate or optional epi UV modules.
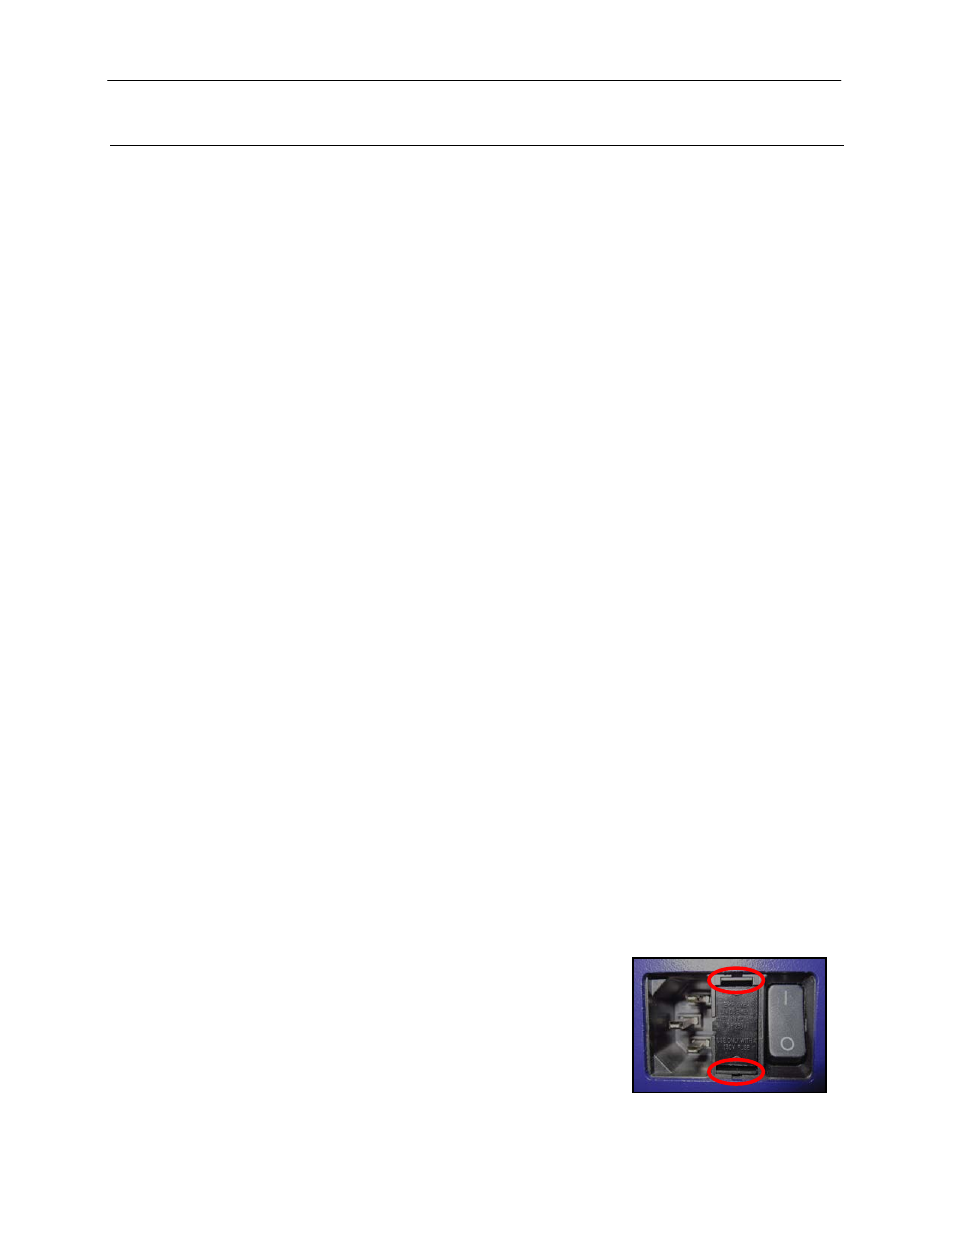
2. Check the fuses located at the back of the unit next to the
power port. A small flat-head screwdriver or similar tool is
required. Push the bottom tab of the fuseholder up until the
bottom of the fuseholder pops out. Then, push the top tab
down until the top pops out. The entire fuseholder can now be
removed.