Maintenance, Every wo hours – Sears 917.25446 User Manual
Page 18
Attention! The text in this document has been recognized automatically. To view the original document, you can use the "Original mode".
MAINTENANCE
Ain SCREEN
HOSE
C L A M P
5,
Lubricate Steering and Front Wheels
There is a grease fitting on each front wheel and axle spindle.
Use a grease gun to give each grease fitting two shots of
extreme pressure lubricating grease (available through your
Sears Service Center)(Fig 241
6. Oil Pivot Points
Place several drops ofSAE 30 oil at points where metal parts
move against each other, especially:
a.
Hood hinges
b. Shifter shaft points,
SEE LUBRICATION CHART. PAGE 19
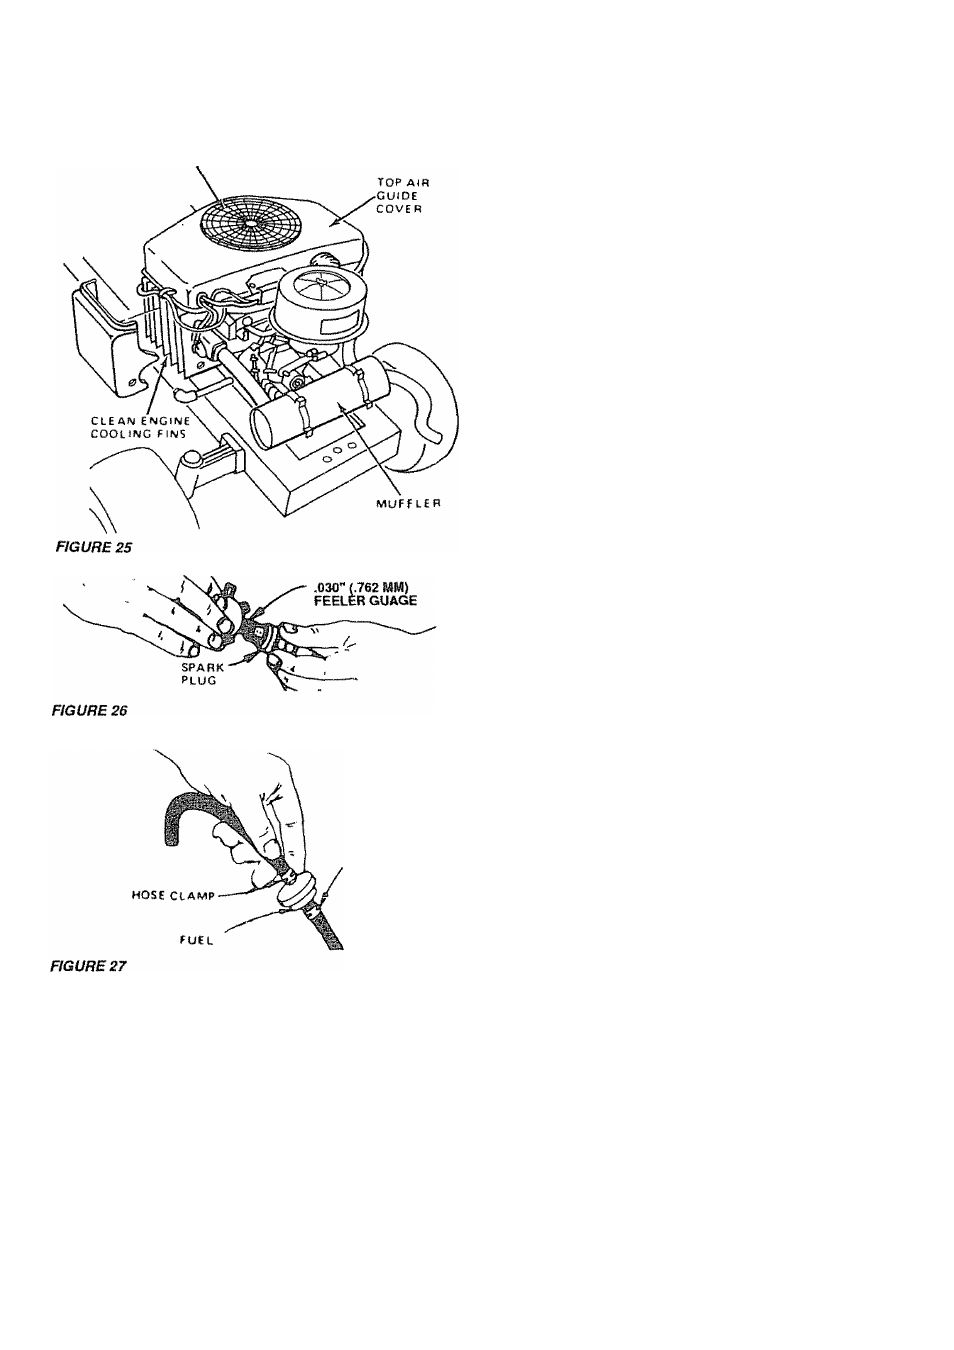
7. Clean Air Screen
Air screen (Fig. 25) must allow free-flow of air to prevent engihe
damage from overheating. Clean with
a
wire brush, compressed
ail orwater pressure to remove dirt, chaff, stubborn dried gum and
fibers.
ALWAYS WEAR SAFETY GLASSES WHEN
USING COMPRESSED AIR.
DO NOT TOUCH HOT MUFFLER, CYLIN
DER OR FINS AS CONTACT MAY CAUSE
BURNS.
8. Inspect Muffler
Inspect and replace corroded muffler as it could create a fire
hazard and/or damage (Fig 25).
9. Clean Engine Cooling Fins
Remove any dust, dirt or oil from engine cooling fins to prevent
engine damage from overheating. Air guide covers must be
removed (Fig. 25). Remove bolts to remove side and top covers.
See "HOOD REMOVAL,"page 21.
DO NOT TOUCH HOT MUFFLER, CYLINDER
OR FINS AS CONTACT MAY CAUSE BURNS,
Every WO Hours
DISCONNECT SPARK PLUG WIRES TO
PREVENT ACCIDENTAL STARTING BE
FORE MAKING ANY INSPECTION, ADJUST
MENT OR REPAIR (EXCEPT CARBURE
TOR). BE CAREFUL TO AVOID TOUCHING
HOT ENGINE OR MUFFLER COMPONENTS.
1.
Replace Spark Plugs
Replace spark plugs at the beginning of each mowing season or
every 100 hours, whichever comes first. Gap should be set at
0 030" (0.762 mm). (Fig 26),
2. Replace Air Cleaner Paper Cartridge
Refer to page 17.
3. Replace In-Line Fuel Filter
If fuel filter is clogged, obstructing fuel flow to carburetor, replace
ment is required
a. With engine cool, remove filter and plug fuel line sections
as removed from both ends of fuel fitter (Fig, 27).
b Place new fuel filter in position in fuel line. Be sure there
are no fuel line leaks and that fuel line is in proper
position in hose clamps.
BE SURE THERE ARE NO FUEL LINE LEAKS
AND THAT FUEL LINE IS IN PROPER POSI
TION IN HOSE CLAMPS.
4-
Change Engine Oil Filter
a. Drain crankcase of oil (refer to "CHANGE ENGINE OIL,"
page 15, through step d). Remove old filter (Fig. 19) by
turning counterclockwise.
b. Before installing new filter, apply a thin coating of oil on
surface of the rubber seal.
c Install new filter by turning clockwise until rubber seal
contacts the filter adapter, then tighten the filter an
additional 1/2 turn.
d. Refill crankcase with engine oil (see page 15 for oil
specifications). Add an additional 1/2 pint (.24 litres) oil
for the new filter capacity,
e. Start the engine. Check for and correct any oil leaks.
18