Figure 5, Figure 6 – Tuffy Security 310 User Manual
Page 4
Page 4 of 4 – 12/9/2011 – Rev 12/14/11
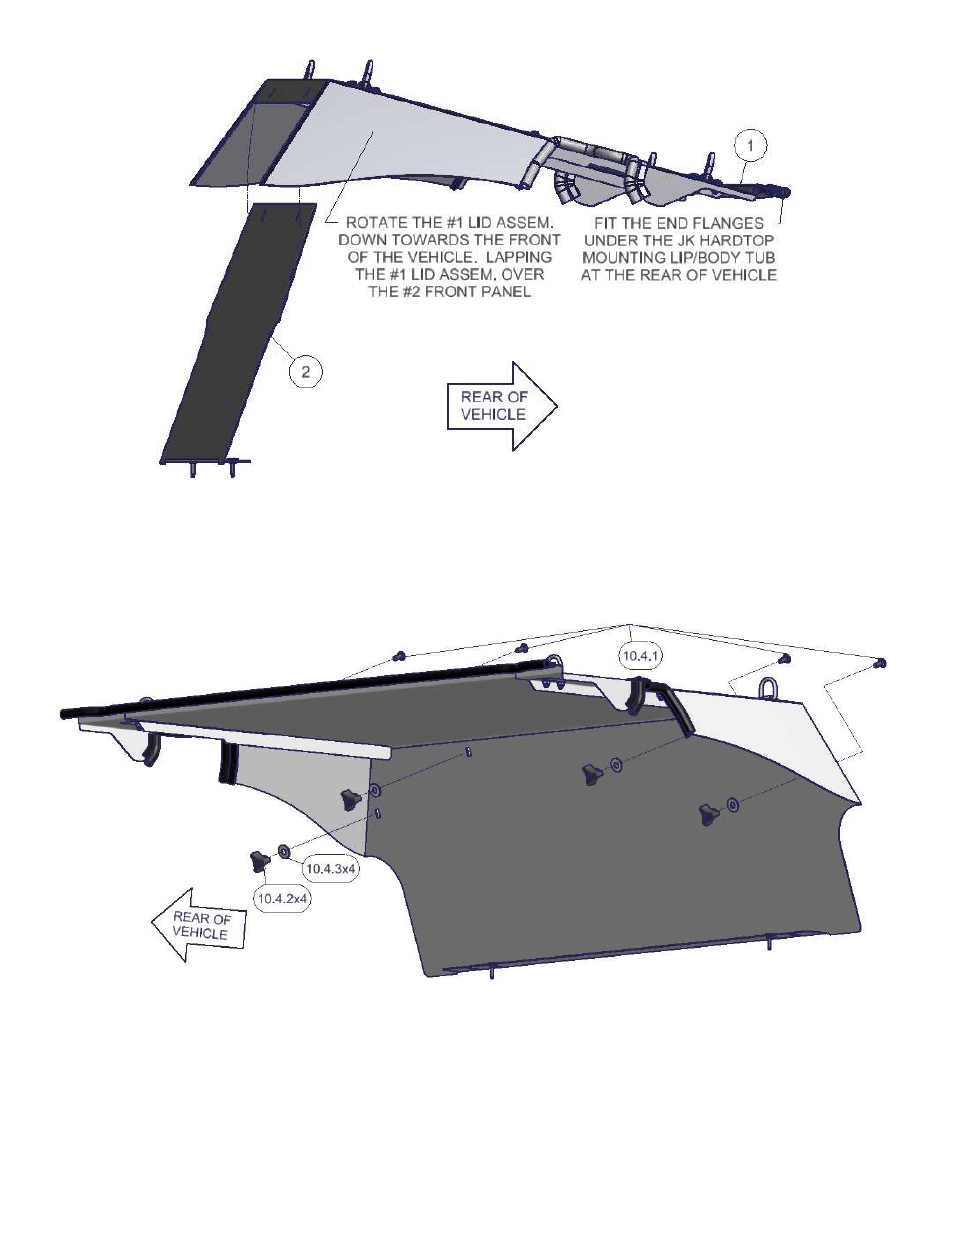
FIGURE 5
7. Adjust the #2 Front Panel so that the gap between it and the forward flanges of the #1 Lid Assembly is minimized and
install (4) #10.4.1 carriage bolts from the front of the installed enclosure. Install (4) #10.4.3 washers and the (4)
#10.4.2 wing knob nuts from inside the enclosure. The two panels have slotted mounting holes to allow for the
tailoring the fit of the enclosure. NOTE: It may be necessary to raise or lower the #1 Lid to provide a better seal to the
carpet in the cargo area. (Figure 6)
FIGURE 6
8. Tighten the (4) #10.4.2 Wing Knob Nuts securing the #1 Lid Assembly and #2 Front Panel, then tighten the OEM
Cargo Tie Down Bolts to further compress the carpet in the cargo area.
Call (970)564-1762 for Technical Support
- 082 (2 pages)
- 089 Manual (3 pages)
- 089 Installation Manual (1 page)
- 101 (2 pages)
- 073 (3 pages)
- 198 (2 pages)
- 189 (1 page)
- 292 (2 pages)
- 282-BTL (1 page)
- 137 (2 pages)
- 295 (3 pages)
- 862 (2 pages)
- 863 (3 pages)
- 311 (2 pages)
- 312 (2 pages)
- 046 (3 pages)
- 145 (4 pages)
- 131 (2 pages)
- 297 (3 pages)
- 296 (3 pages)
- 240 (10 pages)
- 238 (2 pages)
- 058 (3 pages)
- 219 (2 pages)
- 195 (2 pages)
- 144 (2 pages)
- 274 (10 pages)
- 139 (3 pages)
- 157 (10 pages)
- 052 (2 pages)
- 164 (1 page)
- 104 (1 page)
- 043 (1 page)
- 027 (2 pages)
- 035 (2 pages)
- 108 (2 pages)
- 149 (2 pages)
- 049 (2 pages)
- 036 (2 pages)
- 160 (3 pages)
- 289 (2 pages)
- 287 (3 pages)
- 283 (3 pages)
- 309 (2 pages)
- 182 (2 pages)