Figure 2 – Tuffy Security 289 User Manual
Page 2
Page 2 of 2 - 1/5/2012 – Rev122006
Instructions for changing the combination code on part #289-089
Attention: Use code “12345” to open part #289-089 with the pushbutton combo lock.
1. Selecting your combination
1.1. Please look at the front of the combination lock. There are buttons numbered 1 through 0. There is also an OPEN lever and
a CLEAR button.
1.2. Select your own combination and keep the combination in a safe place.
1.3. For best results, select between four and seven numbers in your combination. Each number can only be used one time. Do
not use number combinations that can be easily guessed.
2. Setting your combination
WARNING: Improperly setting the combination is not covered under the warranty. Do not disassemble the lock. Doing
so voids the warranty.
2.1. Remove the lock cover behind the lock mechanism by removing the one torx screw.
2.2. Press on the CLEAR to reset the combination lock.
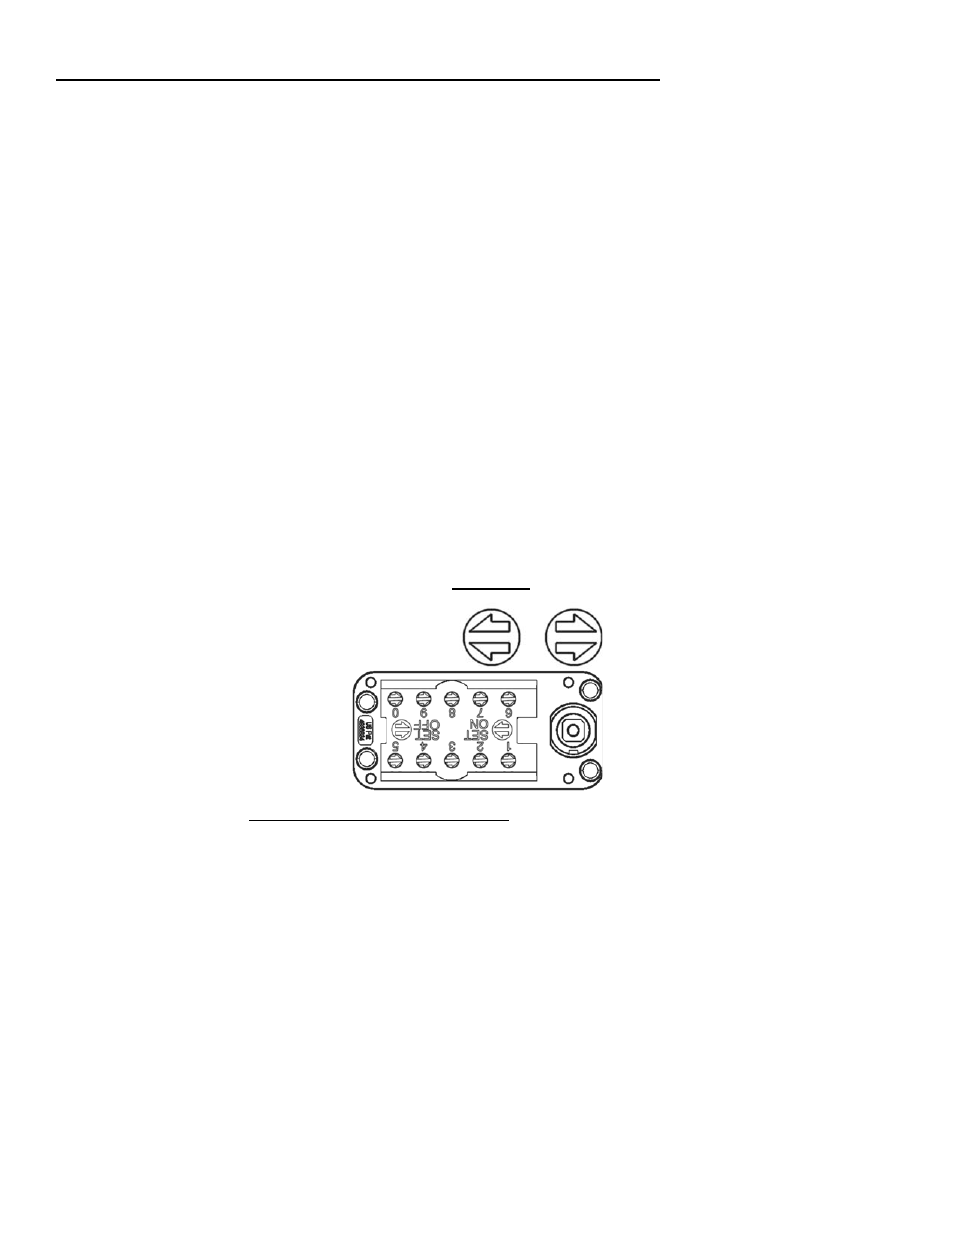
2.3. Looking at the rear of the pushbutton combination lock from the inside of the box you will see ten numbered buttons with
arrows. (These are actually upside down the way the latch is installed) These numbers correspond to the numbered button
on the front of the lock. (See Figure 2)
2.4. The arrows on the screws are pointing in the direction which the previous codes were set to. (See Figure 2)
IMPORTANT: Open knob must be in LOCKED position before the code can be changed.
2.5. Use a small screwdriver to rotate the arrows. For each number in your combination, apply light pressure and rotate a half
turn so that the arrow points correctly (SET ON) and snaps up. Be sure to reset all the arrows to SET OFF before entering
the new combination. (See Figure 2)
2.6. Check to make sure that the arrow of any number that is not in the combination is pointing the correct direction (SET OFF).
(See Figure 2)
CAUTION: Arrows must point either direction (SET ON or SET OFF). An arrow pointing differently indicates that
it has not snapped up, the combination will not work. Test the combination before locking the lid.
Figure 2
3. Testing your combination before closing the lid and locking the box.
Please note: This product is equipped with a clutch mechanism to protect it from forced entry. Do not be alarmed if the
OPEN lever turns even if the correct combination has not been entered.
3.1. Do not close the door.
3.2. Make sure OPEN lever is in home position. If not, turn OPEN lever counterclockwise until it’s in the home position. On the
front of the lock, push only the numbered buttons in your combination. If a mistake is made, shift the CLEAR lever and re-
enter the combination.
3.3. Turn the OPEN lever clockwise to rotate the cam to the unlocked position. If you have entered an incorrect combination, you
can return the buttons to their original setting by shifting the CLEAR lever.
3.4. When you turn the lever, the combination will clear.
3.5. To relock the combination lock, turn the OPEN lever counter-clockwise.
Call (970)564-1762 for Technical Support