Philips STU 901/25R User Manual
Page 9
Attention! The text in this document has been recognized automatically. To view the original document, you can use the "Original mode".
14. If there is patterning, or any other interference on the
screen, adjust the TUNE control (26) on the back of the
Receiver until you have a good picture. Only a small
adjustment, sufficient to remove the patterning, should be
made at a time.
Now check all the VCR programmes for possible patterning.
Select your Satellite Receiver number on your TV and check
again the TV programme for possible patterning.
If a problem occurs, go back to step 7.
15. Go to the section Aim your dish.
1.
Make the connections as shown in the drawing using the
cable supplied with your Receiver.
2.
Connect your Receiver to the mains socket
and switch ON (12).
3. Switch your TV ON.
4
Switch your VCR ON.
5.
Press button number 0 on your Receiver remote control.
The programme number indicator (16) on your Receiver will
show 0. Press the MENU button (8) on the remote control.
6.
Switch your TV to each of its programme numbers in turn to
check that your Receiver is not causing interference with
normal programmes.
7.
If there is [Datteming, or any other interference on the
screen, adjust the TUNE control (26) on the back of the
Receiver until you have a good picture. Only a small
adjustment, sufficient to remove the patterning, should be
made at a time.
8.
Continue this procedure until you have checked all the
programme numbers on your TV.
9.
Select a spare programme number on your TV which you
will always use for satellite programmes - this is now your
‘Satellite Receiver number". Tune your TV until you find a
picture from the Receiver. You will know that you are
looking at a picture from the Receiver when you see the
MAIN MENU appear on your TV screen (see rear flap).
10. If the reception is poor, use a small screwdriver to turn the
TUNE control (26) on the Receiver until the reception is
good. Go back to Step 6.
11. On your TV, select the programme number you use to
watch your VCR.
12. Select a spare programme number on your VCR which you
will always use for satellite programmes. It is a good idea to
use the same programme number as your TV ‘Satellite
Receiver number’.
13. Tune your VCR until you find a picture from the Receiver.
You will know that you are looking at a picture from the
Receiver when you see the MAIN MENU appear on your TV
screen (see rear flap).
1
.
2
.
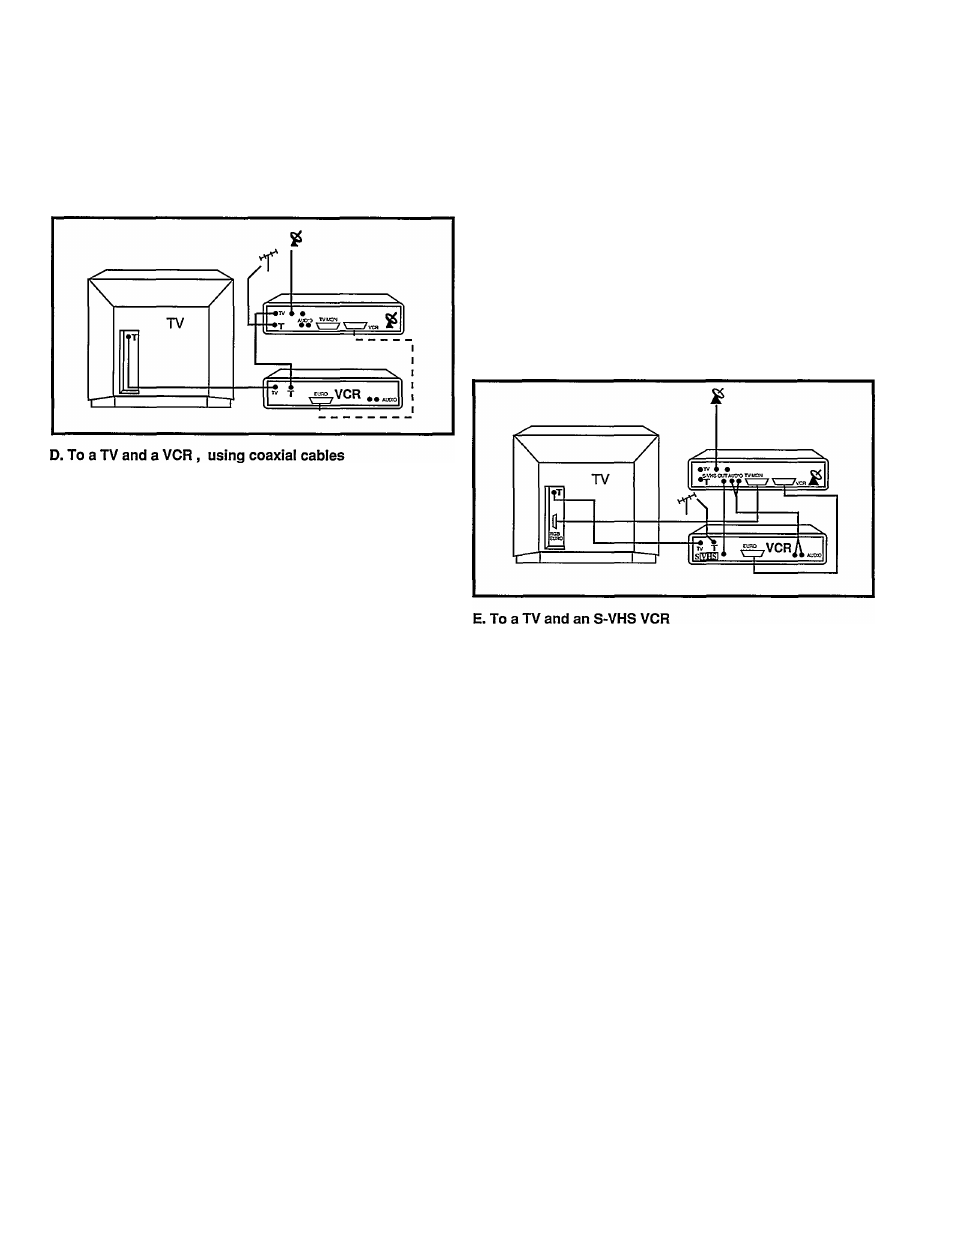
Make the connections as shown in the drawing.
Connect your Receiver to the mains socket.
3.
Switch your TV ON.
4.
Switch your Receiver ON (12)
5.
Press button number 0 on your remote control (6). The
programme number indicator (16) on your Receiver will
show 0. Press the MENU button (8) on the remote control.
You should now see the MAIN MENU on your screen (see
rear flap). If not, you may have to select the
AN
input on
your TV.
6.
Switch the Receiver to Standby using button (4). Play a
video cassette in your VCR. If you do not see a picture from
the VCR, check the connections as above.
7.
Press 0, then MENU on your Satellite Receiver remote
control and go to the section Aim your dish.
NOTE:
Only D2-MAC programmes will be recorded via the S-VHS
connection; PAL7SECAM programmes will only be recorded via
the Euroconnector between your Satellite Receiver and your
VCR.
CgB) 5