Check internal jumpers – Carrier 19XRV User Manual
Page 7
7
Vmax = Maximum measured phase-to-phase voltage
(A to B, B to C, C to A)
Vmin = Minimum measured phase-to-phase voltage
Imbalance Calculation Formula
8. Take a final thermal measurement of the capacitor bank
and power after finalizing the installation to ensure all
connections are good.
9. If a ground fault occurs, then do the following:
a. Check for a ground in the motor or motor wiring.
b. Check for damage to wiring insulation and that
wiring is dry.
c. Verify the motor wiring is separated from ground
and there is no connection between phases.
d. Check for failed IGBTs.
10. If an Overcurrent fault occurs, then do the following:
a. Check for excessive load and verify load limit set-
tings on the ICVC.
b. Check motor and wiring insulation.
c. Check parameter settings on VFD_CONF screen
in the ICVC.
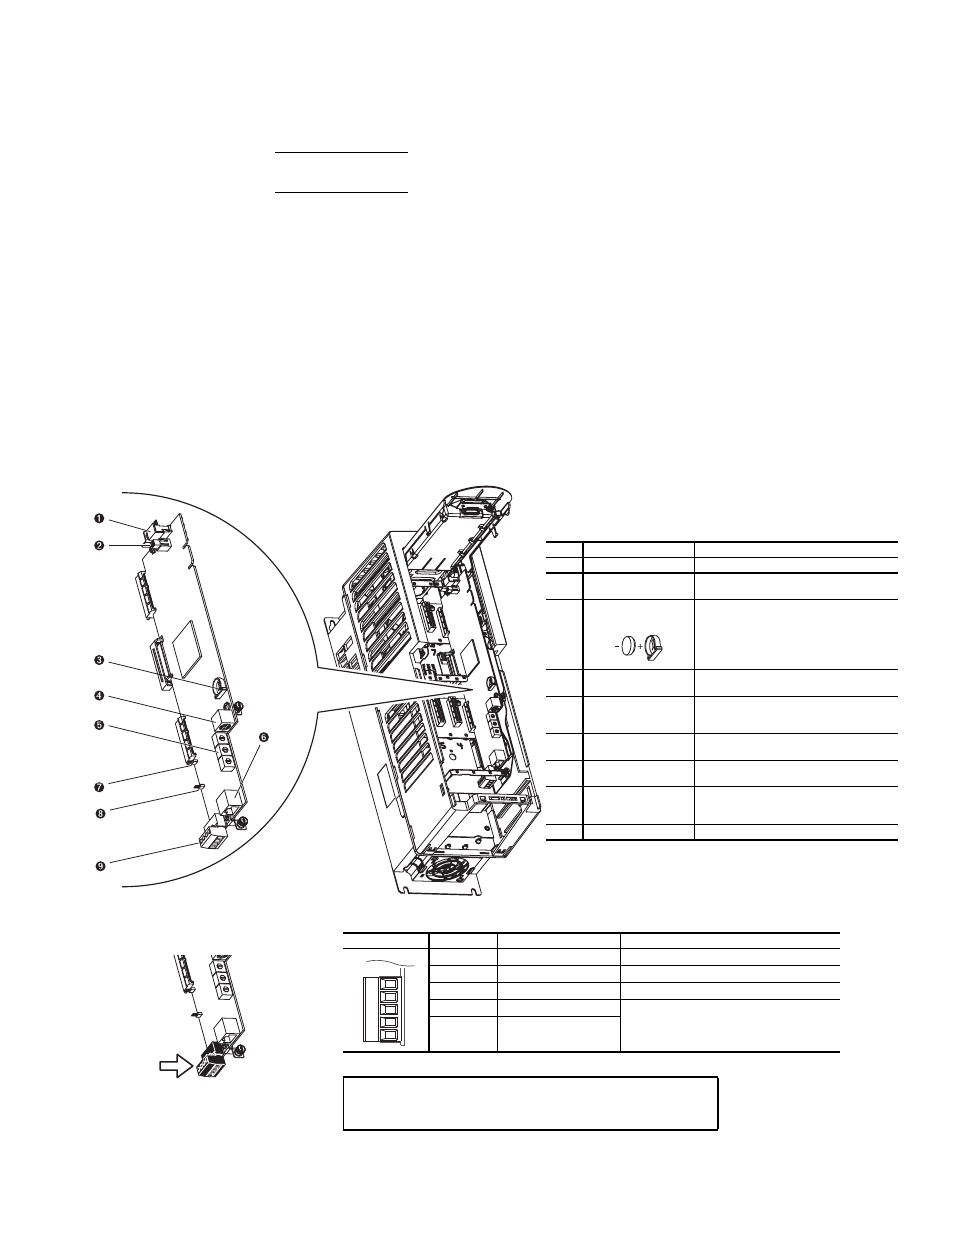
Check Internal Jumpers —
On the Main VFD Con-
trol board there are two jumpers labeled J1 HARDWARE EN-
ABLE and J2 SAFETY ENABLE. J1 should be removed and
J2 should be in place. See Fig. 10.
There are two jumper wires that connect a particular termi-
nal to chassis ground. The MOV and AC EMI jumper should
be connected to the PE-A terminal. The COMMON MODE
CAPACITORS to GROUND jumper should be connected to a
standoff rather than the PE-B terminal.
Use the recommended tools as follows when connecting
jumper wires in Frame 6 and in Frame 7:
• Recommended torque (screws and nuts) = 1.36 N·m
(120.0 lb·in)
• Recommended hex socket = 7 mm
• Recommended screwdriver = T20 star type
See Fig. 11A and Fig. 11B for the correct positions of the
jumpers.
Vavg
=
(VAB + VBC + VCA)
3
Imbalance %
=
(Vmax – Vmin) x 100
Vavg
LEGEND
NO.
NAME
DESCRIPTION
1
HIM Connector
DPI Port 1 (HIM Cradle) connection.
2
Fan Connector
Power supply for internal cooling fan
(Frames 2 & 3).
3
Battery
Receptacle
User installed CR1220 lithium coin cell
battery provides power to the Real Time
Clock (Optional, not supplied).
4
DPI Port 2
Cable connection for handheld and
remote HIM options.
5
Embedded EtherNet/
IP Address Selectors
Rotary switches for setting lowest octet
of EtherNet address (forces address to
192.168.1.xxx).
6
Embedded EtherNet/
IP Connector
Network cable connection.
7
Jumper J2 SAFETY
Safety enable jumper. Removed when
safety option is installed.
8
Jumper J1 ENABLE
Hardware enable jumper. Removed
when a hardware enable configuration is
utilized.
9
TB1
I/O terminal block.
Fig. 10 — PF755 Main Control Board
TB1 I/O Terminal Designations
FIXED I/O
TERMINAL
NAME
DESCRIPTION
Di 0ac
Digital Input 120V AC
Connections for AC power supply.
Di C
Digital Input Common
Digital input common
Di 0dc
Digital Input 24V DC
Connections for DC power supply.
+24V
+24 Volt Power
Connections for drive supplied 24V power.
24VC
24 Volt Common
IMPORTANT: Wiring to pluggable terminal block connectors
should be supported by wire ties or other means to help pre-
vent unintentional disconnection
Di 0ac
Di C
Di 0dc
+24V
24VC
a19-1921