Great Planes Giant Extra 330L Kit - GPMA0250 User Manual
Page 42
the perimeter of the front and rear deck sheeting just as you
did with the floor sheeting. Sand the formers as needed.
When you are comfortable with the fit and positioning, glue
IP and CPR to the floor sheeting, being careful not to glue
any of the cockpit components to the fuselage.
❏ 4. Confirm that IP is properly positioned and hold the
cockpit in place as you drill 5/16" holes through the holes in
IP and through FD3. Remove the cockpit.
❏ 5. From the leftover 5/16" dowel, cut two 1/2" lengths.
Round one end of each of the two dowels.
❏ 6. Insert the dowels into the holes in FD3 so 1/4" of each
rounded end is left extending into the cockpit area. Put
medium CA on one of the die-cut 1/8" ply dowel doublers
(DD) and reach up inside the fuse and slide the doubler
onto one of the dowels, locking the dowel in place and the
doubler tight against FD3. Install the second dowel doubler
the same way. NOTE: You need to use enough medium CA
so that it glues the dowel in place as well as the doubler.
❏ 7. Finish your cockpit as desired.
❏ 8. Place the cockpit back on the fuselage, sliding the IP
over the dowels.
❏ 9. Trim off just the excess from the canopy ends so that
the canopy is open at its leading and trailing edges and set
the canopy onto the fuselage. Center the canopy side-to-
side and position the canopy as far aft as possible. Using
two pieces of tape, lightly tape the canopy to the fuselage at
the leading and trailing edges.
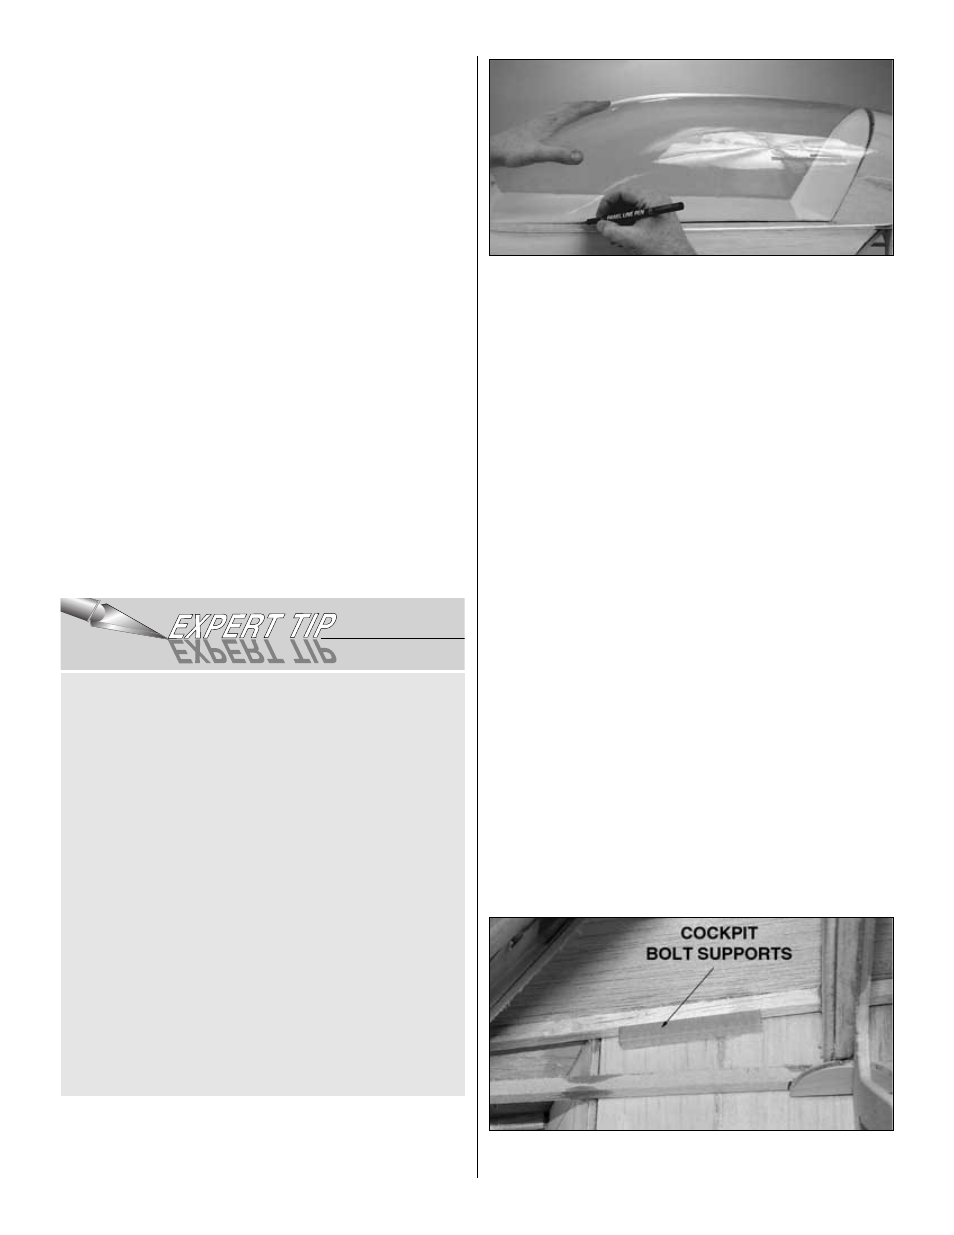
❏ 10. Use a marker to mark where the canopy needs to be
trimmed along the entire perimeter of the cockpit frame. Lift
the canopy off the fuselage and trim slightly outside the pen
marks. Fit and trim the canopy in small amounts until your
canopy fits perfectly to the cockpit. Be careful to work slowly
and not over trim!
❏ 11. Lift the canopy and cockpit off the fuselage. Lay Plan
Protector inside the cockpit saddle to ensure you don’t glue
it to the fuselage and reposition the cockpit back on the
fuselage. Make sure your cockpit interior is complete; this is
your last chance to make changes easily!
❏ 12. Clean the entire canopy with window cleaner,
particularly the interior of the canopy. Be sure your hands
are very clean and not at all oily. The CA fumes will find the
oils from your fingers and any other dust, dirt or smudges
and permanently scar your canopy, so be SURE it's clean
before you glue it!
❏ 13. Confirm that you can confidently position the canopy
on the cockpit. Use MEDIUM CA to glue the canopy to the
cockpit. Hold it in place until fully cured.
NOTE: We intentionally call for medium CA. DO NOT USE
ACCELERATOR. It will smoke the canopy. Thin CA will also
smoke the canopy. “Canopy glues” do not provide as tight
and permanent a bond as CA and you risk the chance of
the canopy coming off in flight. This could be catastrophic
on an aircraft of this size and type.
❏ 14. Position the fuselage upside down in a stand. Confirm
that the cockpit is still properly positioned on the aircraft.
On the prototypes we chose to cover the cockpit floor with
charcoal MonoKote
®
. For a scale appearance, you may
want to make instrument panels in front of the pilot (in the
back seat) and the passenger position. We recommend
doing so from leftover sheeting. Cover them with the
same covering you used for the cockpit floor. We have
provided a single, scale dash panel decal for in front of
your pilot. Scale documentation packages such as those
available from Scale Model Research in California often
include good photos of the instrument panel which can be
xeroxed, shrunk down, and glued to these instrument
panels. We selected DGA 1/3 scale pilots for their light
weight and realistic appearance. We glued a light balsa
bottom into the pilot to maintain his shape, and glued the
balsa bottom right onto the MonoKote covering of the
cockpit floor.
For painting the pilot we have discovered that acrylic
water base paints such as the types found at craft stores
work great. The acrylic paints look realistic on the pilot
because they are not glossy and, best of all, they clean up
with water.
42