Great Planes Giant Extra 330L Kit - GPMA0250 User Manual
Page 10
❏ ❏ 4. Carefully punch out the four die-cut 1/8" balsa stab
webs (SLE, SMW, STE, and ELE), laser-cut 1/8" ply stab
rib S1, die-cut 1/8" ply dowel doubler (DD) and the die-cut
3/32" balsa stab ribs S2 through S8. Sand the edges
slightly to remove any die-cutting irregularities. Be careful
not to alter the shapes or angles of any of the pieces. If this
is your first stab half, align the dowel holes and glue the stab
dowel doubler to the left side of S1 when positioned over the
plans. If this is your second stab half, align and glue the
doubler to the right side of S1.
❏ ❏ 5. Select the S1 through S4 ribs, the phenolic stab
tube socket and the 18" aluminum stab tube. Cut the 18"
aluminum stab tube down to 17" and sand the cut end
smooth so it will slide into the socket easily. Carefully slide
the stab tube socket into the tube holes in ribs S1 through
S4. If the socket does not slide into the ribs, DO NOT force
it. Wrap a small piece of 220 grit sand paper around the
aluminum stab tube and gently sand the inside of the rib
holes. Test fit until the stab tube socket fits properly into the
ribs. Set the tube and socket aside.
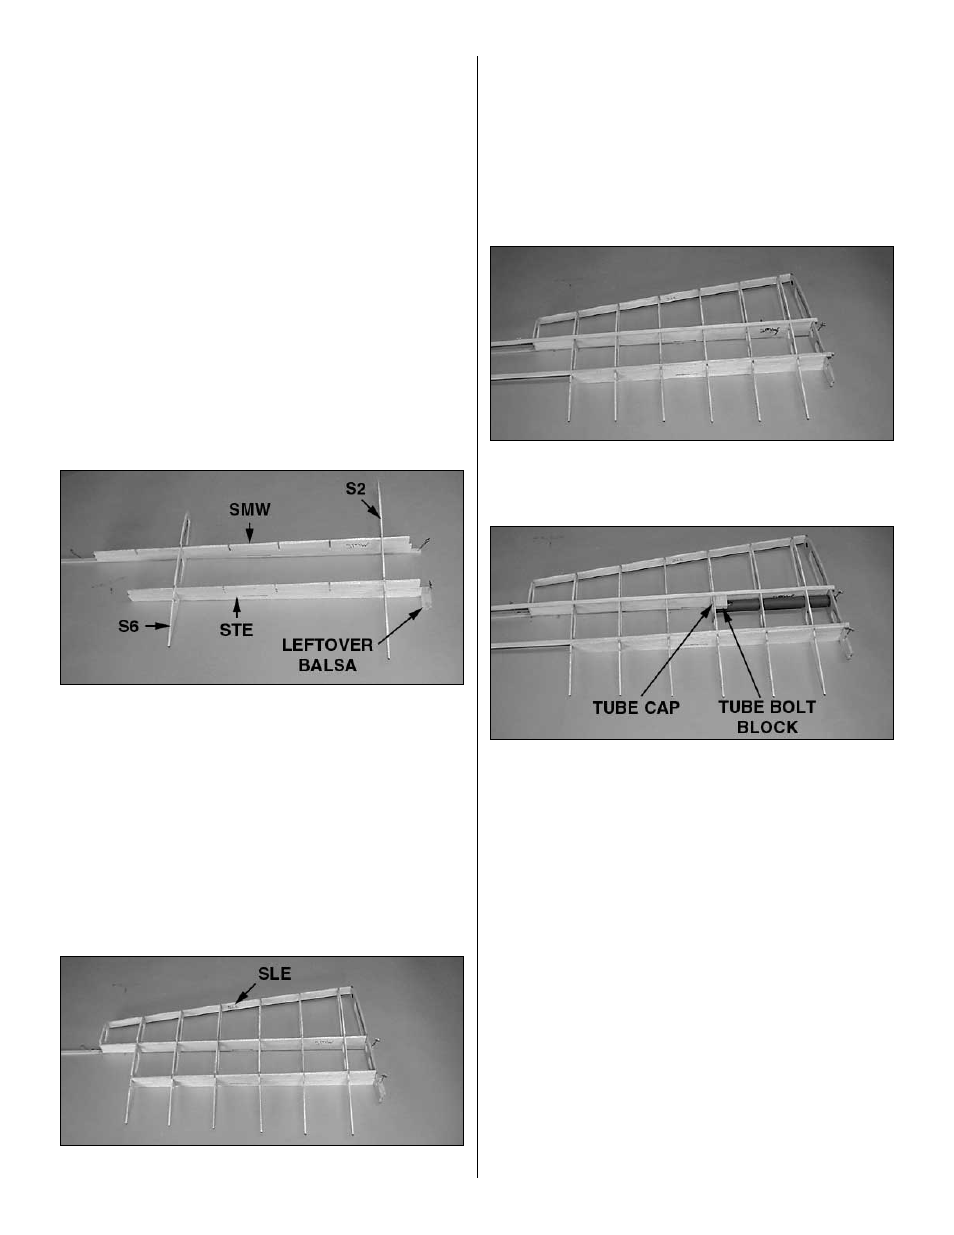
❏ ❏ 6. Select the rib S2, main web (SMW), and trailing edge
web (STE). Slide S2 into its slots in the main web and the
TE web. NOTE: Be sure the rib is slid all the way into the
notches, particularly in the TE web which extends beyond
the rib both top and bottom.
❏ ❏ 7. Position S6 in its slots to lock the webs in place. Glue
S2 and S6 to the main web and spar. Pin a piece of leftover
balsa flush against the root end of the trailing edge web to
hold the trailing edge web in place.NOTE: If you happen to
crack or break one of the ribs during installation, simply take
it out of the stab, position the pieces together and glue with
thin CA. Allow to dry and reinstall.
❏ ❏ 8. Insert ribs S1, S3, S4, S5, S7 and S8 into their locations.
❏ ❏ 9. Carefully slide the stab LE web (SLE) onto the front
of the ribs in their notches. Glue all 8 ribs to all 3 webs and
the spar, and the main web to the spar.
❏ ❏ 10. Test fit (DO NOT GLUE) the top spar into the ribs,
leaving the excess overhanging both S1 and S8. When you
are confident you can fit the spar in place, remove the spar.
Lay a bead of medium CA along the top of the main web
and the corners of the rib slots, and reinstall the top spar.
❏ ❏ 11. Test fit the 1/8" x 1/4" x 24" balsa top aft stab spar
into the ribs as you did the main spar. Glue it to the ribs and
trailing edge web.
❏ ❏ 12. Align the die-cut 1/8" ply tube cap (SHS) against
the outboard edge of R4 and the main web, centered
vertically on R4. Glue it to the main web and R4. Note: This
piece is identical to the stab horn support.
❏ ❏ 13. Carefully slide the stab tube socket through ribs S1,
S2 and S3 and tight against the tube cap on the aft side of
S4. (When building your second stab half, put the uncut end
into the stab half, and trim off the excess in step 14.
Remember to keep the leftover piece for in the fuselage.)
❏ ❏ 14. Glue the stab tube socket to the ribs and web with
medium CA. Trim the inboard end of the stab tube socket
1/8" inboard of S1. NOTE: Do NOT use thin CA for this step,
as you may saturate the stab tube socket and get CA into
the inside of the stab tube socket, making fitting the
aluminum stab tube impossible.
❏ ❏ 15. Position the 3/8" x 3/4" x 3/4" basswood tube bolt
block against the inboard edge of R4 and the main web.
Glue it in place with medium CA. Note: It may be necessary
to sand the tube bolt block slightly to make it flush with the
top of the ribs and spar.
10