Great Planes Corsair 40 Kit - GPMA0177 User Manual
Page 7
Work over waxed paper covered plans, on a flat work
surface. Refer to the plans to identify the parts and
their locations.
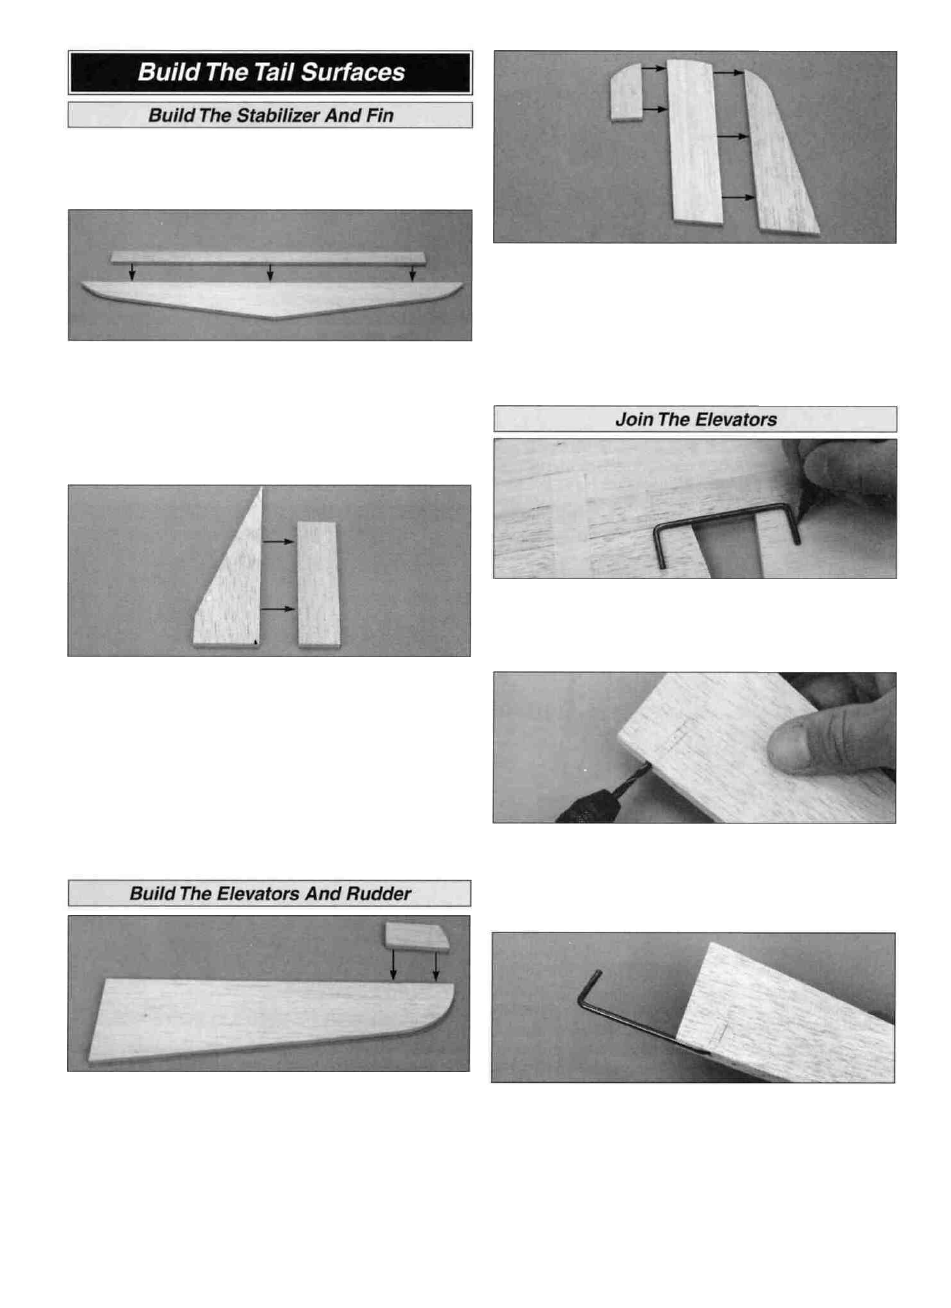
D 1. Locate the shaped 1/4" balsa forward (S01) and aft
stab (S02) parts. Check their fit and sand the mating edges
as needed. Mark a centerline on both parts. Align the
centerlines on the stab parts with the centerline on the
plans. Glue the two parts together with a thin bead of
medium CA. Wipe off any excess from the surface before
it cures.
D 5. Locate the shaped 1/4" balsa balance tabs (S09),
rudder front (S07) and rudder rear (S08) parts. Check
their fit and sand the mating edges as needed. Glue the
three parts together with a thin bead of thin CA. Wipe off
any excess from the surface before it cures.
D 6. Sand the joints of the elevators and rudder smooth
with sharp 220-grit sandpaper and a sanding block.
D 7. Tape the two shaped 1/4" balsa elevators in position
on the TE of the stab. Center the bent elevator joiner wire
(WBNT101) over the elevators as shown, then mark the
location of the "arms."
D 2. Locate the shaped 1/4" balsa fin front (S05) and fin
rear (S06) parts. Check their fit and sand the mating edges
as needed. Glue the two parts together with a thin bead of
medium CA. Wipe off any excess from the surface before
it cures.
D 3. Sand the joints of both assemblies smooth with sharp
220-grit sandpaper and a sanding block.
D 4. Locate the shaped 1/4" balsa elevators (S03) and
balance tabs (S04). Check their fit and sand the mating
edges as needed. Glue the balance tabs to the elevators
with a thin bead of medium CA. Wipe off any excess from
the surface before it cures.
D 8. Carefully draw a centerline around the edges of both
elevators. Drill a 1/8" diameter pilot hole into the LE of each
elevator (on the centerline) at the marked location. Redrill
the holes with a 9/64" bit. The holes must be at least
1-1/8" deep.
D 9. Cut a 1/8" deep groove in the elevator LE between the
inside (root) edge and the hole you drilled (see the "Expert
Tip" on page 8). Insert the joiner wire. Adjust the depth of
the groove until the joiner wire is flush with the LE.
7