To install the printer cover – Panasonic KX-PNB2 User Manual
Page 9
Attention! The text in this document has been recognized automatically. To view the original document, you can use the "Original mode".
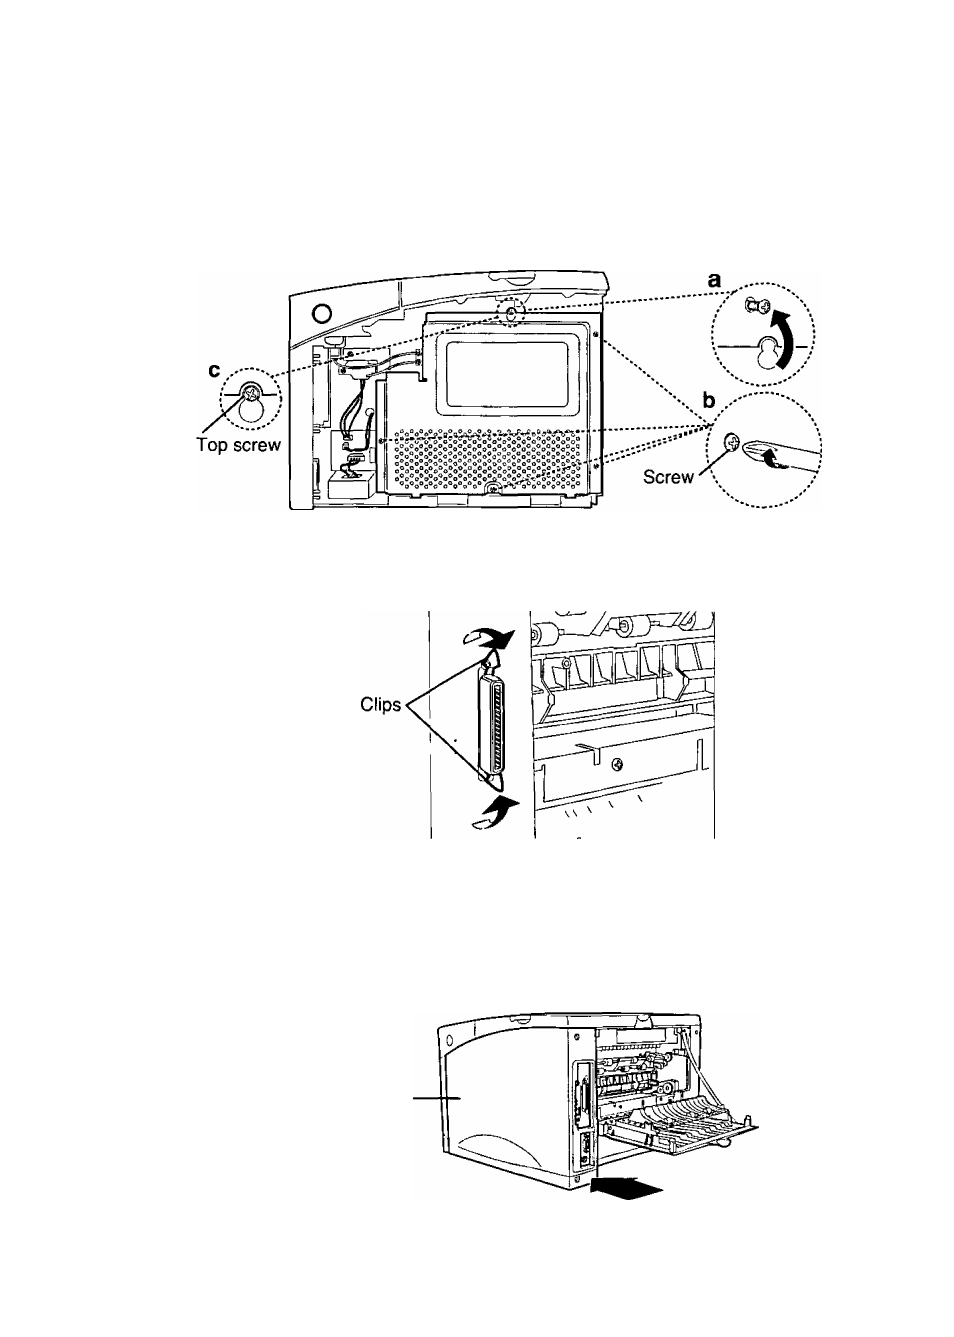
To install the printer cover
a) Replace the top screw loosely and hang the plate on it.
b)
Tighten the other four screws.
c) Tighten the top screw.
6
Stand the clips on the connector to avoid hiding them behind the
printer cover.
7
Set the bottom of the printer cover onto the printer. Make sure the
bottom tabs on the printer cover fit into the corresponding slots in the
printer.
Rotate the cover up towards the printer.
Slide the cover toward the front of the printer until it clicks into place.
Printer cover
See also other documents in the category Panasonic Hardware:
- Infrared Light Emitting Diodes SHC00023CED (4 pages)
- Light Emitting Diodes LN217RPH (3 pages)
- UP0KG8DG (6 pages)
- Light Emitting Diodes SHD00438BEK (3 pages)
- 2SC2406 (5 pages)
- 2SC6036 (3 pages)
- Band Switching Diodes MA27077G (4 pages)
- MA21D382G (4 pages)
- WV-PS31 (2 pages)
- 2SA2174G (4 pages)
- UP0KG8D (5 pages)
- 2SD0965 (3 pages)
- LNG497CK4 (3 pages)
- Light Emitting Diodes LNG0A8CYBZ (3 pages)
- BL-PA100A (32 pages)
- Light Emitting Diodes LN29RPX (3 pages)
- AC Adaptor AG-B15 (8 pages)
- 2SA2079 (3 pages)
- 2SA1790G (4 pages)
- 2SA1748 (3 pages)
- Chip RC Networks EZANT (9 pages)
- 2SB0792A (4 pages)
- 2SA1309A (3 pages)
- Zener Diodes MAZSxxxG Series (8 pages)
- WJ-NT314 (2 pages)
- MA26P02 (2 pages)
- MA27P070G (4 pages)
- CF-VFS372 (4 pages)
- FP (Sigma) (20 pages)
- 2SC2634 (3 pages)
- Light Emitting Diodes LNJ024X4ARA1 (3 pages)
- MA27P010G (4 pages)
- LN1261CTR (3 pages)
- WJ-NT104 (84 pages)
- KX-RC22 (48 pages)
- WJ-NT304 (20 pages)
- AJ-HDP2000P (20 pages)
- TC-32LX60L (34 pages)
- MA271110G (4 pages)
- 2SC4656G (4 pages)
- 2SA2174J (3 pages)
- 2SA2009G (4 pages)
- 2SB0710A (4 pages)
- WJ-PB65E01 (8 pages)
- LNJ216C8ARA (3 pages)