0 calibration, 1 front panel calibration, Calibration – Rice Lake 420 Plus HMI Digital Weight Indicator Installation Manual User Manual
Page 34
30
420 Plus Installation Manual
4.0
Calibration
The
420 Plus
can be calibrated using the front panel, EDP commands, or the
Revolution
®
configuration utility.
Each method consists of the following steps:
•
Zero calibration
•
Entering the test weight value
•
Span calibration
•
Optional rezero calibration for test weights
using hooks or chains.
The following sections describe the calibration procedure for each of the calibration methods.
XXXXXXX
XXXXXXX
XXXXXXX
XXXXXXX
WZERO
WV AL
WSPAN
WLIN
ALGOUT
DIGI N
SETPNT
PROGRM PFORMT
SERIAL
CALIBR
CONFIG FORMAT
REZERO
VERS
WPT–>
1
WPT–>
2
WPT–>
3
WPT–>
4
WPT–>
5
Same as PT ->
1
*
CAL*
Display and edit
span calibration
A/D count value
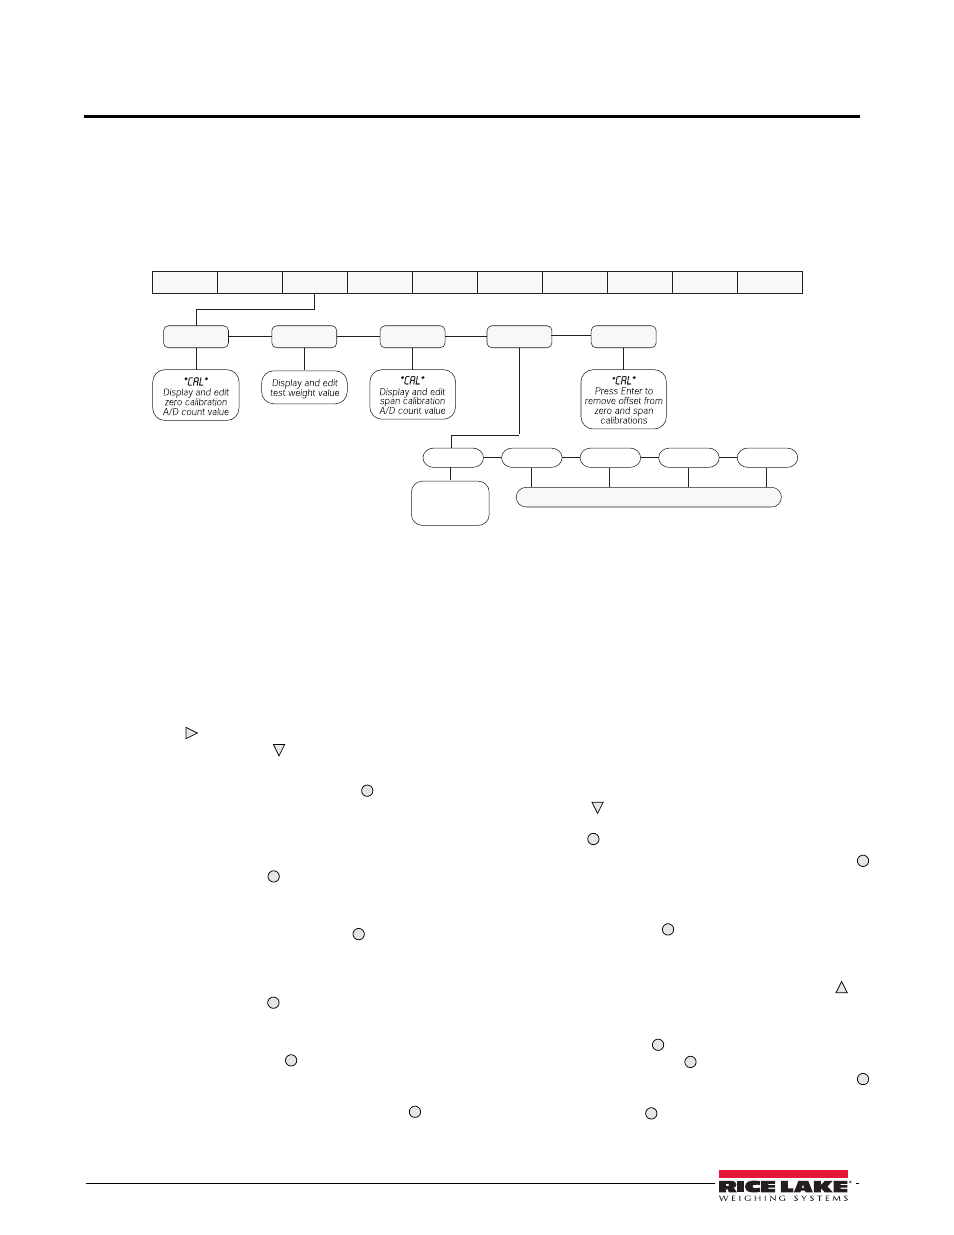
Figure 4-1. Calibration (CALIBR) Menu
4.1
Front Panel Calibration
To calibrate the indicator using the front panel,
1. Place the indicator in setup mode (display
reads
CONFIG
) and remove all weight from the
scale platform. If your test weights require
hooks or chains, place the hooks or chains on
the scale for zero calibration.
2. Press until the display reads
CALIBR
(see
Figure 4-1). Press to go to zero calibration
(
WZERO
).
3. With
WZERO
displayed, press to calibrate
zero. The indicator displays
*CAL*
while
calibration is in progress. When complete, the
A/D count for the zero calibration is displayed.
DO NOT adjust this value after WSPAN has
been set! Press again to save the zero
calibration value and go to the next prompt
(
WVAL
).
4. With
WVAL
displayed, press to show the
stored calibration weight. Use the procedure
shown in Figure 3-4 15 to enter the actual
value of the test weights to be used for the span
calibration. Press to store the entered
WVAL
value and go to span calibration (
WSPAN
).
5. With
WSPAN
displayed, place test weights on
the scale and press to calibrate span. The
indicator displays
*CAL*
while calibration is in
progress. When complete, the A/D count for
the span calibration is displayed. Press again
to store the span calibration value and go to the
next prompt (
REZERO
).
6. Five-point linearization (using the WLIN
parameter) provides increased scale accuracy
by calibrating the indicator at up to five
additional points between the zero and span
calibrations.
Linearization is optional: if you choose not to
perform linearization, skip the WLIN
parameter; if linearization values have
previously been entered, these values are reset
to zero during calibration. To perform
linearization, follow the procedure below:
Standard Calibration: With
WLIN
displayed,
Press to go to the first linearization point
(
PT-> 1
). Place test weights on the scale and
press or
ENTER
.
Enter the actual test weight value, then press
to calibrate. The indicator displays
*CAL*
while
calibration is in progress. When complete, the
A/D count for the linear calibration is
displayed. Press again to save the calibration
value and go to the next prompt (
PT-> 2
).
Repeat for up to five linearization points. To
exit the linearization parameters, press to
return to WLIN.
Millivolt Calibration: If millivolt calibration is
enabled press to display and edit the test
weight value, press again to display and edit
the millivolt value for that weight, press
again to calibrate and display the raw A/D
count, press again to move to the next
calibration point.