Losi LOSA99062 User Manual
Page 2
2
Starting
Before starting for the first time: follow these instructions
without the chassis on the starter allowing the motors to
run for 20-30 seconds at least 5 times to help the brushes
seat in.
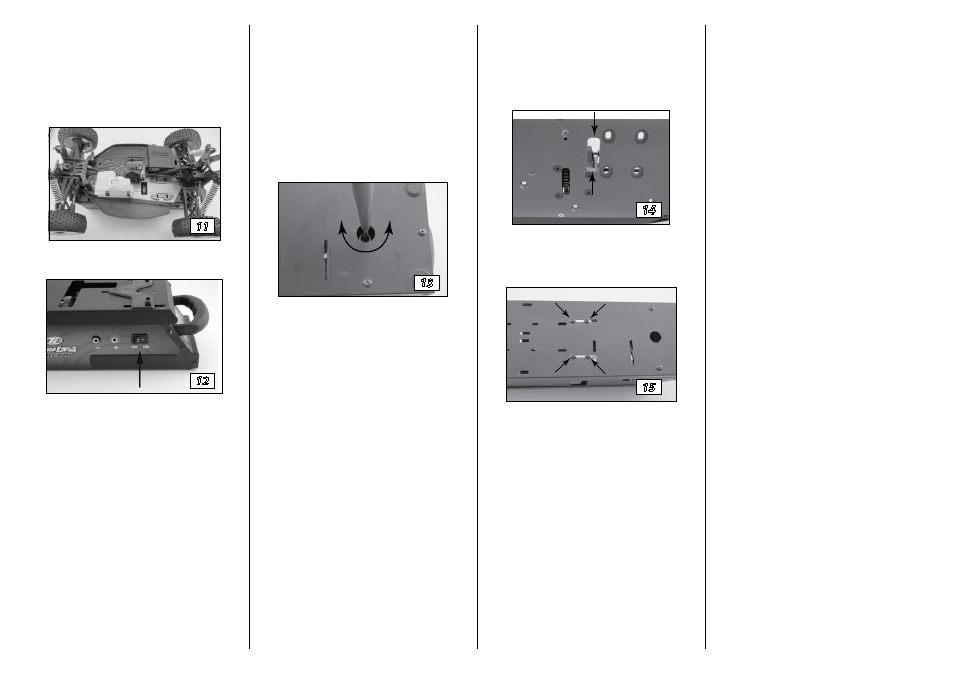
Place the chassis into the fixtures as seen in the
image below.
Turn the power switch to the “ON” position.
Press down on the back of the chassis which should
power up the motors a little before the starter wheel
engages the flywheel on the engine. Always check
to be sure that the rubber wheel is not hitting the
chassis or you will overheat the motors and damage
the rubber wheel. If the engine doesn’t start after 5 to 6
seconds stop and check for fuel, glow igniter etc before
continuing. Never turn the engine over for more than
10 seconds at a time without letting the motors rest. If it
doesn’t start there is something wrong and continuing
to turn it over will not help—only overheat the motors.
If there is not adequate power there may not be enough
time between the motors powering up and the starter
wheel engaging the flywheel. Go to “Adjusting the starter
switch” and adjust this as necessary. As the motors break
in and the wheel wears you will gain starting power.
After the engine starts, release the chassis – it should sit
in the fixtures and idle without interference. Turn “OFF”
the power switch when not in use.
Note: If the engine is new, tight, or flooded,
it may be necessary to loosen the glow
plug 2–3 turns to get it turning over. Re-
tighten after engine starts turning over. Do
not continue to stall the motors or allow
the rubber wheel to grind on the flywheel
or chassis.
Adjusting the starter switch
You can adjust the starter switch and the point at which
the motors start running by turning the Phillips head
adjustment screw (accessible through the hole in the
bottom of box as seen below).
Sooner
Later
Turning the adjustment screw counterclockwise will
allow the motors to start sooner and have better starting
power. Turning the adjustment screw clockwise will start
the motors later and give you more travel before the
motors start to power up. You may want to adjust this to
compensate for starter wheel wear.
Ideally, the motors should start when the top plate is
depressed about 1/8-inch. If you find that the motors are
easily stalled while trying to start your engine, adjust the
starter switch as noted above so that the motors start
sooner.
Troubleshooting Guide
Motors run slow
Wheel rubbing on chassis
Motors overheated—let cool
Battery(s) needs to be charged
Starter wheel won’t turn over engine
Loosen glow plug
Adjust switch so motors start sooner
Put a few drops of fuel in carburetor
Check for wheel interference with chassis
(See Photo 7)
Check for starter wheel wear
Tech/Service Tips
•
On some models it may be necessary to relieve the
ends of the flywheel opening on the bottom of your
chassis (as seen below) to prevent the chassis from
interfering with the starter wheel and allow the
wheel easy access to engage the flywheel on the
engine.
•
It’s a good idea to use compressed air to clean the
dust and dirt out of the starter box.
•
To replace the starter wheel, remove the four screws
in the center of the box bottom as seen below.
Disconnect the wires from the motor and mark the
location of the mounting screws before removing.
Remove the screws on either side of the wheel shaft.
After replacing the wheel, be sure to re-install the
assembly in its original position.
Warranty Period
Exclusive Warranty- Horizon Hobby, Inc., (Horizon)
warranties that the Products purchased (the “Product”)
will be free from defects in materials and workmanship
at the date of purchase by the Purchaser.
Limited Warranty
(a) This warranty is limited to the original Purchaser
(“Purchaser”) and is not transferable. REPAIR OR
REPLACEMENT AS PROVIDED UNDER THIS WARRANTY
IS THE EXCLUSIVE REMEDY OF THE PURCHASER. This
warranty covers only those Products purchased from
an authorized Horizon dealer. Third party transactions
are not covered by this warranty. Proof of purchase is
required for warranty claims. Further, Horizon reserves
the right to change or modify this warranty without
notice and disclaims all other warranties, express or
implied.
(b) Limitations- HORIZON MAKES NO
WARRANTY OR REPRESENTATION, EXPRESS OR IMPLIED,
ABOUT NON-INFRINGEMENT, MERCHANTABILITY OR
FITNESS FOR A PARTICULAR PURPOSE OF THE PRODUCT.
THE PURCHASER ACKNOWLEDGES THAT THEY ALONE
HAVE DETERMINED THAT THE PRODUCT WILL SUITABLY
MEET THE REQUIREMENTS OF THE PURCHASER’S
INTENDED USE.
(c) Purchaser Remedy- Horizon’s sole obligation
hereunder shall be that Horizon will, at its option, (i)
repair or (ii) replace, any Product determined by Horizon
to be defective. In the event of a defect, these are the
Purchaser’s exclusive remedies. Horizon reserves the
right to inspect any and all equipment involved in a
warranty claim. Repair or replacement decisions are
at the sole discretion of Horizon. This warranty does
not cover cosmetic damage or damage due to acts of
God, accident, misuse, abuse, negligence, commercial
use, or modification of or to any part of the Product.
This warranty does not cover damage due to improper
installation, operation, maintenance, or attempted repair
by anyone other than Horizon. Return of any goods
by Purchaser must be approved in writing by Horizon
before shipment.
11
12
13
14
15