Wiring diagram – Losi LOSA99061 User Manual
Page 2
2
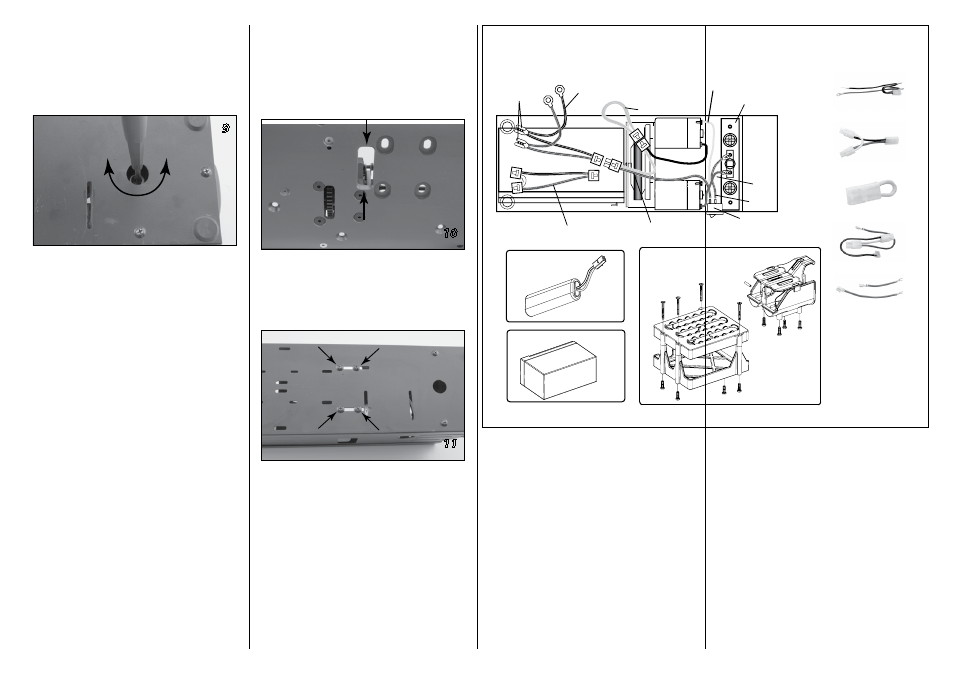
Adjusting the starter switch:
You can adjust the starter switch and the point
at which the motors start running by turning
the Phillips head adjustment screw (accessible
through the hole in the bottom of box as seen
in Image 9).
Sooner
Later
Turning the adjustment screw counterclockwise
will allow the motors to start sooner and have
better starting power. Turning the adjustment
screw clockwise will start the motors later and give
you more travel before the motors start to power
up. You may want to adjust this to compensate for
starter wheel wear.
Ideally, the motors should start when the top plate
is depressed about /8-inch. If you find that the
motors are easily stalled while trying to start your
8IGHT, adjust the starter switch as noted above so
that the motors start sooner.
Troubleshooting Guide
Motors run slow
Battery(s) needs to be charged
Starter wheel won’t turn over engine
Loosen glow plug
Adjust switch to motors start sooner
Put a few drops of fuel in carburetor
Check for wheel interference with chassis
(See Image 0)
Check for starter wheel wear
Tech/Service Tips
•
On some models it may be necessary to relieve
the ends of the flywheel opening on the
bottom of your chassis (Image 0) to prevent
the chassis from interfering with the starter
wheel and allow the wheel easy access to
engage the flywheel on the engine.
•
It’s a good idea to use compressed air to clean
the dust and dirt out of the starter box.
•
To replace the starter wheel, remove the four
screws in the center of the box bottom as
indicated in Image .
Disconnect the wires from the motor and
mark the location of the mounting screws
before removing. Remove the screws on
either side of the wheel shaft. After replacing
the wheel, be sure to re-install the assembly
in its original position.
Connect to Power Ports
12V Gel Cell Harness
Jumper
*Pre-Wired at Factory
Starter Switch
12V Gel Cell Harness
Stick Pack Harness
Jumper
Wiring Harness
Red 87mm/131mm
12V 2Ah
Gel Cell
Battery Holder
7.2V
Battery Holder
7.2V Battery
(not included)
12V 2Ah Battery
(not included)
Stick Pack Harness
Wiring Harness
Power Switch
Red
131mm
Red
87mm
Wiring Diagram
Connect to
12V Battery
Terminals
9
10
11