Installing the optical drive – Dell PowerVault DL2000 User Manual
Page 97
Installing System Components
97
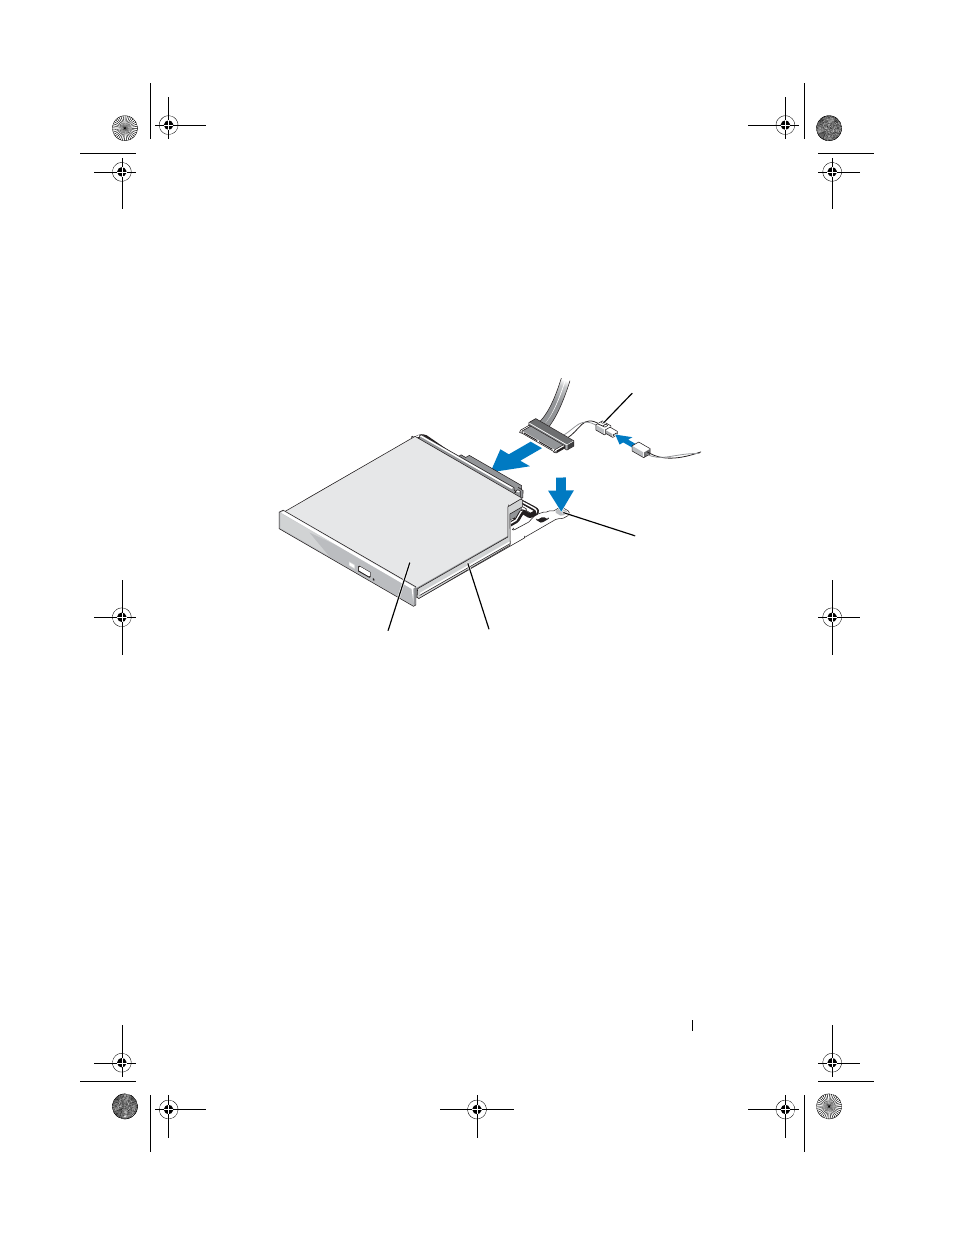
4 Disconnect the optical drive cable from the back of the drive.
5 To remove the optical drive, press down and forward on the blue tray
release tab and slide the drive tray out of the system. See Figure 3-17.
Figure 3-17.
Removing and Installing the Optical Drive Tray
Installing the Optical Drive
1 Insert the optical drive tray into the system until it is fully inserted and
locked into position.
2 Connect the SATA cable (the end with the branching power cable) to the
back of the optical drive.
3 Connect the branching power cable to the power supply connector.
4 Remove the cooling shroud. See "Removing the Cooling Shroud" on
1
optical-drive cable
2
optical-drive release tab
3
optical -drive tray
4
optical drive
2
4
3
1
Book.book Page 97 Monday, September 14, 2009 12:57 PM
- AXIM X3 (158 pages)
- AXIM X3 (366 pages)
- AXIM X3 (178 pages)
- AXIM X3 (2 pages)
- PowerVault MD3220 (32 pages)
- PowerVault MD3220 (76 pages)
- PowerVault MD3220 (11 pages)
- PowerVault MD3220 (76 pages)
- PowerVault MD3220 (272 pages)
- PowerVault MD3220 (32 pages)
- PowerVault MD3220 (2 pages)
- PowerVault MD3220 (74 pages)
- PowerVault MD3220 (28 pages)
- PowerVault MD3220 (32 pages)
- PowerVault MD3220 (32 pages)
- PowerVault MD3220 (237 pages)
- PowerVault MD3220 (32 pages)
- PowerVault MD3220 (32 pages)
- PowerVault MD3220 (388 pages)
- PowerVault MD3220 (32 pages)
- PowerVault MD3220 (6 pages)
- PowerVault MD3220 (174 pages)
- PowerVault 114x (7 pages)
- PowerVault 114x (49 pages)
- POWERVAULT MD3600F (222 pages)
- PowerVault MD3200i (22 pages)
- PowerVault MD3200i (32 pages)
- POWERVAULT MD3600F (2 pages)
- POWERVAULT MD3600F (222 pages)
- PowerVault MD3200i (34 pages)
- POWERVAULT MD3600F (17 pages)
- PowerVault MD3200i (32 pages)
- POWERVAULT MD3600F (90 pages)
- POWERVAULT MD3620F (16 pages)
- POWERVAULT MD3600F (38 pages)
- POWERVAULT MD3600F (318 pages)
- PowerVault MD3200i (32 pages)
- PowerVault MD3200i (75 pages)
- PowerVault MD3200i (32 pages)
- PowerVault MD3200i (32 pages)
- POWERVAULT MD3600F (90 pages)
- PowerVault MD3200i (21 pages)
- PowerVault MD3200i (32 pages)
- PowerVault MD3200i (32 pages)
- POWERVAULT MD3600F (2 pages)