Ace pumps, Ace hydraulic pump seal replacement, Ace pump disassembly – Great Plains TSF1260 Operator Manual User Manual
Page 68
64
TSF1060 and TSF1260
Great Plains Manufacturing, Inc.
500-642M
01/12/2012
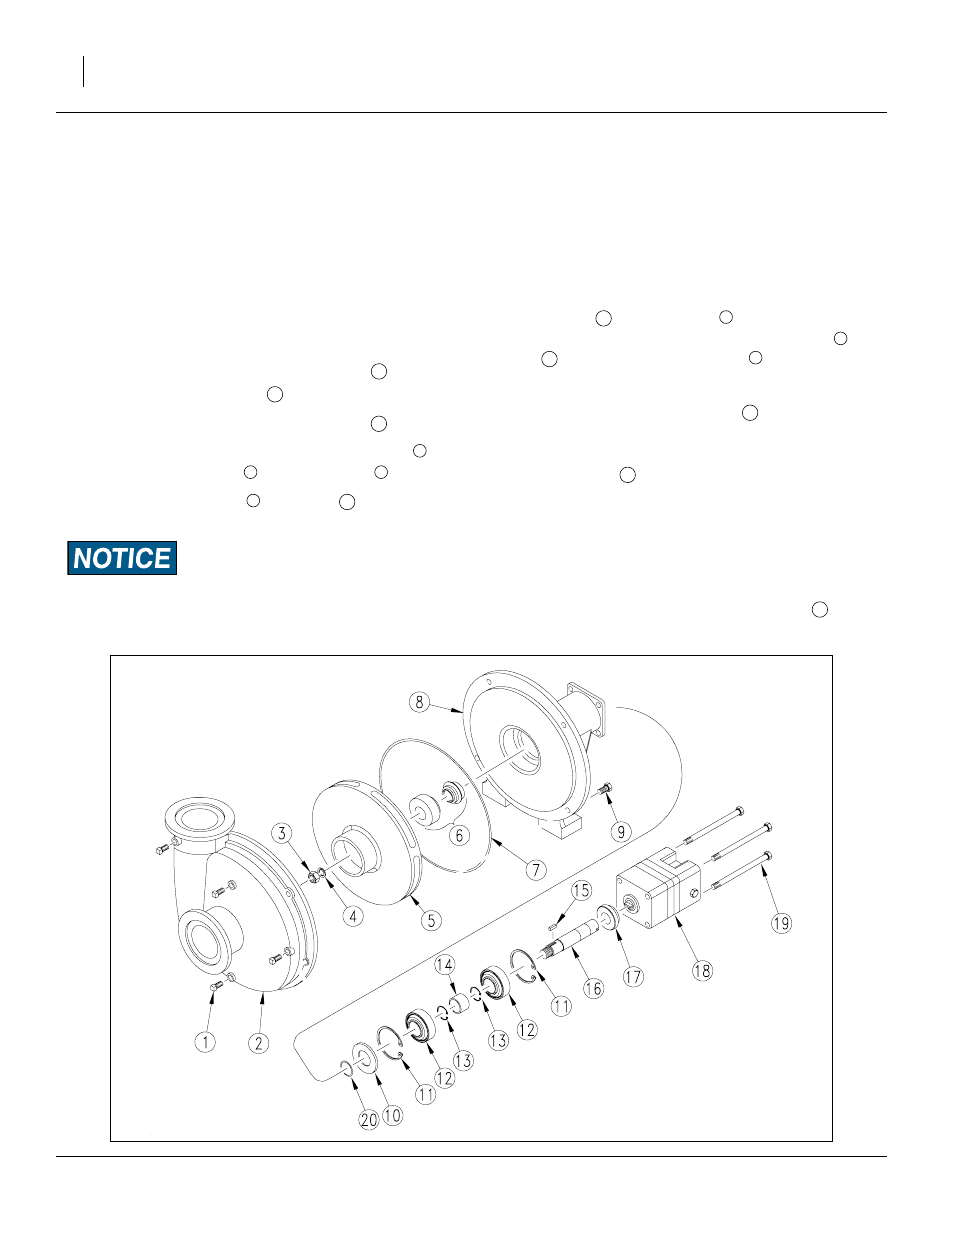
Ace Pumps
The Ace pump is designed for long life and service.
Through the years, it may be necessary to replace the
mechanical seal or service components of the pump. A
mechanical seal may weep slightly, but if it starts to drip,
the pump will have to be disassembled. Before disas-
sembly, be sure to wash it out with fresh water.
If the pump leaks, before removal from sprayer, run the
pump with adequate water in tank to diagnose the actual
pump problem.
Ace Hydraulic Pump Seal Replacement
Refer to Figure 58
Ace Pump Disassembly
1.
Remove four
5
⁄
16
in hex head cap screws
from rear
of motor. Remove motor
and coupler.
2.
Remove rear internal bearing snap ring
.
3.
Remove four
3
⁄
8
in x
3
⁄
4
in hex head cap screws
from mounting frame
. Remove volute
.
4.
Remove
3
⁄
8
in lock nut
from shaft
. Insert a flat
file into impeller vane to hold stationary.
Excess torque may damage plastic impellers.
5.
Press shaft
out of impeller
using one
5
⁄
16
in hex
head cap screw from step 1. Remove impeller
,
key
, and rotating seal member
.
6.
Press shaft/bearing assembly out of frame.
7.
Remove stationary seal member
by prying out
with screwdriver or pressing out from motor end of
pump housing.
8.
Remove o-ring
from shaft groove.
Note: If replacing only the pump seal:
a) Press the shaft /bearing assembly into frame.
b) Reinstall rear internal bearing snap ring.
c) Skip to Assembly step 8.
9.
Press bearings off of shaft.
10. Remove forward internal bearing snap ring
.
Figure 58
Ace Hydraulic Pump
23373
19
18
11
9
8
2
3
16
16
5
5
15
6
17
20
11