Wheatheart X Series 13 Augers User Manual
Page 31
W
HEATHEART
- X13 S
ERIES
A
UGERS
3. A
SSEMBLY
X1374, X1384, X1394
3.5. I
NSTALL
B
OOT
B
EARING
, L
OWER
S
PROCKET
,
AND
D
RIVE
C
HAIN
30787 R1
31
3.5. INSTALL BOOT BEARING, LOWER SPROCKET, AND
DRIVE CHAIN
See Table 3.5. for a list of parts required to install the boot bearing, lower
sprocket, and drive chain.
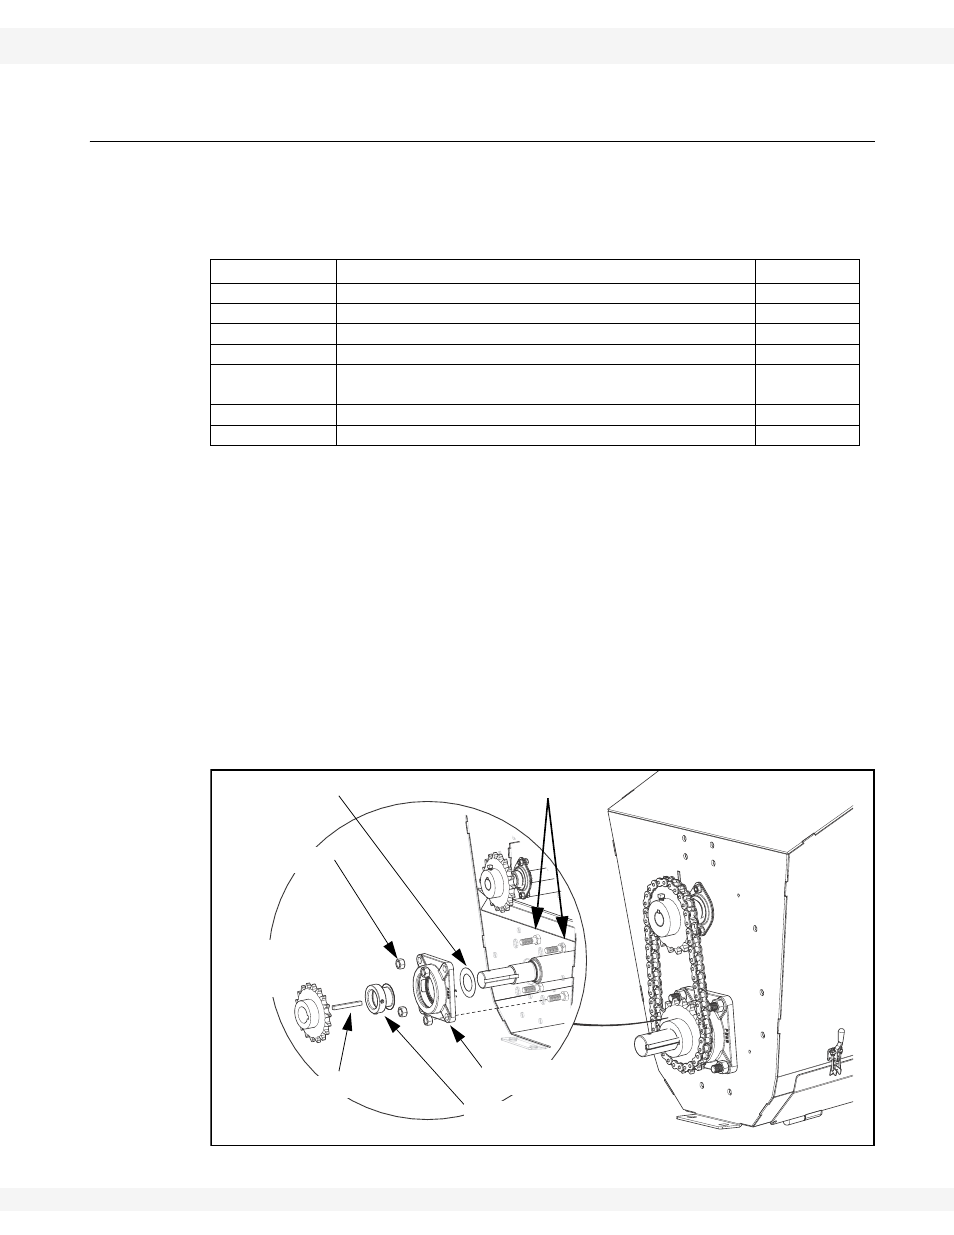
1. Install the lower sprocket as follows:
a. Slide the 2” wide rim flat washer onto lower flight shaft.
b. Slide the lower bearing over the flighting shaft, and bolt it loosely in place
with four 5/8” X 2” bolts and 5/8” locknuts.
c. Ensure that the flight shaft shoulder is seated against washer and lower
bearing.
d.
Position
the lock collar tightly against the bearing, then tighten the collar set
screw against the flighting shaft.
e. Install the 3/8” x 3-3/8” square key on the flighting shaft, then slide the
lower sprocket onto the flighting shaft. Align lower sprocket face with upper
sprocket face using a straight edge, then tighten set screws.
Figure 3.7 Installing Boot Bearing, Sprocket, and Chain
Table 3.5. Parts Required, Installing the Boot Bearing, Lower Sprocket,
and Drive Chain
Part Number
Description
Amount
20084
2” rim washer
1
20015
2” lower bearing, 4-bolt flange, lock collar
1
18541
Square key, 3/8" x 3-3/8"
1
18525
Lower sprocket, 80b18 x 1-3/4”
1
19781
19134
Drive chain (80b37 roller chain)
#80 chain connector
1
1
19991
5/8” x 2” bolts
4
19600
5/8” locknuts
4
2” RIM WASHER
DRIVE
5/8” X 2” BOLTS
5/8” LOCKNUTS
LOWER
SPROCKET
SQUARE KEY
LOCK COLLAR
LOWER BEARING
CHAIN
AND FLANGE