Electrical service (cont.), Electrical service – CHAMPION PP-28 Manual User Manual
Page 30
22
ELECTRICAL SERVICE
ELECTRICAL SERVICE (Cont.)
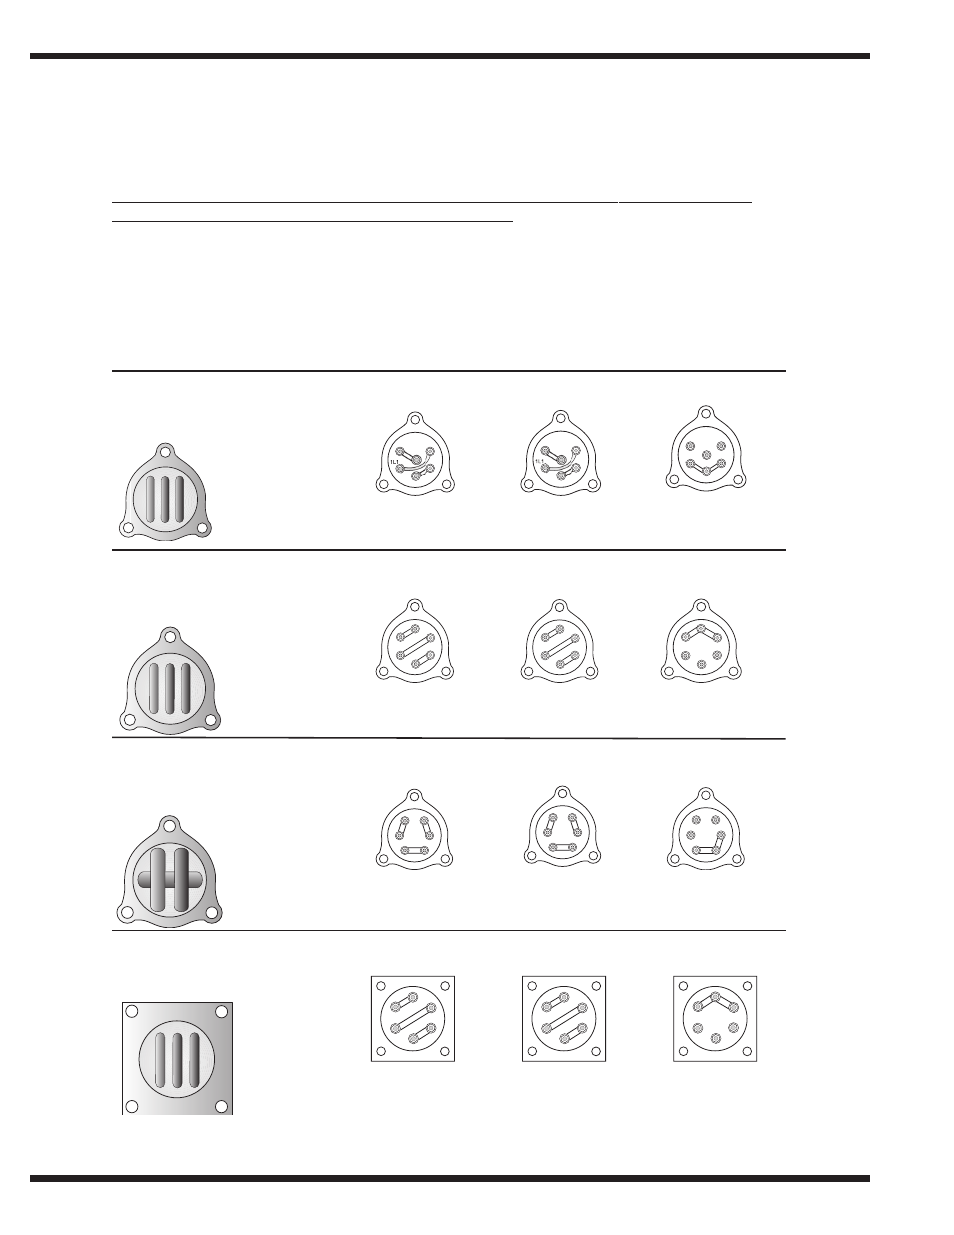
Heater Element Wiring – Booster Tank and Wash Tank Heater Elements
Refer to the illustrations and follow the steps below to properly install terminal jumpers and
to make line power connections to a replacement element.
Step 1. Hold the element assembly with the calrod coils facing toward you.
Step 2. Match your element coil to Configuration A, B, C, or D.
Step 3. Rotate your element coils to match the correct configuration.
Step 4. Flip the element over and match your element to the correct terminal configuration.
Step 5. Install terminal jumpers according to the illustration for your voltage requirement.
Step 6. Install the element and make your line connections 1L1, 1L2, or 1L3 per the illustration.
Terminal Connections view of element
Terminal Connections view of element
Configuration A
Booster tank element
View of calrod coils
Configuration B
Booster tank element
View of calrod coils
Configuration D
Wash tank element
View of calrod coils
Terminal Connections view of element
Terminal Connections view of element
Configuration C
Booster tank element
View of calrod coils
208-240V/3 Phase
Delta Connection
208-240V/3 Phase
Delta Connection
208-240V/3 Phase
Delta Connection
208-240V/3 Phase
Delta Connection
208-240V/3 Phase
Wye Connection for
380-415V/3 Phase
208-240V/3 Phase
Wye Connection for
380-415V/3 Phase
208-240V/3 Phase
Wye Connection for
380-415V/3 Phase
208-240V/3 Phase
Wye Connection for
380-415V/3 Phase
480V/3 Phase
575V/3 Phase
Delta Connection
480V/3 Phase
575V/3 Phase
Delta Connection
480V/3 Phase
575V/3 Phase
Delta Connection
480V/3 Phase
575V/3 Phase
Delta Connection
1L2
1L3
1L2
1L3
1L1
1L2
1L3
1L1
1L2
1L3
1L1
1L2
1L3
1L1
1L2
1L3
1L1
1L2
1L3
1L1
1L2
1L3
1L1
1L2
1L3
1L1
1L2
1L3
1L1
1L2
1L3
1L1
1L2
1L3