Ul4000 ultra-lok, Tool, Maintenance – BAND-IT UL4000 Cordless Ultra-Lok Tool User Manual
Page 12
BAND-IT IDEX, Inc.
A Unit of IDEX Corporation
4799 Dahlia Street
Denver, CO 80216-0307 USA
P: 1-800-525-0758
F: 1-800-624-3925
Document # P07886 Rev. N
© Copyright
BAND-IT IDEX, Inc. 2013
All rights reserved
www.BAND-IT-IDEX.com
Page 12 of 14
UL4000
Ultra-Lok
Tool
Maintenance
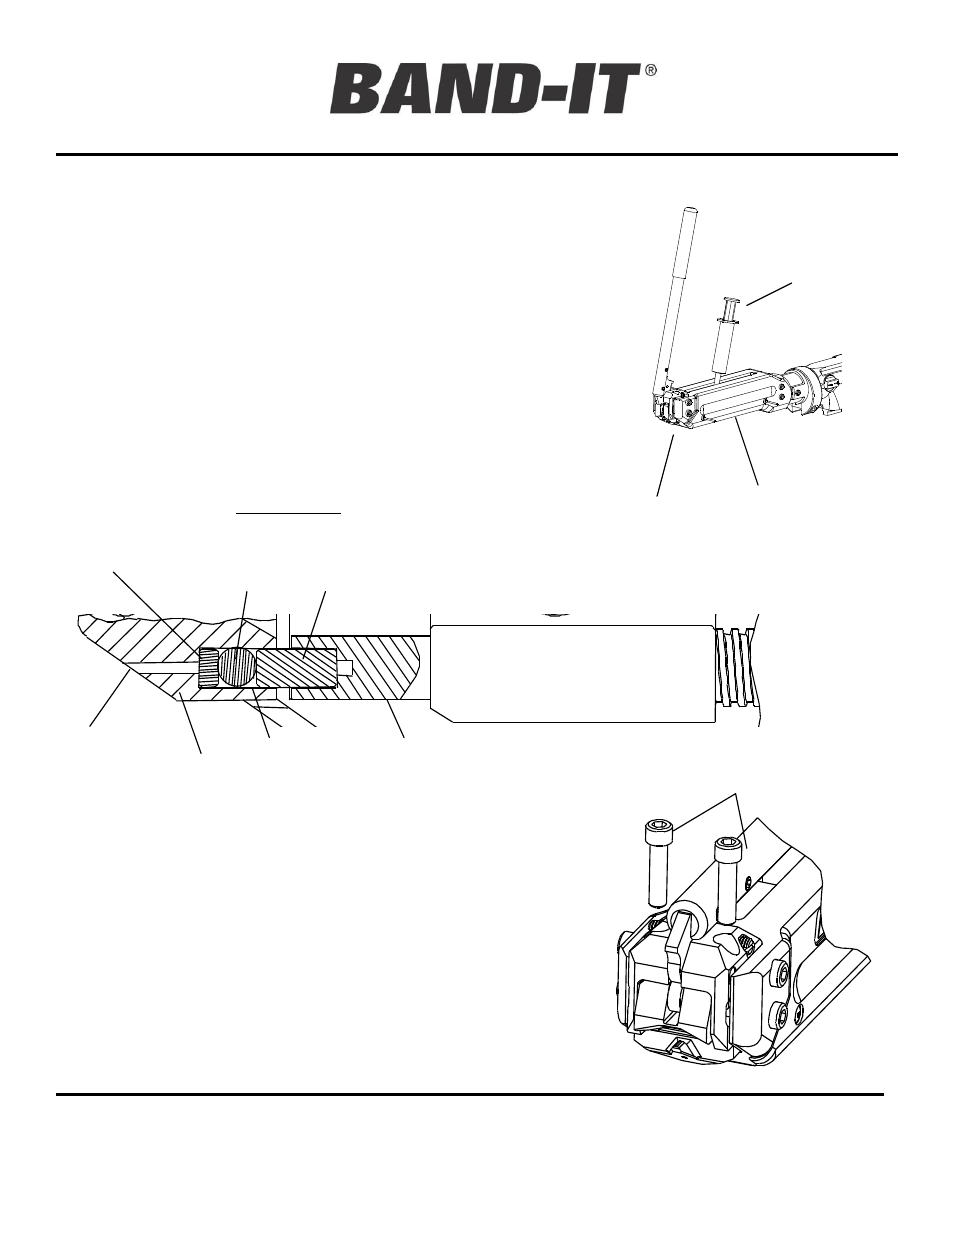
1. Approximately every 500 clamps, lubricate tension screw with
molybdenum disulfide lubricant, or equivalent.
Make sure tension block is all the way forward against the tool head. Remove
cap from syringe and insert tip of syringe into slot on top of tool body. Press
the tip against the tension screw just behind the tension block and squeeze
out approximately ½” long bead of lubricant. Remove syringe, and actuate
tool without a clamp a couple of times to spread lubricant evenly on tension
screw.
To order more lubricant, specify BAND-IT #C23199
3. To gain access to bearing components: remove blade mounting
screws (2 places) and slide blade free. Paper clip may be used to push
bearing components out of blade. Wipe lubricant from components. If ball or
bearing tips app
ears heavily worn, replace with new one. Note: ¼” ball is
made from hard tungsten carbide material, do not replace with regular ball
bearing. (Smooth indention from ball in the bearing tips is normal).
To re-assemble bearing components: wipe blade cavity clean. Push small
bearing tip into blade cavity. Apply lubricant to ball and push into blade cavity
and fill remaining space with lubricant. Push load bearing tip firmly into blade
cavity, some lubricant will be squeezed out. Re-attach blade to tool head,
making sure that load bearing tip extends into tension screw. While turning
blade mounting screws into blade, push on blade rearwards. Tighten screws
to approximately 120 in-lbs.
4. When replacing worn blade follow instructions above to properly
re-assemble bearing components.
2. Every 500-1000 clamps, depending on tension setting, inspect
and repack front bearing with same lubricant. Turn load bearing tip and
small bearing tip over for a new bearing surface.
Small Bearing Tip
Item 14
¼” Ball
Item 15
Load Bearing Tip
Item 16
Access Hole to push
out components (use
paper clip)
Blade
Item 2
Blade Cavity,
must be packed
with lubricant
Tension
Screw
Item 7
Bearing Detail
Blade Mounting
Screws
Item 21
Tool
Body
Tool
Head
Item 1
Lubricating
Syringe. Reorder
#C23199