JLG 4017 Service Manual User Manual
Page 36
Boom
3.12
4017
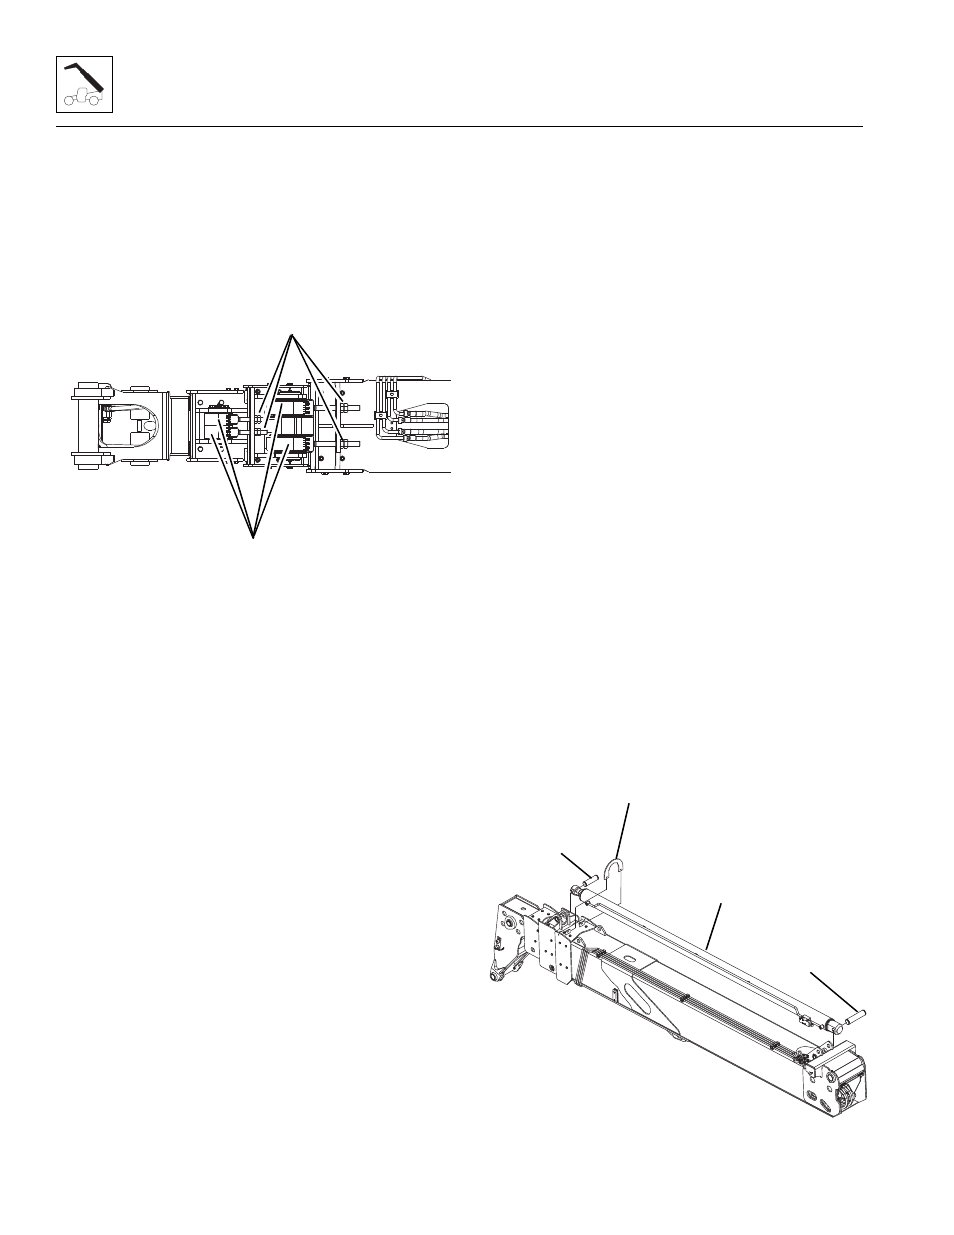
11. Attach both extend chain clevises (1) through the
holes in the bottom front of the first boom section.
Install the washers, adjustment nut and jam nut to
the clevises.
12. Attach both extend chain clevises (1) through the
holes in the bottom front of the second boom
section. Install the washers, adjustment nut and jam
nut to the clevises.
Note: Adjust all four extend chains (2) using the
measurement taken in the beginning of the tear down
procedure. Depending on the extent of the parts being
replaced, the above measurement is to be used as a
starting point ONLY.
13. Pull the rear of the hose carrier over the rear of the
fourth boom section and set onto the rear of the third
boom section. Using the two bolts, washers and
nuts, bolt the rear of the hose carrier to the rear of
the third boom section. Apply Loctite 242
®
and
torque the two bolts to 90 Nm (66 lb-ft).
14. Remove the caps from the fittings on the hose
carrier bulkhead and the plugs from the tilt and
auxiliary hoses. Install all four hoses and tighten until
wrench-tight. Mark the hose fitting then tighten each
hose firmly 1 to 1 1/2 flats.
15. Remove the caps from the auxiliary hoses in the
boomed and install the auxiliary hoses from the front
of the hose carrier to the auxiliary bulkhead. Tighten
each hose wrench-tight. Mark the hose fitting then
tighten each hose firmly 1 to 1 1/2 flats. Bolt the
auxiliary hose bulkhead to the side of the boom head
and torque the two bolts to 90 Nm (66 lb-ft).
16. Using a suitable sling through the rod end of the tilt
cylinder, lower the tilt cylinder into boomhead. Align
the tilt cylinder barrel end bore with the boomhead
bore and install the tilt cylinder pin and retaining clip.
Note: Grease tilt cylinder barrel end bore and pin before
installing.
17. Remove the caps from the fittings on the tilt cylinder
and the plugs from the tilt hoses from the hose
carrier. Install both tilt hoses and tighten until
wrench-tight. Mark the hose fitting then tighten each
hose firmly 1 to 1 1/2 flats.
18. Using suitable slings, lift complete boom off supports
and set on level ground. It will be necessary to place
a block under the rear of the boom to keep the tilt
and auxiliary tubes from being damaged
19. Turn the boom over being careful not to damage the
tilt and auxiliary tubes mounted on the side and rear
of boom.
20. After boom is turned upright, place a suitable
support under the rear of the boom.
21. Attach a sling around a balance point on the extend/
retract cylinder and carefully set on top of the first
boom section.
Note: Grease extend/retract cylinder barrel end bore
and rod end bore and pins before installing.
22. Align the extend/retract cylinder barrel end (3) with
bore at rear of the first boom section. Install the pin
and retaining clip (4).
23. Align the extend/retract cylinder rod end (3) with
bore at front of the second boom section. Install the
pin and retaining clip (4).
24. Install extend/retract cylinder support (5). Apply
Loctite 242
®
and torque bolts to 90 Nm (66 lb-ft).
MZ0790
1
2
MZ1210
3
5
4
4