Radiator/oil cooler and coolant heater replacement – JLG 4013PS Service Manual User Manual
Page 101
7-5
3508PS, 3509PS, 3512PS, 3513PS, 4008PS, 4009PS, 4012PS, 4013PS, 4017PS, 40.8, 40.9
Engine: Perkins 1104-42 & 1104-42T
b. Thermostat Installation
1. Install the engine thermostat, thermostat gasket and
thermostat housing. Secure with the two capscrews.
Torque to 24 Nm (18 lb-ft).
2. Properly connect the battery.
3. Open the radiator cap, and fill the radiator
completely with coolant. Replace and tighten the
radiator cap. Add coolant to the overflow bottle until
the bottle is 1/4 to 1/2 full. This overfilling will
compensate for any air trapped in the cooling
system.
4. Run the engine to operating temperature. Visually
check for leaks with the engine running. Check the
coolant level in the overflow bottle and fill, or drain,
as necessary.
5. Close and secure the engine cover.
6. Remove the Do Not Operate Tags from both the
ignition key switch and the steering wheel.
7.4.3
Radiator/Oil Cooler and Coolant
Heater Replacement
Before considering radiator or oil cooler replacement for
other than obvious damage, conduct a cooling system
pressure test check the coolant specific gravity, coolant
level, fan belt tension and dash panel temperature
indicator.
• If the engine runs hot, check the temperature of
the upper radiator hose.
• If the hose is not hot, the thermostat may be
stuck in the closed position.
• If the engine has overheated, performance may
suffer, indicating other damage including a leaking
cylinder head gasket, cracked cylinder head or
block, and/or other internal engine damage.
a. Radiator/Oil Cooler Removal
1. Park the machine on a firm, level surface, level the
machine, fully retract the boom, lower the boom,
place the transmission control lever in
(N) NEUTRAL, engage the park brake and shut the
engine OFF.
2. Place a Do Not Operate Tag on both the ignition key
switch and steering wheel, stating that the machine
should not be operated.
3. Open the engine cover. Allow the system fluids to
cool.
4. Properly disconnect the battery.
5. Remove the engine cover to ease removal of
radiator/oil cooler.
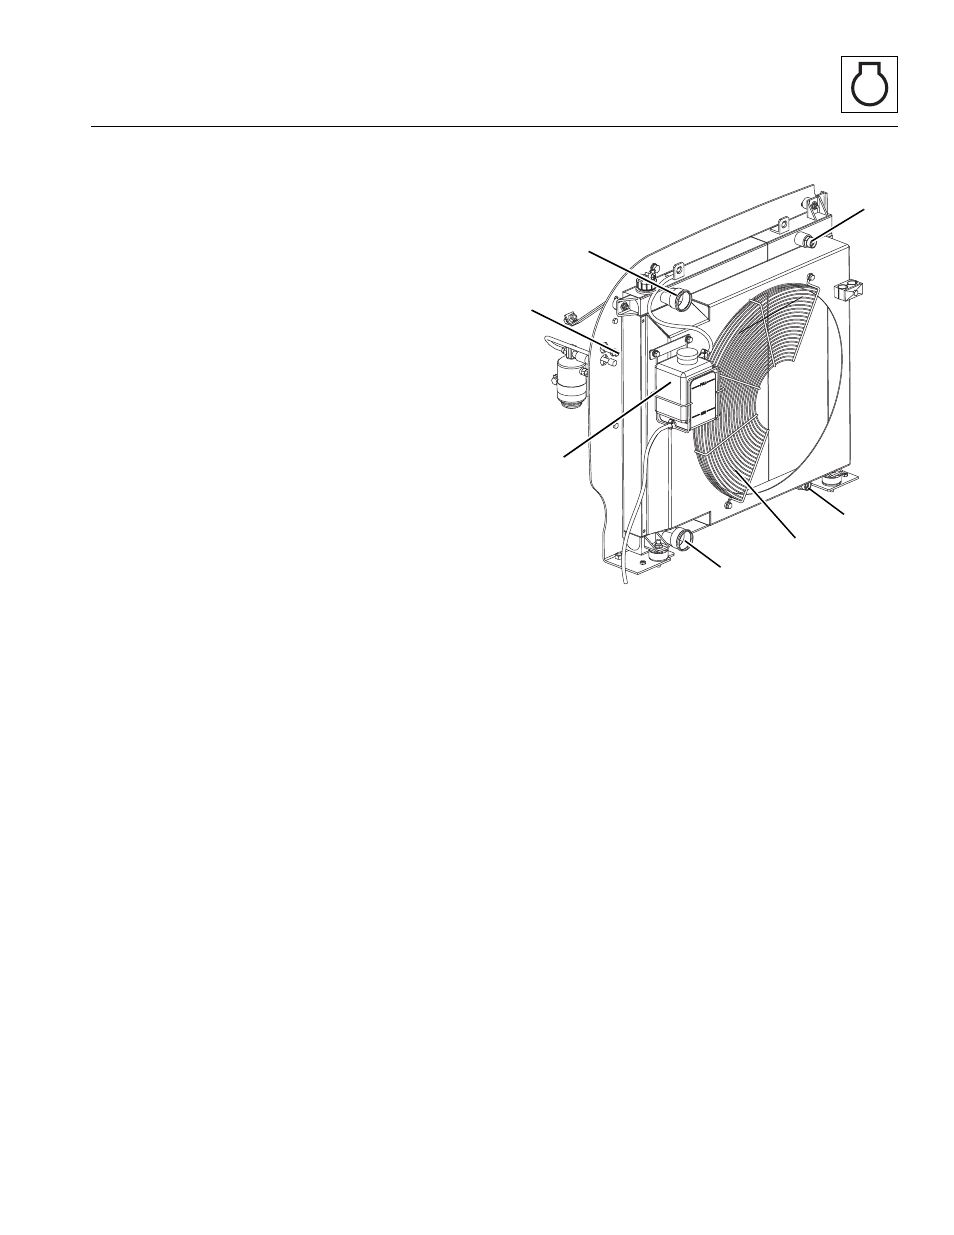
6. Remove the coolant overflow bottle (2).
7. Remove the radiator fan shroud (3) and the engine
belly pan.
8. Slowly turn the radiator cap to the first stop and allow
any pressure to escape. Remove the radiator cap.
9. Place a suitable container beneath the radiator drain
plug.
10. Place a funnel at the base of the radiator to channel
the drained coolant into the container. Loosen the
drain plug and slowly remove to allow the coolant to
drain. Transfer the coolant into a properly labeled
container. Dispose of properly if coolant needs to be
replaced. Replace the radiator drain plug.
11. Loosen the radiator clamp on the top (4) and bottom
(5) radiator hoses. Work the hoses off the radiator.
Position the hoses out of the way to allow radiator
removal, or remove the hoses from the engine.
Inspect the hoses, and replace if necessary.
12. Disconnect and plug the oil cooler top (6) and
bottom hoses (7) and cap the fittings on the oil
cooler. Inspect the hoses, and replace if necessary.
13. Label, disconnect and cap the air conditioner hoses
(8) (if equipped).
14. Remove the four nuts and four washers from the
radiator mounts.
MZ2070
4
2
5
3
7
7
6
8