Apple Color StyleWriter 2200 User Manual
Page 135
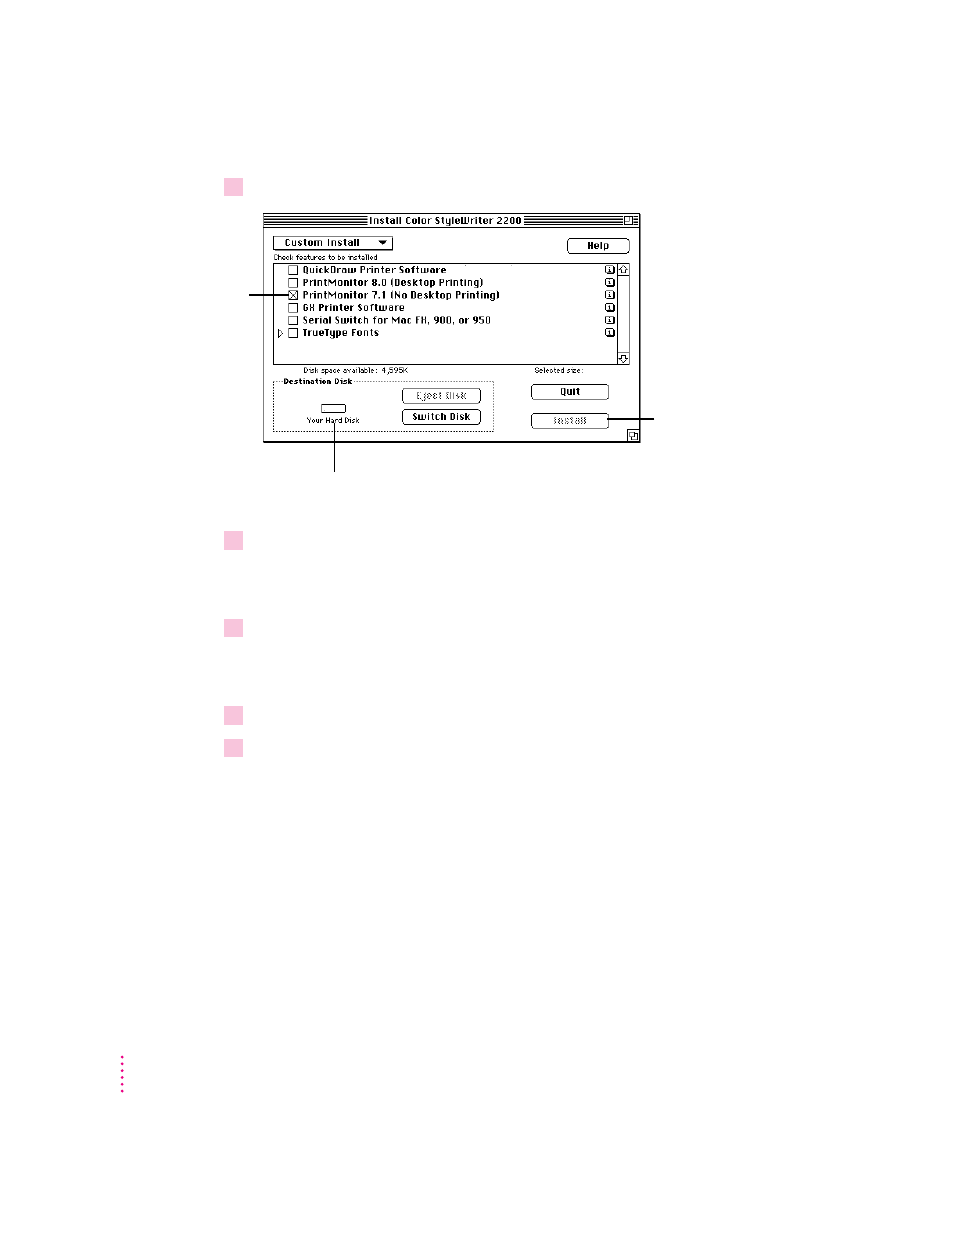
5
In the Custom Install dialog box, click the PrintMonitor 7.1 checkbox.
6
When you see a message on your screen, follow the directions and insert the next disk.
The Installer ejects disks and asks you to insert others. Keep following the
instructions on the screen until the installation is complete.
7
When you see a message reporting that installation was successful, click Restart.
The Installer restarts your Macintosh. When the computer restarts, the
desktop printer icons appear with an X on them.
8
After the computer restarts, drag your old desktop printer icons to the Trash.
9
Read the next section to learn how to use the new software.
128
Appendix E
Finally, when you’re
ready to begin,
click Install.
First, click this
checkbox. (An X
appears to show it’s
selected.)
Second, make sure the disk named here is the one on
which you want to install the printer software. (If not,
click Switch Disk until the correct name appears.)
- Câble composite AV (16 pages)
- Adaptateur secteur USB (16 pages)
- Battery Charger (52 pages)
- iSight (32 pages)
- StyleWriter - Adaptateur EtherTalk (19 pages)
- StyleWriter EtherTalk Adapter (19 pages)
- Câble AV composante YUV (16 pages)
- Adaptateur EtherTalk pour StyleWriter (19 pages)
- VESA Mount Adapter (20 pages)
- Mac Performa 5300CD (141 pages)
- Video System (95 pages)
- Final Cut Pro 7 (178 pages)
- Final Cut Pro 7 (1990 pages)
- Component AV Cable (16 pages)
- Component AV Cable (12 pages)
- Composite AV Cable (14 pages)
- Composite AV Cable (16 pages)
- IEEE1394 (24 pages)
- Universal Dock (88 pages)
- USB Power Adapter (8 pages)
- USB PowerAdapter (16 pages)
- World Travel Adapter (20 pages)
- TV (48 pages)
- AirPort Time Capsule 802.11ac (32 pages)
- AirPort Extreme 802.11n (5th Generation) (44 pages)
- AirPort Express 802.11n (1st Generation) (48 pages)
- AirPort Extreme 802.11n (3rd Generation) (44 pages)
- AirPort Express 802.11n (2nd Generation) (32 pages)
- AirPort Express v4.2 (48 pages)
- AirPort Time Capsule 802.11n (3rd Generation) (40 pages)
- Newton Connection Utilities (for Macintosh) (117 pages)
- Newton Backup Utility (for Macintosh) (39 pages)
- Wireless Keyboard and Mouse (20 pages)
- Newton Internet Enabler (29 pages)
- (22-inch) Cinema Display (21 pages)
- Color StyleWriter 1500 (144 pages)
- Bluetooth (4 pages)
- Color StyleWriter Pro (73 pages)
- Newton Connection Utilities (for Windows) (108 pages)
- AirPort Extreme Base Station v4.2 (36 pages)
- AirPort Extreme Card (12 pages)
- AirPort Time Capsule 802.11n (2nd Generation) (40 pages)
- ImageWriter LQ (2 pages)
- TV/FM Radio System (151 pages)