3 basic operation, Item no setting item no setting – GW Instek GOS-652G User Manual
Page 22
⎯ 17 ⎯
4.3 Basic Operation
Before connecting the power cord to an AC line outlet, make sure that the AC line voltage input switch on the rear panel of
the instrument is correctly set for the AC line voltage. After ensuring the voltage setting, set the switches and controls of the
instrument as shown below:
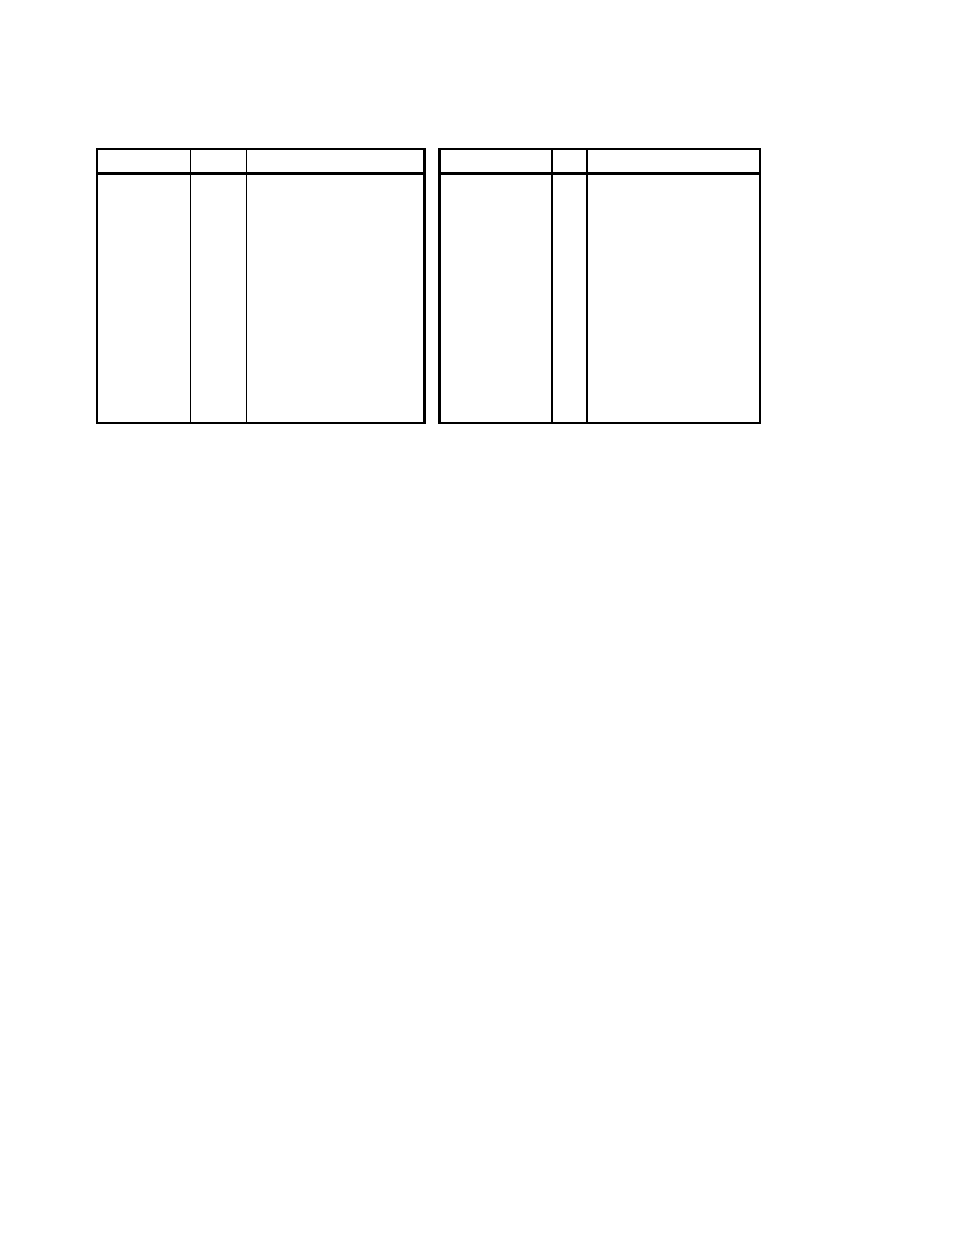
Item
No
Setting
Item
No
Setting
POWER
(9)
Disengage position(OFF)
SLOPE
(22) +
INTEN
(2)
Clockwise(3-o‘clock
position)
TRIG ALT
(24) Released
FOCUS
(4)
Mid-position
LEVEL LOCK
(29) Pushed in
ILLUM
(6)
Full anti-clockwise Position
HOLDOFF
(31) MIN(anti-clockwise)
(Except 622G & 635G)
TRIGGER MODE (28) AUTO
VERT MODE (39)
CH 1
HORIZ DISPLAY (38) A (623G,653G &658Gonly)
CHOP
(41)
Released
MODE
CH 2 INV
(36)
Released
TIME/DIV
(18) 0.5mSec/DIV
POSITION
(40)(37) Mid-position
SWP.UNCAL
(19) Released
VOLTS/DIV
(10)(14) 0.5V/DIV
POSITION
(34) Mid-position
VARIABLE
(13)(17) CAL(clockwise position)
x10 MAG
(33) Released
AC-DC-GND
(11)(15) GND
X-Y
(27) Released
SOURCE
(26)
Set to CH 1
COUPLING
(25)
AC
After setting the switches and controls as mentioned, connect the power cord to the AC line outlet, and then, continue as follows:
1)
Engage the POWER switch and make sure that the power LED is turned on. In about 20 seconds, a trace will appear on the
CRT screen. If no trace appears in about 60 seconds, counter check the switch and control setting.
2)
Adjust the trace to an appropriate brightness and image with the INTEN control and FOCUS control respectively.
3)
Align the trace with the horizontal center line of the graticule by adjusting the CH 1 POSITION control and TRACE
ROTATION control (adjustable by screwdriver).
4)
Connect the probe to the CH 1 INPUT terminal and apply the 2Vp-p CALIBRATOR signal to the probe tip.