Caution – WEATHER GUARD 1210 User Manual
Page 2
Page 2 of 6
PART IDENTIFICATION & REPLACEMENT PART NUMBERS
3/8" Drive Ratchet
3/8" Drive Socket 1/2" Deep Well
3/8" Drive Socket 7/16"
5/16" Drill Bit
Electric Drill
Tape Measure
Hammer
Center Punch
3/8" Drive Torque Wrench (foot lbs.)
TOOLS REQUIRED
FIT-UP
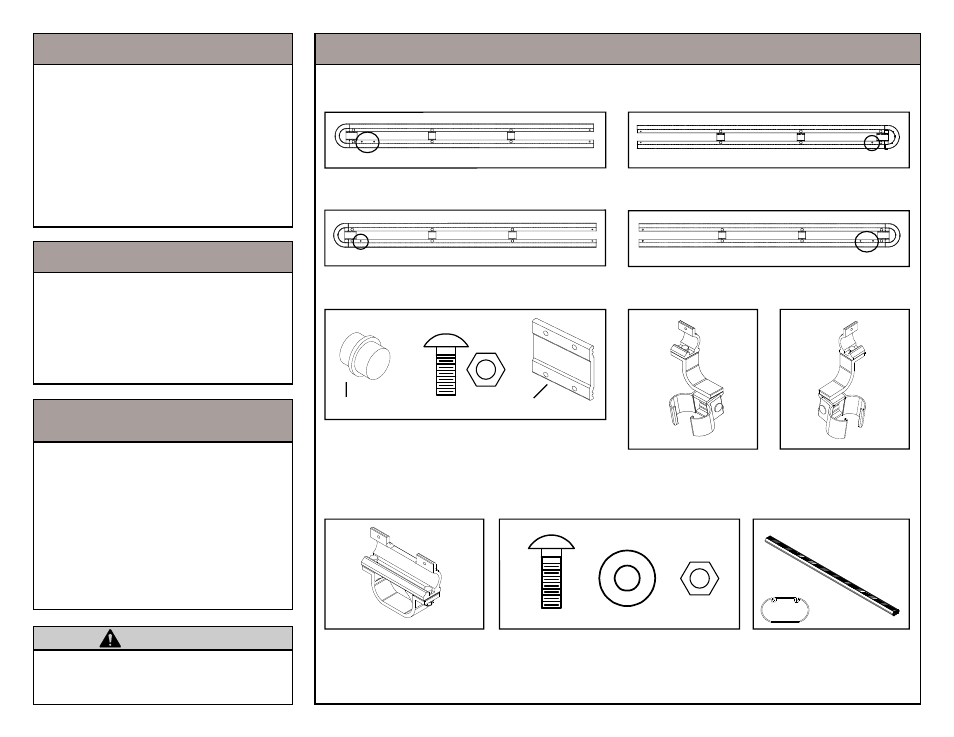
Part O (Qty. 1)
Driver Side Front Rail Assembly
Part P (Qty. 1)
Driver Side Rear Rail Assembly
Part R (Qty. 1)
Passenger Side Front Rail Assembly
Two Holes
Two Holes
One Hole
One Hole
Part X (Qty. 1)
Front / Accessory
Cross Member
Replacement Part #1215
Side Rail Hardware Kit
Part S - Side Rail Alignment Plug (Qty. 4)
1/4-20 X 5/8" Carriage Bolt (Qty. 8)
1/4-20 Stop Nut (Qty. 8)
Part T - Side Rail Connecting Plate (Qty. 2)
Replacement Part Number #7620
Rail Mounting Hardware Kit
1/4-20 X 3/4" Carriage Bolt (Qty. 10)
1/4-20 Stop Nut (Qty. 10)
1/4" Flat Washer (Qty. 10)
Replacement Part Number #7621
Part W (Qty. 4)
Universal Driver/Passenger
Front Mounting Clamp
Replacement Part #7618
Part U (Qty. 1)
Driver Side
Rear Mounting Clamp
Replacement Part #7617
Part V (Qty. 1)
Passenger Side
Rear Mounting Clamp
Replacement Part #7636
Part S
Part T
Part Q (Qty. 1)
Passenger Side Rear Rail Assembly
NOTE: Side rails are labeled in the packaging, take note before removing them from the carton. The rear as-
semblies have one predrilled hole and the front assemblies have two predrilled holes. The smooth edge faces
away from the truck and the grooved edge faces inward. All side rails have a replacement part number of #7619.
Smooth Edge Up
Smooth Edge Up
Smooth Edge Up
Smooth Edge Up
Cross
Section
Product fit-up is based on vehicle de-
sign available at the revision date of
this installation manual. The ATR
TM
has
been fitted and is recommended for
any combination of bed lengths and
cab designs on most pickup trucks.
IMPORTANT!
Model 1205 Owners.
If installing a Model 1211 on a Model
1205, compact size truck, the front ac-
cessory crossmember, Part X, will
have to be cut down to 57" from 67".
Carefully pry off the end red cap and
trim the black anti-wear strip back 10".
Cut 10" off the end of the cross mem-
ber. Using an industrial adhesive, re-
apply the red end cap.
To keep debris out of your eyes
when drilling or cutting, always wear
protective eye wear.
CAUTION