Mounting a mamh-2 motor hanger on a wall – Foredom Double Motor Hanger User Manual
Page 2
1. Before you can hang up your flex shaft
motor, decide where you want the motor
hanger to be. If you are right handed it will
probably be on your right, and if you are left
handed it will probably be on your left.
Depending on which you have, attach either
the MABC-1 Bench Clamp or MABC-2 Base
to your work bench very securely. Both
mounts have knobs for adjusting
the height of the motor hanger.
2. Slide the handpiece rest
MAHR-2 onto the Middle
Rod
and tighten it enough so that it
does not slide around. You will
want to adjust its position on the
rod according to your needs once
the motor is hanging.
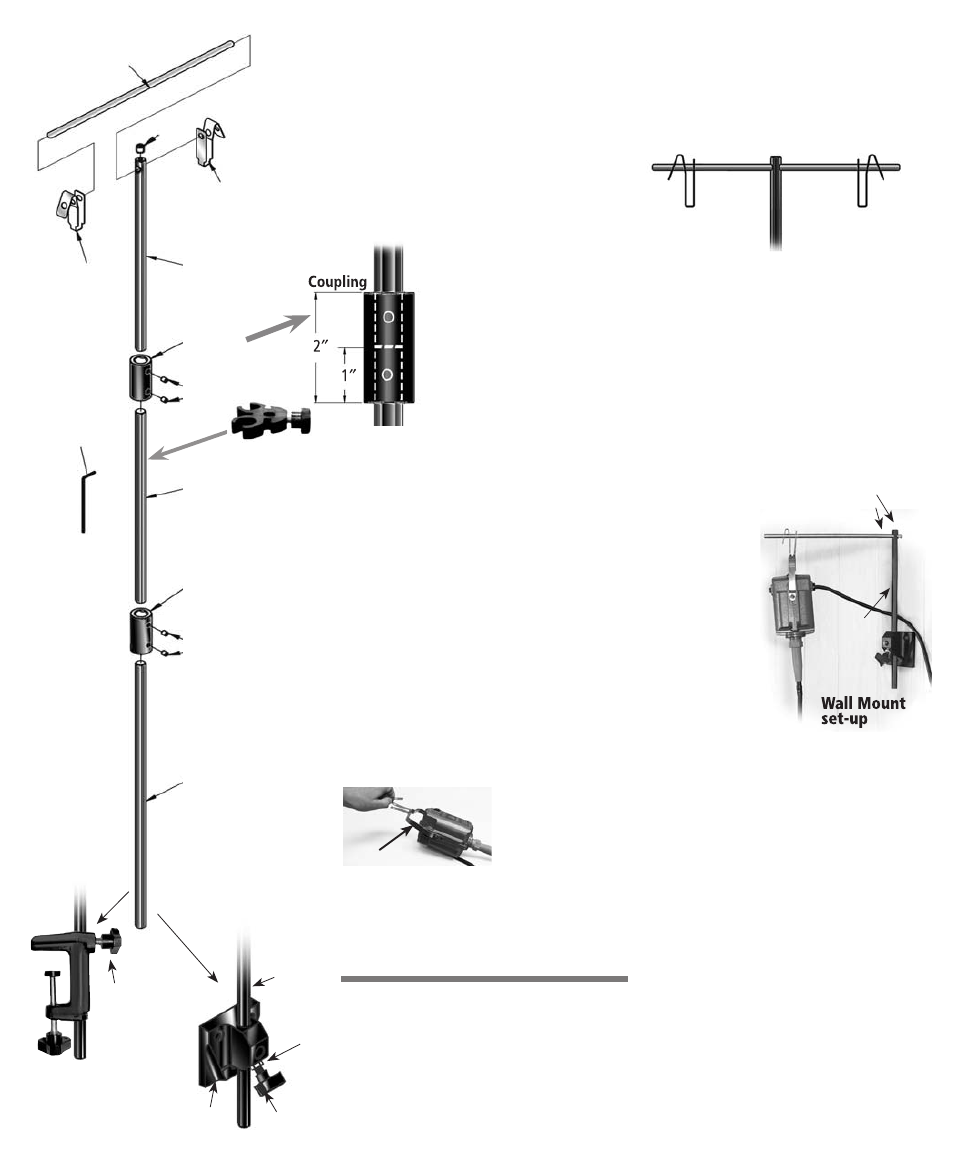
3. Assemble the rods in the order
shown in the drawing at left.
Insert the rods half way into the couplings.
4. Use the Hex Key to securely tighten
both Set Screws in each of the two
Couplings. When the three rods are
properly joined by the Couplings it should
feel like one solid steel bar and should
not flex or wobble at all.
5. Insert the Hanger Rod through the Top Rod
with cross hole so that the Hanger Rod is
centered and securely tighten the Set Screw
into the end of the Top Rod with cross hole
using the Hex Key.
6. Slide the assembled hanger rods into either
mount that you have installed on your work
bench at a comfortable height for you to reach
and tighten adjusting knob.
Make sure the
vertical hanger rod extends at least 1/4
″
below the end of either the MABC-1
Bench Clamp or MABC-2 Base.
7. Slip a Safety Hook
through the motor
bale so that the
circular holes in the
Safety Hook are at
the top.
8. Slide Safety Hook holding motor onto the
Hanger Rod with the hooks positioned as
shown at top right side of this page.
MABC-1
Bench Clamp
attaches to
bench top
or
Hanger Rod
UA10661
Safety
Hook
UA10658
Safety
Hook
Set
Screw
3/32
″
Hex Key
UA115
Top Rod with
cross hole
(12
1
⁄
4
″ long)
UA10683
Coupling
UA10682
Set
Screws
Middle
Rod
(12
1
⁄
4
″
long)
UA10685
Coupling
Set Screws
UA110
Bottom Rod
(17
″ long)
UA10686
Bottom end of Rod
inserts into MABC-1
Bench Clamp or
MABC-2 Base
Handpiece rest
MAHR-2 slides
onto Middle
rod before
couplings are
attached
Safety Hook
Upright
Rod
1/2
″ Hex
Jam Nut
Threaded
Knob
Threaded
Knob
Base
Mount
MABC-2
Base
screws or
bolts to
bench top
or side
Mounting a
MAMH-2
Motor
Hanger
on a wall
1. Attach the
MABC-2 Base
Mount to a wall
stud* or other
very sturdy vertical
wooden structure.
Be sure the
wood screws are
firmly fastened
into solid wood.
2. Use only the Top Rod with cross hole for
the hanger rod. Insert the Hanger Rod and
tighten this connection with a set screw.
3. Insert the vertical Top Rod through the Base
Mount and tighten both the Threaded Knob
firmly against the Rod and the Jam Nut firmly
against the Base using a 1/2
″ wrench.
4. Adjust the Hanger Rod to hold a single
motor and you’ve got a wall-mounted
motor hanger!
To find the wall stud: tap on the wall with
your knuckle. Wall Studs are the inside
frame of a wall.
Move sideways along the wall, still tapping,
and listen for a solid sound. Studs are usually
placed 16
″– 24″ apart, but may be located
differently in older buildings.
If you don’t trust your ear, use an electronic
or magnetic stud finder, available at
hardware stores.
Using the MABC-2 Base
1. Position the assembled Motor Hanger at
desired height.
2. Tighten the Threaded Knob firmly against
the Rod.
3. Tighten the Jam Nut firmly against the Base
using a 1/2
″ wrench.
Check www.foredom.net for
MAMH-1 and MAMH-2
instruction videos!
Follow Instructions below to assemble your
MAMH-1 or MAMH-2 Double Motor Hanger
*
9. Use the Threaded Mounting Knobs to raise
or lower the height of the Motor Hanger.
Keep a distance of 25
″–29″ between the
benchtop and the bottom surface of the
motor. Turn motor on to be sure it is installed
properly. A second motor can also be
mounted on the hanger.
IMPORTANT:
Be sure to position motor
height to avoid sharp angles and bends in
your shaft and sheath. Excessive heat or
wear will occur if the curve is less than
a
4
″ radius.
Hanger Rod
Top Rod
with cross
hole
Set Screw here