Foredom K.1030 User Manual
Page 2
Assembly
Before attaching the handpiece or adapter
with power cord to the control box turn the
Speed Selection Knob down to MIN. Make
sure that the power is off by confirming
that the Speed Indicator LED Light is off by
pushing in the On/Off button located on the
upper left side of the control box for at least
2 seconds.
Attaching the
Micromotor Handpiece
Be sure that the handpiece collet is secure
with an accessory in it. Attach the micromo-
tor handpiece by plugging in the handpiece
cord into the Motor connection port on the
top of the Control Box.
Connecting AC Power Adapter
First, make sure the power to the handpiece
is turned off by pushing in the On/Off button
on the upper left side of the control unit for
at least 2 seconds. Then, plug the adapter
plug into the DC IN port located on the
lower left side of the control box. Next, plug
the power cord receptacle into the 3-prong
power cord port in the adapter. Finally,
plug the power cord into an electrical
outlet to charge the battery or to use
the micromotor without battery drain.
4. The Forward/Reverse Button located
on the upper right side of the control box is
for operating the micromotor handpiece in
reverse rotation. Rotation direction
always resets to Forward when power
is stopped and restarted. The Fwd/Rev
LED on top of the control unit will light up
when reverse rotation is selected. The light
goes off when Forward rotation is engaged.
Forward is the most commonly used setting.
Right-handed people will get the most control
in forward rotation. Forward motor rotation
means that the motor is turning an accessory
(bur, bit, drill, cutter, etc.) counterclockwise
when holding the handpiece upright in your
hand and you are looking down on to the
front of the accessory. When the handpiece/
accessory is applied to the workpiece, your
viewpoint changes to the back end of the
handpiece and accessory and the forward
rotation direction can be described as
clockwise.
5. The Optional On/Off Foot Pedal will not
vary the speed and only turns the micromotor
on or off. It plugs into the port marked FOOT
on the lower right side of the control box. To
select the on/off foot pedal you must press
the foot control button located just below the
Forward/Reverse Button on the right side of
the control box. With the on/off foot pedal
you can select and keep a specific speed
setting and return to it without turning the
speed control dial. This is useful when acces-
sories require an optimal speed or a lower
maximum speed (<30,000rpm) than the full
speed range of the micromotor.
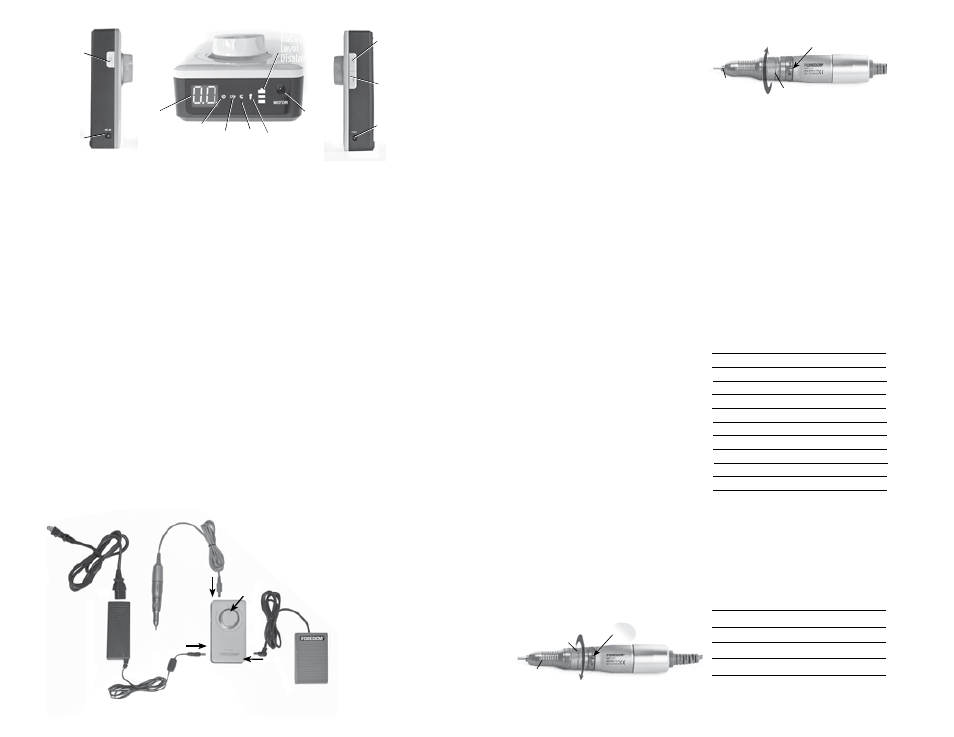
6. To Change an Accessory or bur, first open
the collet. To open the collet, first turn off the
unit by holding down the on/off button for
at least 2 seconds– until the indicator light
is off. The collet snaps open when the
knurled locking ring on the handpiece is
turned clockwise toward the R (Remove or
Release). You can now remove an accessory
or bur and insert another. Insert the new bur
shank fully into the collet for maximum
support. Do not use accessories with
Optional
On/Off Foot
Pedal
AC Power
Adapter
and
Battery
Charger
Power Cord Plugs
into electrical outlet
Micromotor
Handpiece
plugs into
Control
Unit
Power
Adapter plugs
into control
unit
Optional
On/Off
Foot
Pedal plugs into
control unit
shanks less than 1
″ (25mm) long. To tighten
the new bur twist the knurled locking ring
counterclockwise toward the S (Secure) until
it stops and locks the collet closed.
Never turn the power on to the hand-
piece when the collet is open or in the R
(Release) position.
If the power is on when the collet is open, it
will damage the motor because the spindle is
locked and it will not turn. Always keep a
bur in the collet when it is not in use.
Maintenance
The handpiece has permanently lubricated
ball bearings, which require no lubrication.
Putting even a small amount of oil or grease
in the handpiece will damage it and void
the warranty.
Replacement & Optional Parts
Part No.
2.35mm (3/32
″) Collet HP4-117
3.18mm (1/8
″) Collet
HP4-117B
3mm Collet
HP4-117C
Lithium Ion Battery
HP8-B1800
Motor Brushes (2)
HP8-163
Set of 2 Wrenches
HP4-993
Charger/ Adapter
HP8-306
Optional Parts
On/Off Foot Pedal (shown at left) HP4-927
Carrying Case (shown on front) AP1130
Tool Belt with Pouch (shown on front) A-KC300
Collet Adapters are used to ‘step down’ a
collet size without actually having to change
the collet. It is a faster and easier way to use
smaller diameter shank accessories without
the effort of changing a collet.
Collet Accessory
Adapter Size
Shank Size
Part No.
3/32
″ (2.35mm)– 1/16″ 1/16″ HPL4-3233
1/8
″ to 1/16″ 1/16″ HPL4-3234
3mm – 3/32
″ (2.35mm) 3/32″ (2.35mm) HPL4-3235
1/8
″ – 3/32″ (2.35mm) 3/32″ (2.35mm) HPL4-3236
3mm to 1.6mm
1.6mm
HPL4-3237
On/Off
Button
2-digit
RPM
Indicator
LED
Display
Battery
Charge
Overload
Fwd/
Rev
Foot
Pedal
Battery
Level
Display
Forward/
Reverse
Button
Optional
On/Off Foot
Pedal
Outlet
Optional
Foot Pedal
Button
Power
Adapter
Outlet
Micromotor
Handpiece
Outlet
Knurled
Locking Ring
Collet
Open
knurled locking ring
collet
Close
R
I
S
Operating Instructions
for the HP4-310 Control Unit
1. Charging the Battery: Once the power
cord and adapter are connecting the control
unit to the electrical outlet, the Battery
Charge LED light will blink on and off. When
the battery is fully charged the light will
stay on. The first time the battery is charged
it will take about 3 hours. After that, it will
take about 2 hours to fully charge a low
battery. When fully charged the micromotor
will run for 3 to 5 hours depending on the
workload. Charging should be done in a
cool dry place 32°F – 104°F (0°C – 40°C).
The motor will shut down on its own when
the battery charge is too low.
2. The Power On/Off Button located on
the upper left side of the control box must
be pushed in at least 2 seconds to either
turn on or off the micromotor. When it is on
the red LED two digit speed indicator light
will light up as well as the battery indicator/
charge light. 00 rpm is not the same as
OFF. Use the Power On/Off Button to
turn the unit off.
The unit will power off automatically
after 3 minutes if it is not in use.
3.
Each time the unit is turned on
the speed control dial must be
reset to MIN for the micromotor
handpiece to work. The Speed
Control Dial varies the speed from
MIN (minimum) to MAX (maxi-
mum). The Speed Indicator LED
light shows the speed in two
digits 00 = zero rpm and
30 = 30,000 rpm.
Speed
Control
Dial