The powergraver, Maintenance procedures, Important – Foredom PowerGraver User Manual
Page 3
6
The PowerGraver
®
Kit
The Foredom
®
PowerGraver is a complete
power tool used to perform a wide variety of
tasks such as engraving, stone setting, bright
cutting, bead raising, and other applications
requiring the use of a graver or a hammering
effect. Foredom power tools are manufactured to
high standards of precision and with proper use
and regular maintenance will give you years of
trouble-free performance.
The Foredom PowerGraver Kit K.2293 consists of
a permanent magnet DC motor, flexible shaft with
neoprene sheath, dedicated handpiece with palm
rest, variable speed dial control, and accessories
listed at left.
•
Always use dust collection, respirator,
or face mask to prevent inhalation of
dust particles from workpiece
or abrasives.
•
Never use or continue to use a graver or
accessory which appears to be damaged.
Inspect each graver for cracks or flaws
before using it.
•
Always insert the shank or arbor of an
accessory or mandrel into the collet of
the handpiece as far as possible in order
to provide proper support and tighten the
collet securely.
•
Never use excessive side pressures
which may tend to bend or break the
shank or arbor of an accessory. Let the
impact of the hammer do the work.
•
Do not stall the motor by jamming or
using excessive pressure on the accessory.
This can result in damage to the motor or
flexible shaft.
•
Never operate the motor with the outer
sheath removed from the flexible shaft.
•
Always disconnect the power cord
before servicing the motor or removing
the flexible shaft or sheath.
•
Never operate your power tool during a
perceptible power decrease. Turn power
tool off and do not use until power is
fully restored.
•
Use proper grounding procedures. This tool
should be grounded while in use to protect
the operator from electric shock. The tool is
equipped with an approved 3-conductor cord
and a 3-prong grounding type plug to fit the
proper grounding receptacle. The green (or
green and yellow) conductor in the cord is
the grounding wire. Never connect the green
(or green and yellow) wire to a live terminal.
If your unit is for use on less than 150 volts,
it has a plug that looks like sketch A in the
diagram below. An adapter (sketches B and
C) can be used for connecting plugs as
shown below to 2-prong receptacles. The
green colored rigid ear, lug, etc., extending
from the adapter must be connected to a
permanent ground such as a properly
grounded outlet box.
Some jurisdictions,
including Canada, prohibit the use of 3 to
2 prong adapters. Where prohibited, they
should not be used. Use only 3-wire
extension cords that have 3-prong grounding
type plugs and 3-pole receptacles that accept
the tool's plug. Always disconnect the power
cord before servicing the machine. Never use
in an area where flammable vapors are present.
Accessories
Collets: HP602 (1/16
″
),
HP603 (3/32
″
), 604 (1/8
″
)
and HP605 (3mm)
Gravers: A-G91 #52 Round
A-G92 #3 Onglette
A-G93 #2 Bevel
A-G94 #40 Flat
10215 Carbide Stylus
10177P Anvil Point
3
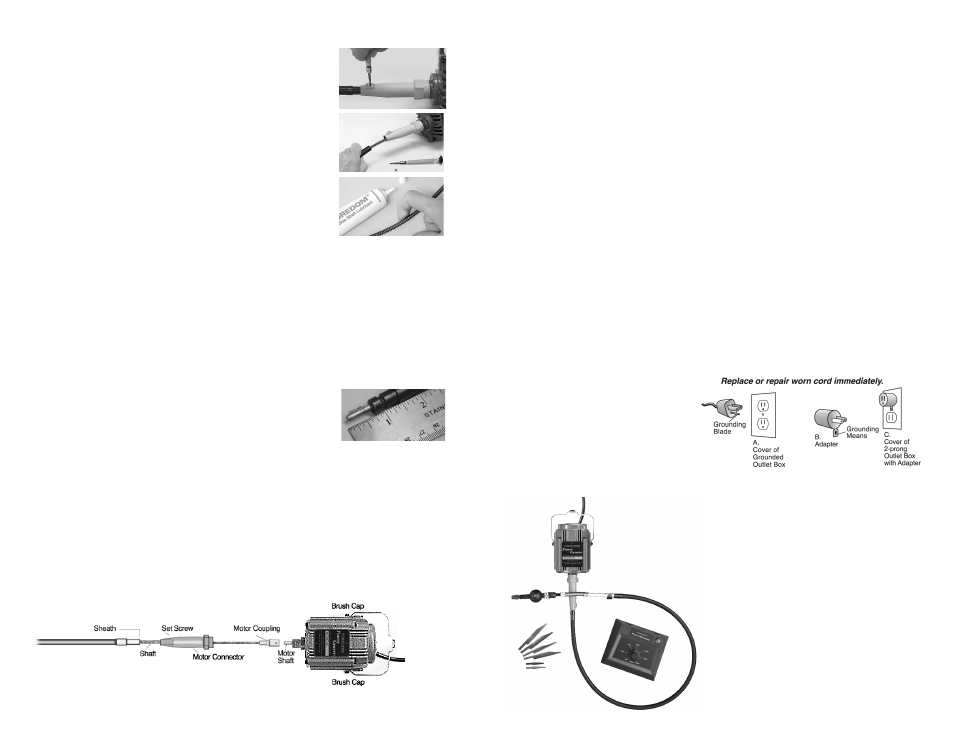
Exposing the Inner Shaft
1.Remove handpiece
(see page 4).
2. Loosen set
screw on motor
connector.
3. Slide outer
sheath out of motor
connector and wipe
shaft clean.
4. Apply a very light
coating of lubrication
to shaft starting at the
top and working
downward to about
one inch from the handpiece end. Apply grease
with your finger tip or small brush. Don’t overdo,
apply a light film of grease. Once the machine is
running, the shaft itself will spread the grease. If
too much grease is applied, the excess will work
its way into the handpiece and will make the
handpiece run hot. For this reason, apply a bit
less near the handpiece end of the shaft.
Never operate the motor with the outer
sheath removed from the flexible shaft.
5. Replace and adjust
sheath so that shaft
key tip extends 3/4
″
(19mm) from sheath.
Retighten the set
screw in motor connector.
6. Clean outside of sheath by wiping with
a cloth.
7. Hang and run the motor for about 10 minutes
before attaching the handpiece to allow enough
time for the grease to warm up, spread and
drain off. Wipe off any excess grease at tip end
of sheath.
8. Re-attach handpiece.
Maintenance Procedures
Always make sure your power tool
is unplugged during maintenance!
It is very important to routinely clean your
Foredom
®
Power Tool and lubricate the shaft
(NOT the motor), especially in areas that
generate a lot of dust.
Dirt and improper lubrication are the most
common causes of poor operation and
excessive wear.
Always disconnect power tool before
cleaning or servicing.
Note: The M.PGX has permanently
lubricated ball bearings and does not
require additional lubrication.
Routine Cleaning of Motors
Foredom Motors need air circulation through the
motor housing to remove waste heat and cool the
windings. Inlet and outlet slots provide the means
for air flow. However, saw dust and conductive
debris (like metal filings or gold dust) can enter in
through these slots. If not cleaned regularly, dust
can collect, making a bridge between parts,
causing an electrical short.
In high dust environments, Foredom
recommends cleaning the motor every
40 hours of use.
To remove dirt and dust buildup, motor brushes
should be removed, cleaned and replaced, and air
should be blown through the motor.
Routine Cleaning and
Lubrication of Flexible Inner Shaft
The shaft should be checked, wiped clean, and
re-lubricated with grease every 50 hours of use.
With every 200 hours of use, the shaft should be
thoroughly cleaned with solvent and lubricated.
Use Foredom flex shaft grease (p/n MS10006) or
high quality white lubricating grease.
IMPORTANT!