Securitron iMXDa_iEXDa QUICK START GUIDE User Manual
Page 2
PN# 500-22310
Page 2
Rev. B, 01/10
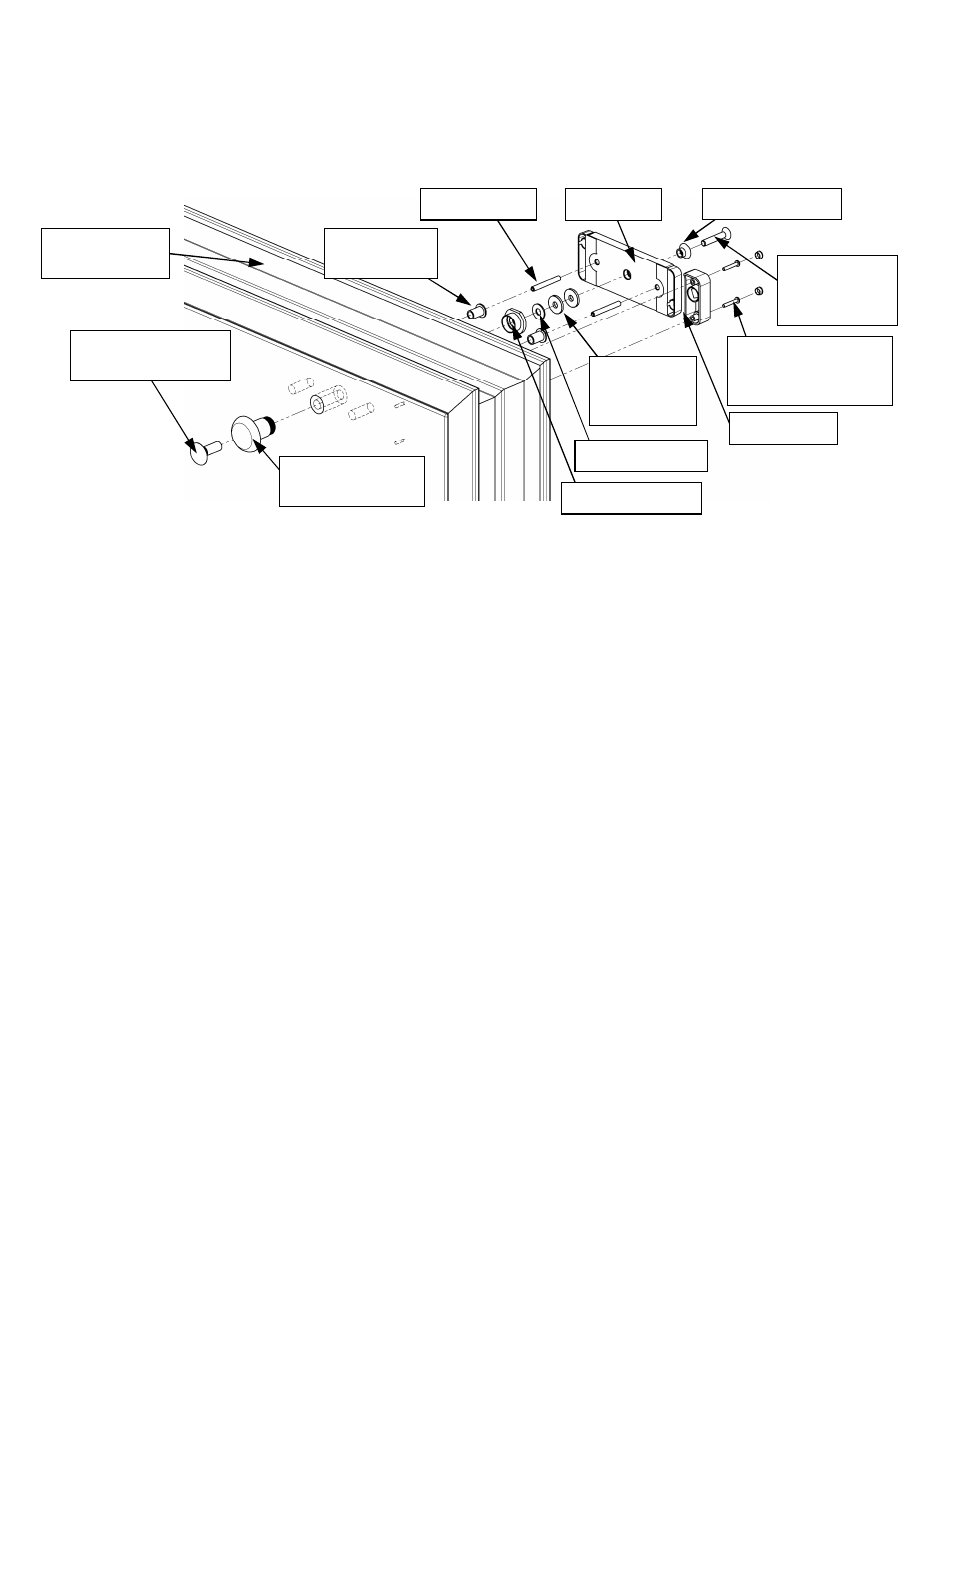
STEP 1 - MOUNTING THE STRIKE PLATE
The strike plate should be mounted prior to the lock housing. Figure 2 below illustrates typical
strike mounting for the iMXDa. (For the iEXDa the SB-MXD Sex Bolt, cap, and steel washer
shown here are replaced with a standard sex bolt).
Figure 2
Step-by-step Mounting of the Strike and Actuator:
1. Fully close the door.
2. Carefully fold the template and place into desired position.
3. ON THE DOOR: Center punch the strike and actuator mounting holes marked [A] on the
template.
4. ON THE FRAME: Center punch the slotted lock mounting bracket holes marked [A] on the
template.
5. Drill the three (3) holes required for the strike in the door as noted on the template.
6. Using a hammer, install the two (2) provided roll pins into the back of the strike plate.
7. Insert the two (2) provided roll pin bushings into the holes drilled in the door.
8. Use steps 9 thru 17 for installation of the IMXDa or steps 18 thru 23 for the iEXDa strike
plate.
(iMXDa):
9. Mark and drill the two (2) 3/16” [4.8mm] diameter holes for the pins of the SB-MXD ON THE
OUTSIDE OF THE DOOR – these holes are designated [C] on the template. NOTE: The SB-
MXD may be used to mark the two (2) pin holes by inserting the sex bolt into the hole
from the outside of the door and lightly tapping the head with a hammer so that the pins
mark the door where the pins are located. (Cover the head with a piece of cardboard to
protect from marring if necessary).
10.Install the sex bolt through the hole in the door from the outside, engaging the pins into the
holes.
11.Thread the cap onto the end of the sex bolt inside of the door. Using a wrench, tighten the
assembly.
12.In the following order, assemble the strike mounting screw, strike bushing, strike plate, 1 to
3 rubber washer(s), and the steel washer. Use of two (2) rubber washers is recommended.
13.Apply thread locking compound to the strike screw threads.
14.Thread the strike mounting screw into the sex bolt just a few threads, while aligning the two
roll pins into the roll pin bushings.
15.Pull on the assembly (strike) to expose the end of the spring loaded plunger.
16. With the plunger being held extracted, use a wrench (or vise grip pliers) on the plunger end
and a 3/16” hex key wrench in the socket head of the screw to tighten the assembly.
17. Release the assembly.
(iEXDa):
18.Install the sex bolt through the hole in the door from the outside.
19.In the following order, assemble the strike mounting screw, strike bushing, strike plate and
rubber washer(s) together.
20.Apply thread locking compound to the strike mounting screw threads.
21. While holding the assembly together, thread the strike mounting screw into the sex bolt just
a few threads, while aligning the two roll pins into the roll pin bushings.
1-3
Rubber
Washers
Strike
Mounting
Screw
Strike Bushing
SB-MXD Sex
Bolt (iMXDa)
Steel Washer
SB-MXD Cap
Standard Sex
Bolt (iEXDa)
Door Frame
& Stop
2X Roll Pin
Bushings
2X Roll Pins
Strike
Plate
Actuator
2X Actuator
Mounting Screws
and Dress Plugs