Installation instructions, Audi q5, Part numbers – Reese 44654 PROFESSIONAL RECEIVER User Manual
Page 2
Installation Instructions
Audi Q5
Part Numbers:
87603
75708
44654
Do Not Exceed Lower of Towing Vehicle
Manufacturer’s Rating or
Hitch Shown In Proper Position
Hitch type
Max Gross
Trailer WT (LB)
Max Tongue
WT (LB)
Weight Distributing
N/A
N/A
Weight Carrying
Ball Mount
4500 (2043 Kg)
450 (204 Kg)
LOWER FASCIA
ATTACHMENT
GROOVE
ATTACHMENT
SCREW
LOWER FASCIA
SLOT FOR SNAP-IN TAB
GROOVE
1.
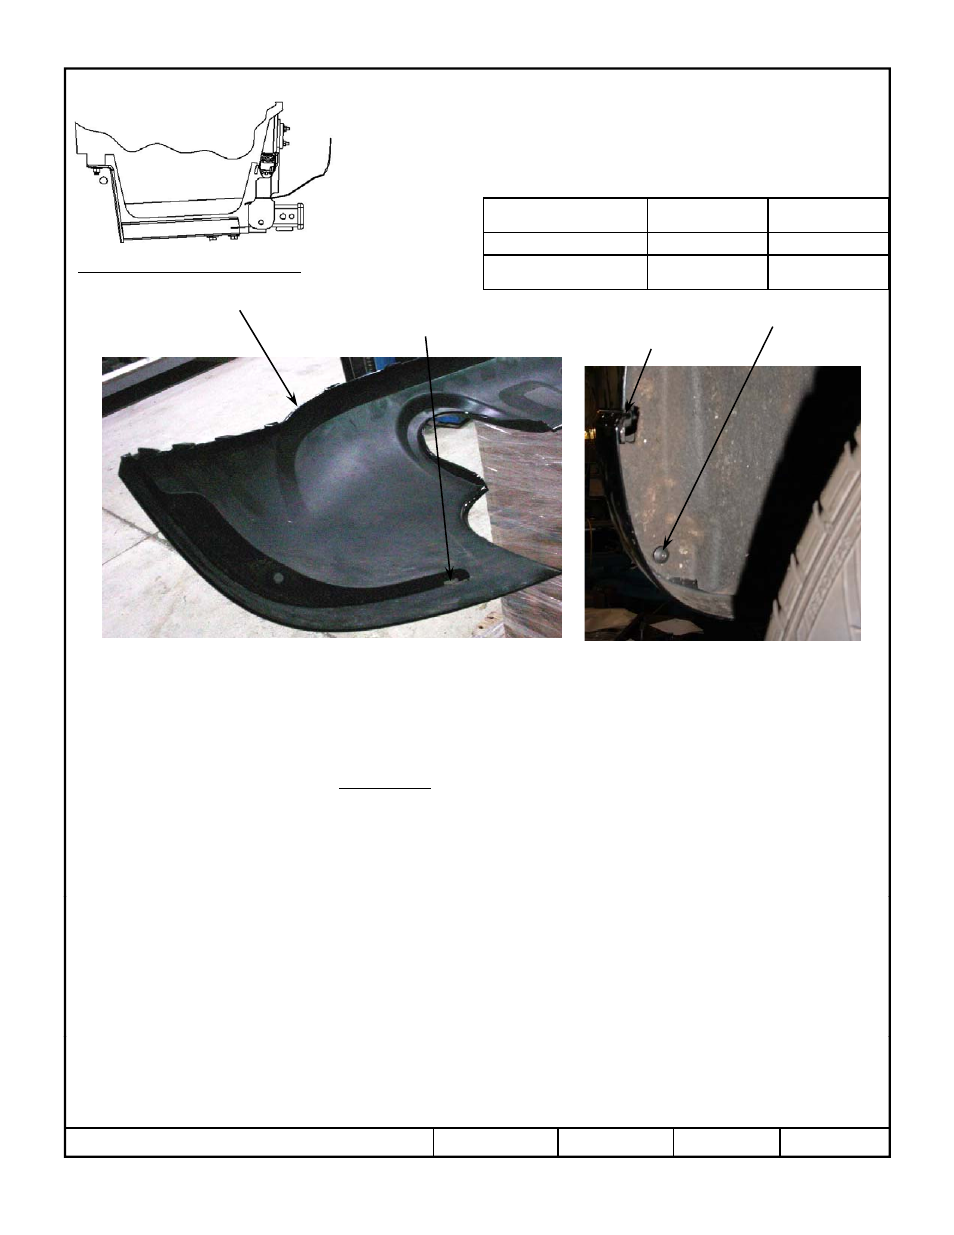
Raise vehicle on hoist or ramps. Use appropriate safety precautions.
2.
Remove lower fascia by removing two screws to the trunk and a screw in each wheel well with a T-20 Torx™ bit. There is a snap-
in tab next to the wheel well screw. Gentle remove tab from slot. The lower fascia is snapped into a continuous groove as shown.
With gentle outward force remove it from the groove.
3.
Using the provided fishwire, install the forward bolt and block (item 1 and 2) into the cross member as shown in figure 1. Install the
forward bracket part loose with item 3 and 4.
Ti
h
i
li l
h d i
’
id b
h
k
b
d
h
lid
h b
k
i
Tip: there is a little more room on the driver’s side between the trunk, sway bar, and exhaust to slide the bracket in.
4.
Apply the clear galvanic isolators to the bottom surface of the horizontal mounting tab where the existing aluminum exhaust
hanger will be mounted.
5.
With a 13 mm socket, loosen the (4) 35mm long M8 exhaust hanger bolts enough to slide the hitch horizontal mounting bracket
between the vehicle and the aluminum exhaust hanger. At the same time, slide the attachment bar into the forward bracket as
shown in figure 3. The side brackets may push the rubber exhaust isolator out a little. Finger tighten the M8 bolts to align the
horizontal U-bolt holes.
6.
Install the 5/16” U-bolts (item 5) as shown in figure 2. Be careful not to let the U-bolt drop into the frame. Slide the 3/8” block (item
6) onto the U-bolts and hand tighten the washer and nuts.
I
ll h h
dl
h
d b l
h h f
d b
k
h hi h (i
9 3
d 10)
7.
Install the handle nuts, washers, and bolts to attach the forward bracket to the hitch (item 9, 3, and 10).
8.
Tighten the U-bolts first, then the M8 exhaust hanger bolts, Followed by the two attachment bar bolts and finally the forward bolt
on the cross member.
9.
Reinstall lower fascia.
Tighten remaining 1/2” fastener with torque wrench to 75 Lb -Ft (102 n*m)
Tighten 1/2” handle nut fasteners with torque wrench to 50 Lb.-Ft. (68 n*m)
Tighten all M8 fasteners with torque wrench to 20 Lb.-Ft. (27 n*m)
Tighten all 5/16” fasteners with torque wrench to 17 Lb.-Ft. (23 n*m)
Tighten remaining 1/2 fastener with torque wrench to 75 Lb.-Ft. (102 n m)
z
2010 Cequent Performance Products
Sheet 2 of 6
75708N
8-12-10
Rev. A
Note: check hitch frequently, making sure all fasteners and ball are properly tightened. If hitch is removed, plug all holes in trunk pan or other body panels to
prevent entry of water and exhaust fumes. A hitch or ball which has been damaged should be removed and replaced. Observe safety precautions when working
beneath a vehicle and wear eye protection. Do not cut access or attachment holes with a torch.
This product complies with safety specifications and requirements for connecting devices and towing systems of the state of New York, V.E.S.C. Regulation V-5
and SAE J684.
Form: F205 Rev A 5-6-05