Ransburg, Fluid regulator, Low voltage cable removal (refer to figure 14) – Ransburg Evolver Solvent Robot Applicator 79190-XXXXXXXX User Manual
Page 48: When equipped - see figure 15), Low voltage cable removal - parts list (figure 14)
Low Voltage Cable Removal
(Refer to Figure 14)
1. Disconnect low voltage cable [2] from rear of
power supply. For A10406-XX power supply,
disconnect circular connector from receptacle on
rear of power supply. For LECU5004-XX power
supply, disconnect wires from connector J3 at rear
of MicroPak.
2. Loosen retaining ring [5] (see Figure 10) and
remove applicator from robot wrist.
3. Using 3/16" Allen wrench, remove set screw [10].
4. Remove the low voltage cable [2] by pulling
through the robot arm and mounting plate.
5. To reinstall, insert power supply end of cable
[2] through mounting plate [3], pull through robot
arm and connect to junction box or power supply.
For connections to power supply, plug connector
into receptacle (A10406-XX power supply) or con-
nect wires as shown in Figure 4 (LECU5004-XX
power supply).
6. Align the timing mark of the plug on the ap-
pli-cator end of the cable [2] with the mark on the
mounting plate [3] and tighten set screw [10].
FLUID REGULATOR
(When Equipped - See Figure 15)
1. Remove all pressures, both air and fluid from
the line leading to the spray gun.
2. Purge all fluid from the gun prior to performing
any service.
3. Remove one end of the tubing [39] from the
fitting [12]. Remove the six (6) screws [11].
4. Remove diaphragm assembly [10] and in-
spect it for wear or damage. Pay particular atten-
>
Once regulator bonnet [10] is re-
moved, diaphragm [2] will be loose and
may fall out.
NOTE
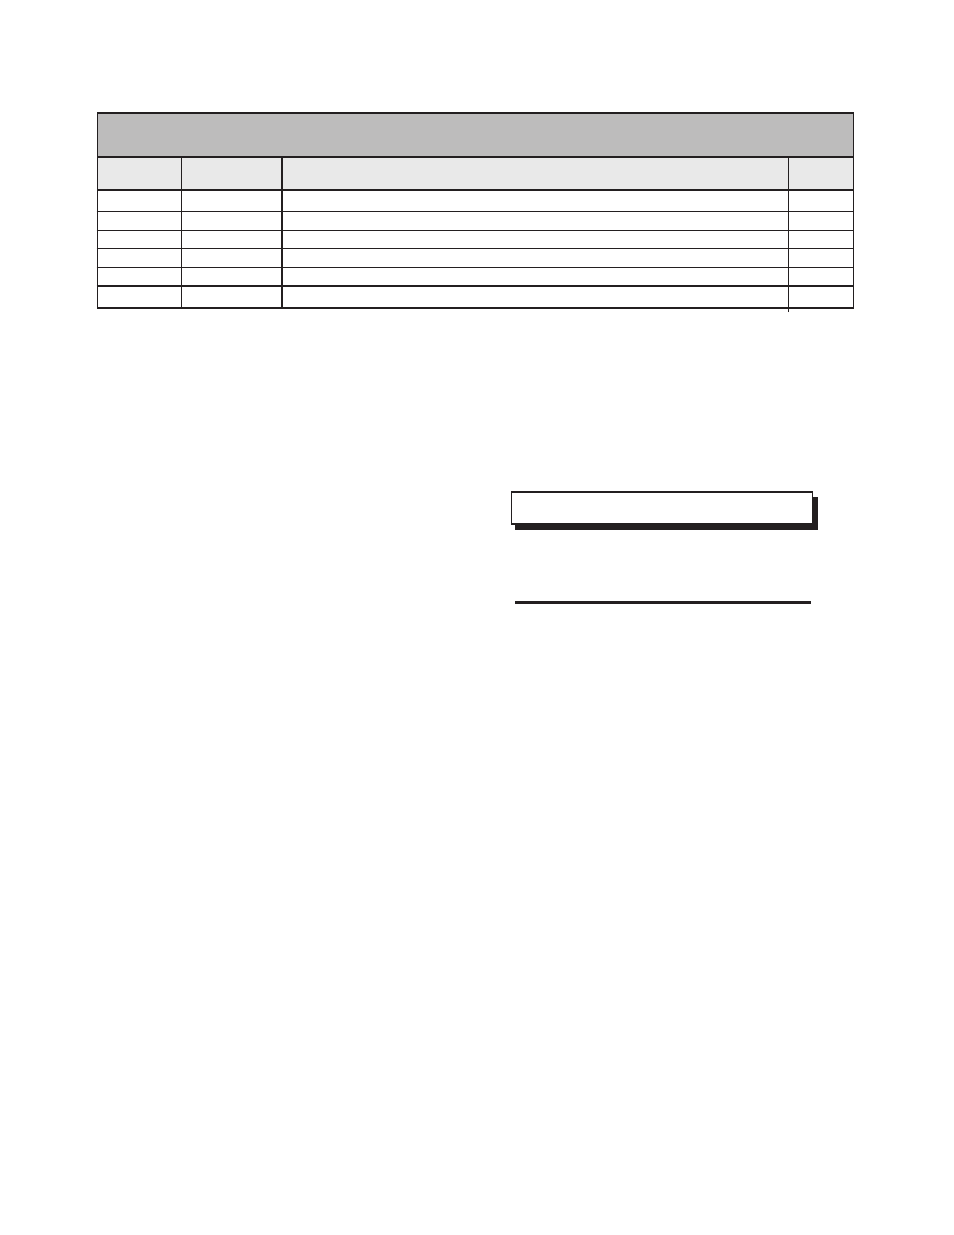
2
79008-XX
Low Voltage Cable, One-Piece, for LECU5004-XX Power Supply
1
2
A11353-XX Low Voltage Cable, One-Piece, for A10406-XX Power Supply
1
2
A11355-XX Low Voltage Cable, Junction, for A10406-XX Power Supply
1
3
79155-00
Robot Mounting Plate, English Fittings
1
3
A10975-00
Robot Mounting Plate, Metric Fittings
1
10
SSF-2052
Set Screw
1
Item #
LOW VOLTAGE CABLE REMOVAL - PARTS LIST (Figure 14)
Part #
Description
Qty
tion to the air side, since it can be damaged by
solvent contact. Replace if necessary.
5. Use a 3/16" Allen wrench to unscrew the pop-
pet seat retainer. The tungsten carbide seat and
needle may pop out because of the spring force
applied against them.
6. Inspect the needle and seat assembly [4] for
wear. If wear or damage is evident, replace.
Replace both needle and seat at the same time
because they are a matched set. Inspect o-ring
(5) for damage, replace as necessary.
7. Reassemble the fluid regulator by inserting
the spring [3], needle and seat [5] back into the
regulator block assembly. Be sure to lube o-ring.
Secure the needle/seat assembly by screwing the
seat retainer [4] into the regulator block assembly
until a torque of 8-10 lbs•in is
obtained.
8. When replacing the diaphragm [2], remove the
screw [9] that holds both halves together. Inspect
o-ring [6] for damage. To reassemble, make
sure that the side is toward the lower support [8].
Reinstall screw and tighten. Be careful not to
over tighten. If the diaphragm is inserted wrong,
Evolver Solventborne Robotic Atomizers - Maintenance
44
Ransburg
AA-03-02.12