Setup and operation – PASCO WA-9611_13 SONOMETER User Manual
Page 6
2
Sonometer
012-03489E
To setup the sonometer (see Figure 2):
➀
Choose one of the ten strings and place the brass
string retainer into the slot on the tensioning lever.
➁
Loosen the string adjustment screw and place the
crimped lug that is attached to the other end of the
string over the screw head, as shown.
➂
Tighten the string adjustment screw until the
tensioning lever hangs level.
➃
Place the bridges in any locations you wish, to deter-
mine the length of the string.
➄
Hang a mass (approximately 1 kg) from the tensioning
lever to produce the desired tension, then adjust the
string adjustment screw as needed so that the
tensioning lever is level. See Figure 3. (The lever must
be level to accurately determine the string tension
from the hanging mass.)
String tension is determined as shown in Figure 3. If
you hang a mass “M” from slot one of the lever, the
tension of the string is equal to Mg, where g is the
gravitational constant (9.8 m/s
2
). If you hang the mass
from slot two, the tension equals 2Mg; if you hang it
from slot three, the tension is 3 Mg, etc.
➅
You can now:
-
Vary the tension of the string by hanging the mass
from different slots in the tensioning lever. (Always
adjust the string adjustment screw so the lever remains
level.)
-
Vary the length of the string by adjusting the distance
between the bridges.
-
Vary the linear density of the string by changing
strings.
-
Pluck the string to observe how each of these vari-
ables effects the resonant frequency.
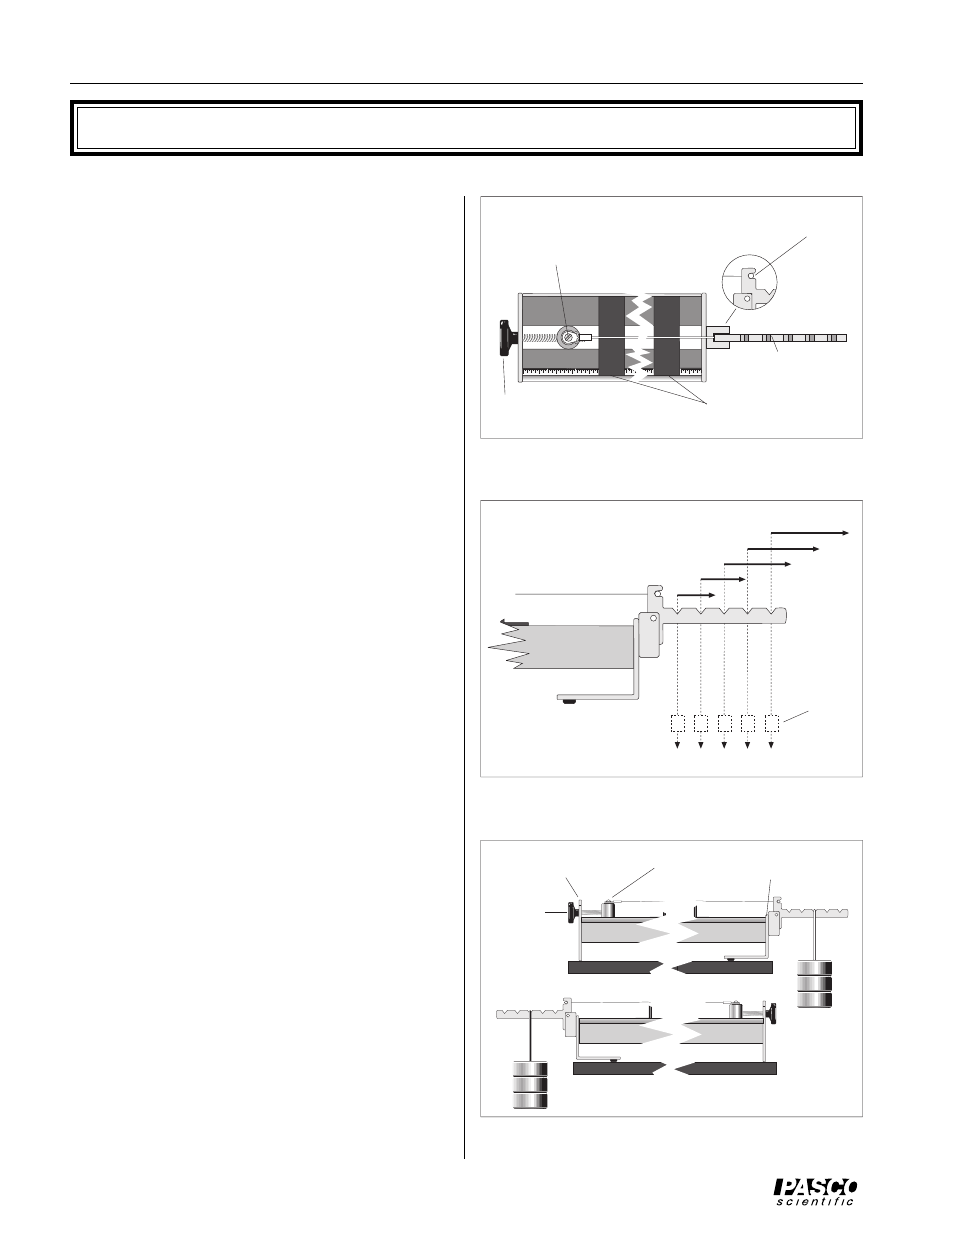
Setup and Operation
Tensioning lever
String adjustment screw
Brass string retainer
Crimped lug
Bridges
Figure 2 Sonometer Setup
Figure 3 Setting the Tension
Hanging
Mass
(mass = M)
(weight = Mg)
1Mg
2Mg
3Mg
4Mg
5Mg
String tension (T)
Figure 4 Reversing the End Plates
Aluminum Cylinder
End plate
String
Adjustment
screw
End plate
Slot
1
2
3
4
5