Rear view, Analog output option – Liquid Controls SP2200 User Manual
Page 21
19
ANALOG OUTPUT OPTION
Description:
An optional 4-20mA (0-20mA) output has been added to the unit.
The output can be programmed to track C rate or C total.
This feature is available by adding suffix A to the part number.
Connections are via a 2 terminal pluggable screw connector.
Connections: (see FIG. 1)
PIN13 supplies the 12 to 18 VDC to power the current loop.
PIN14 is the control sink driver
Accuracy:
50uA worst case
Compliance Voltage:
3 to 30 VDC non inductive
Setup:
The optional analog output feature uses 4 dip switches on the back
for setup. These switches are used as follows:
SW1 - View or change "set low" and/or "set high" values
SW2 - Select output for rate or total
SW3 - Select 4-20mA or 0-20mA
SW4 - Calibrate the unit.
After the regular parameters shown in the programming flowchart
have been set, locate the 4 switches on the back of the unit. (see
FIG. 1)
Switch Settings:
SWITCH 1: Enter Analog Low & High (normally off)
Switch 1 is used to load in the low (4mA or 0mA) and/or the high
(20mA) output settings. With power on, set switch 1 ON (up).
LOW SETTING is viewed or changed by pressing PRE A. If the
displayed value is correct, press ENTER. If not, press buttons A
through E to step to the desired value and press ENTER. (disre-
gard the display which will show the last count reading).
HIGH SETTING is viewed or changed by pressing PRE B. If the
displayed value is correct, press ENTER. If not, press buttons A
through E to step to desired value and press ENTER.
Return switch 1 to OFF (down) position, PRE A and PRE B buttons
now function to view or change relay trip values.
SWITCH 2: Select Count or Rate
SW2 OFF (down): Analog output follows C rate
SW2 ON (up): Analog output follows C count
SWITCH 3: Select 4-20mA or 0-20mA
SW3 OFF (down): Selects 4-20mA output range
SW3 ON (up): Selects 0-20mA output range
SWITCH 4: Calibrate (normally off)
Switch 4 is used for calibration. Calibration is done at the factory
and should not be needed (see SWITCH 1 to enter high and low
values). If recalibration is desired, a calibrated 20mA ammeter
with 1uA resolution is needed. Attach the "+" lead of the meter to
pin 13 and the "-" lead to pin 14. Set switch 4 ON (up). The unit
will output approximately 20.000mA and a decimal will light in the
third position. Read the output using the ammeter. Press PRE A.
If the display is the same as the ammeter reading, press ENTER.
If not, press buttons A through E to step to ammeter reading and
ENTER. (Disregard display which now shows the last count read-
ing with decimal point in third position) Return switch 4 to OFF
(down) position.
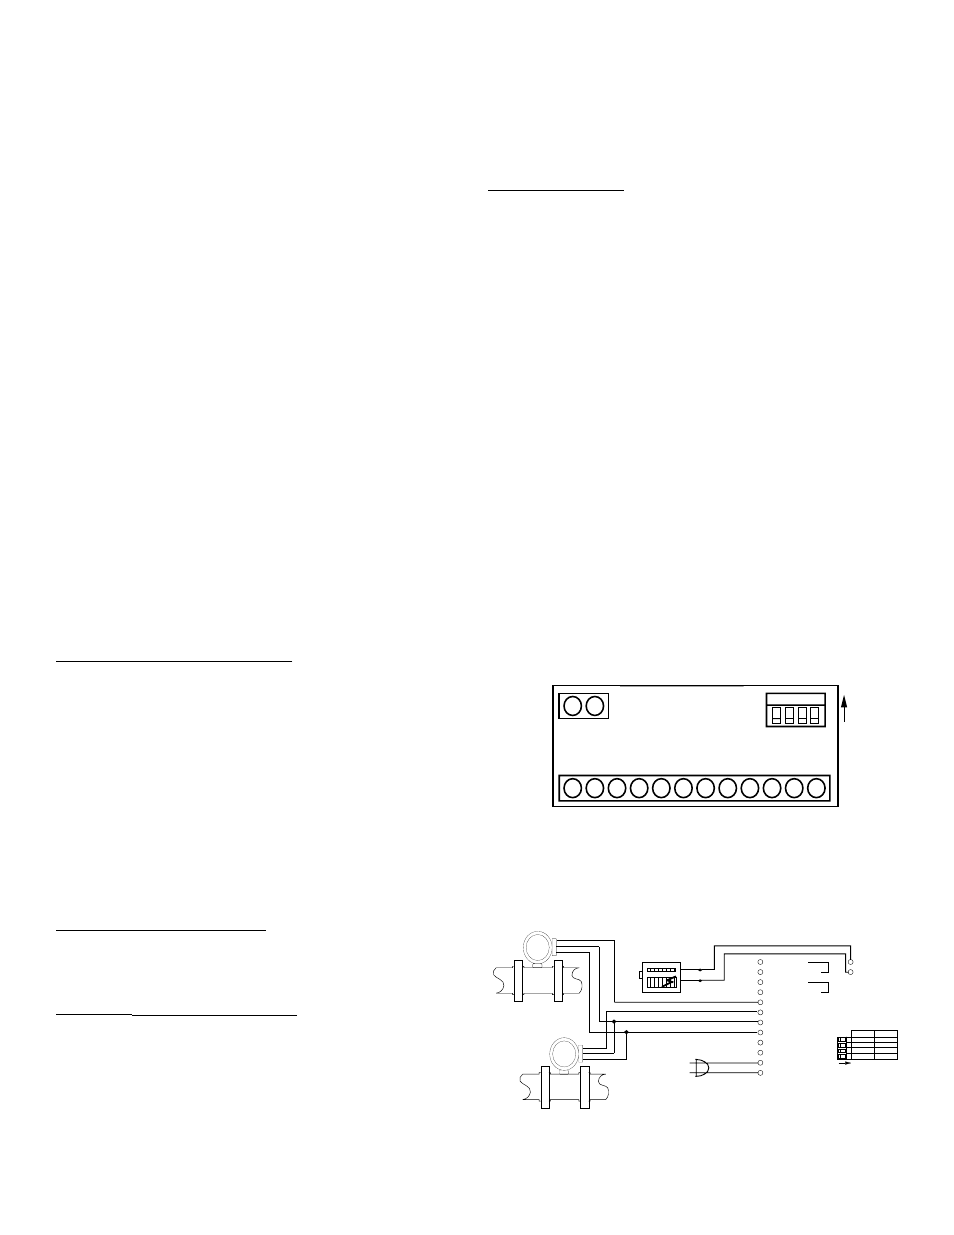
FIG. 1
Typical Wiring:
GND
+12V
STRIP CHART
RECORDER
TURBINE FLOWMETER
PULSE OUTPUT
PULSE OUTPUT
-
+
1- COMMON
2- N.O.(N.C./NPN)
3- COMMON
4- N.O.(N.C./NPN)
5- A INPUT
6- B INPUT
7- 12VDC OUT/+DC IN
8- -DC (GROUND)
9- RESET INPUT
10- NOT USED
11- A.C. INPUT
12- A.C. INPUT
RELA
YS
A
B
13- V+
14- I SINK
ANALOG
OUTPUT
ON
CAL.
0-20mA
COUNT
SET
OFF
RUN
4-20mA
RATE
RUN
1 2 3 4
ON
SWITCH
TURBINE FLOWMETER
1 2 3 4
REAR VIEW
1 2 3 4 5 6 7 8 9 10 11 12
13 14
Analog Out
Setup Switches
Serial Port
ON