Burkert Type 2036 User Manual
Page 12
12
Assembly
Type 2036
6.2.2 Preparatory work
→
Clean pipelines (sealing material, swarf, etc.).
→
Support and align pipelines.
devices with welded body
note!
damage to diaphragm or actuator.
▶ Before welding in the body disassemble the actuator and
diaphragm.
Remove the actuator from the valve body:
→
Move the actuator to the upper actuator position (CFA, NC: by
applying pilot pressure; CFB, NO: by removing the pilot pressure).
→
Mark the position of the actuator in relation to the valve body.
→
Unscrew the four body screws that connect the valve body with
the actuator. Remove the actuator and the diaphragm.
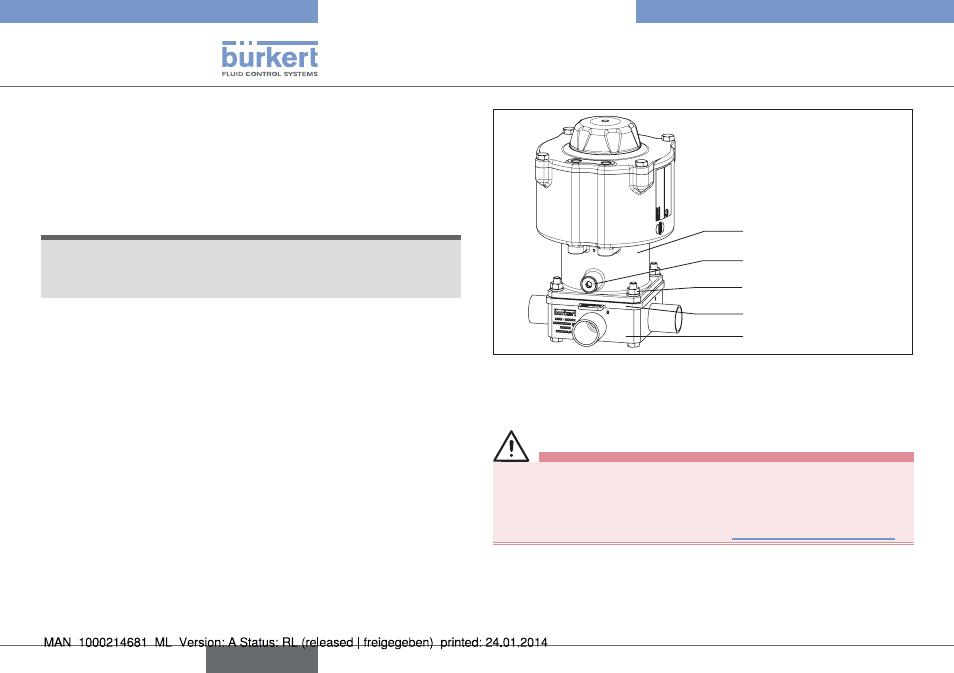
Actuator
Body screws
Diaphragm
Valve body
Guide pin
Fig. 6:
Assembly
6.3 installation
Warning!
risk of injury from improper assembly.
Non-compliance with the tightening torques is dangerous due to
possible discharge of medium and possible release of pressure.
▶ Observe the tightening torque (see "Tab. 2: Tightening torque").
english
- Type 0125 (15 pages)
- Type 0121 (4 pages)
- Type 0330 (2 pages)
- Type 0331 (4 pages)
- Type 6012 (4 pages)
- Type 0127 (18 pages)
- Type 0131 (5 pages)
- Type 0141 (5 pages)
- Type 0142 (12 pages)
- Type 0145 (3 pages)
- Type 0174 (5 pages)
- Type 0212 (2 pages)
- Type 0211 (5 pages)
- Type 0212-B (18 pages)
- Type 0250 (64 pages)
- Type 0253 (2 pages)
- Type 0255 (15 pages)
- Type 0355 (2 pages)
- Type 0255 (2 pages)
- Type 8006 (34 pages)
- Type 8640 (2 pages)
- Type 8640 (55 pages)
- Type 8640 (119 pages)
- Type 0256 (15 pages)
- Type 0256 (2 pages)
- Type 0258 (72 pages)
- Type 0262 (5 pages)
- Type 0273 (6 pages)
- Type 0280 (5 pages)
- Type 0280 (2 pages)
- Type 0280 (12 pages)
- Type 0281 (2 pages)
- Type 0282 (2 pages)
- Type 0283 (2 pages)
- Type 0286 (4 pages)
- Type 0287 (15 pages)
- Type 0290 (2 pages)
- Type 0290 (14 pages)
- Type 0293 (18 pages)
- Type 0300 (6 pages)
- Type 0301 (6 pages)
- Type 0311 (2 pages)
- Type 0312 (6 pages)
- Type 6519 (3 pages)
- Type 6519 (4 pages)