Draw-Tite 20250 4-FLAT WIRING KIT User Manual
Draw-Tite For the car
3. Locate a suitab
le grounding point near
the connector such as the vehicle's
frame or cross member. (Do not drill
into vehicle floor or bed.) Clean dirt and
rustproofing from area. Drill a 3/32" hole
and secure white wire using eyelet and
screw provided.
CA
UTION
V
erify what is behind any surface prior
to drilling to avoid damage to the vehicle
and/or personal injury. Do not drill into
any exposed surfaces.
W
ARNING
All connections m
ust be complete
to function properly. Test and verify
installation with a test light or trailer
once installed.
NO
TE
Store 4-Flat in rear cargo area when
not in use.
W
ARNING
Ov
erloading circuit can cause fires.
DO NOT exceed lower of towing
manufacturer rating or:
• Max. stop/turn light: 1 per side (7.5 amps)
• Max. tail lights: (7.5 amps)
Read vehicle's owners manual &
instruction sheet for additional information.
NO
TE
T
railer lighting that requires more than
7.5 amps per circuit must use a Trailer
Light Power Converter. If your trailer
requires an electrical plug other than
the 4-Flat, see your dealer for optional
6-Way or 7-Way adapters.
ENGLISH
T
OOLS REQUIRED:
Hot Air Gun or Appropr
iate Heat Source,
Wire Crimpers, Drill (3/32” Drill Bit),
Philips Head Screwdriver
1. Locate the v
ehicle's taillight
wiring harness.
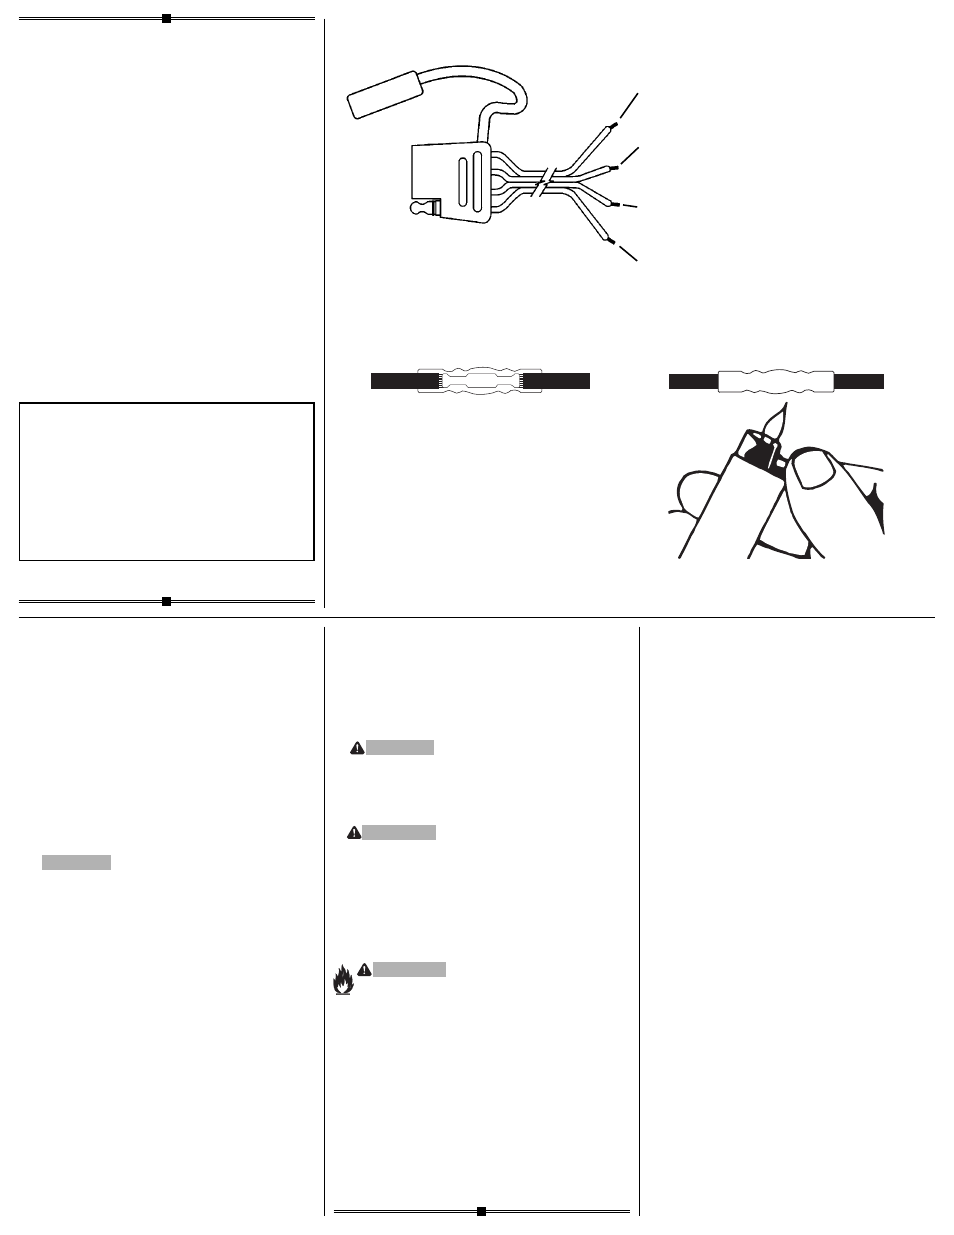
2. Match the color-coded wires from
the connector to the appropriate wires
as shown
d.
Make connections using
the insulated butt connectors provided.
Always use a circuit tester to identify
each of the vehicle lighting circuits.
CA
UTION
When using a circuit tester
, carefully
probe one wire at a time. Do not probe
across two wires or across wire and
vehicle structure. Damage to electronic
components may result.
Insulated Butt Connector Installation
ef
A. Mak
e sure the wire end is
properly seated. Make the crimp
connection using a tool designed
for insulated splices.
B. Apply heat directly to the splice
, working
from the center out to the edges, using
a hot air gun or other source, until the
tubing recovers and the adhesive flows.
Allow to cool before inspecting splice
and checking integrity.
18250-037
Rev. A
07/15/05
READ
THIS FIRST:
Read and f
ollow all instructions carefully
before beginning installation.
LISEZ CECI EN PREMIER:
Lire et suivre toutes les instr
uctions
attenrivement avant le montage.
LEA
ESTO PRIMERO:
Lea y siga todas las instr
ucciones cuidadosa-
mente antes de iniciar la instalación.
•
d
•
f
•
e
Installation Instr
uctions
Directives de Montage
Instrucciones de Instalación
Trailer Light Wiring Kit
Kit de câblage pour feux
de remorque
Juego de cables para luces
de remolque
Vehicle End
Côté véhicule
Extremo del vehículo
Gr
een Wire (Right Turn & Stop)
Fil vert (Feu stop et clignotant droit)
Cable verde (Luz de vuelta a la derecha y de freno)
Yellow Wire (Left Turn & Stop)
Fil jaune (Feu stop et clignotant gauche)
Cable amarillo (Luz de vuelta a la izquierda y de freno)
Brown Wire (Taillights)
Fil brun (Feu arrière)
Cable marrón (Luz trasera)
White Wire (Ground)
Fil blanc (Masse)
Cable blanco (Tierra)