Draw-Tite 24850 SPORTFRAME HITCH User Manual
Installation instructions, Chevrolet camaro, Part numbers
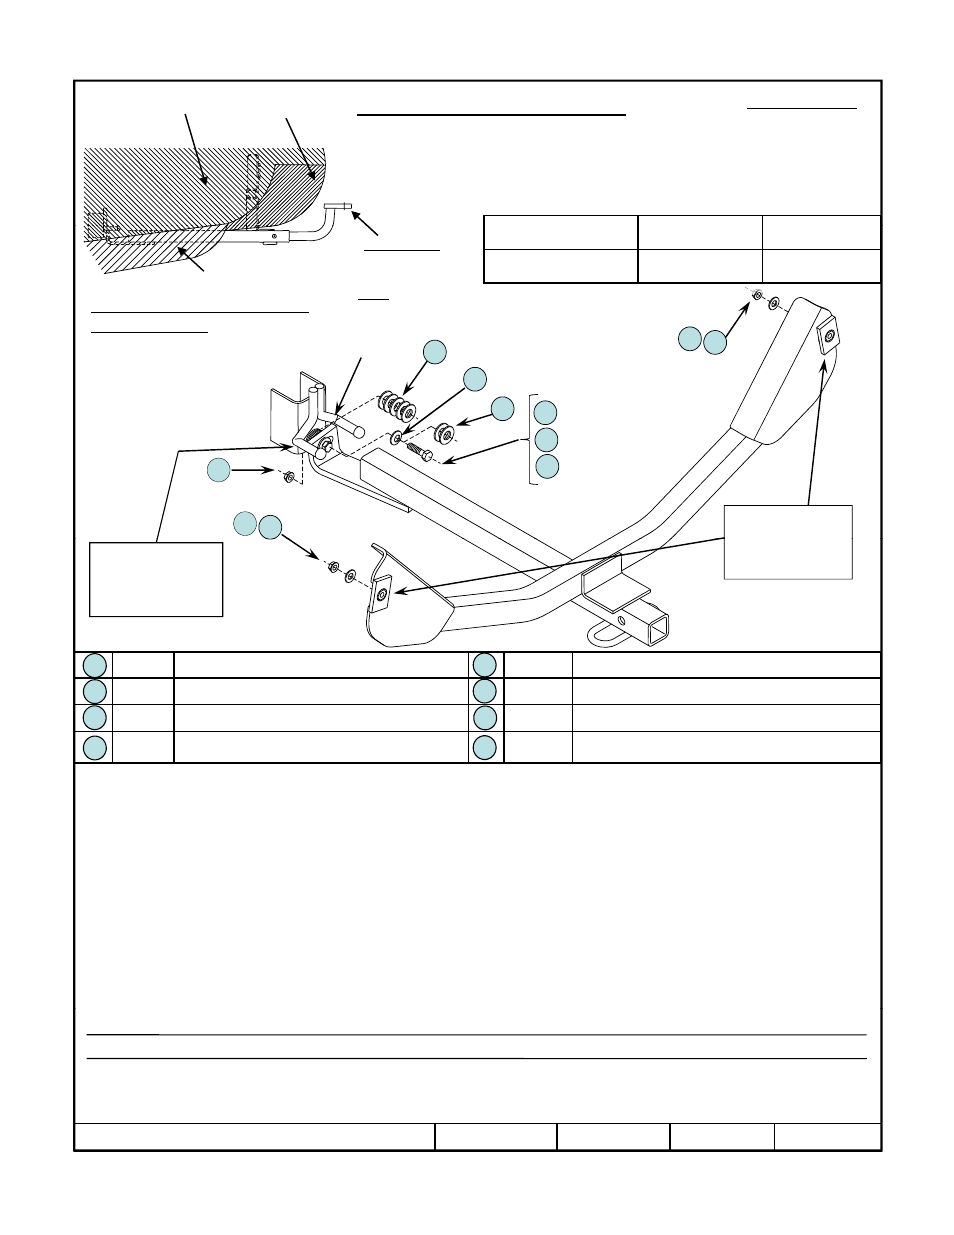
Installation Instructions
Chevrolet Camaro
All Models, Excluding convertible
(will not fit vehicles with optional dealer
installed ground effects package)
Part Numbers:
24850
60266
77223
Do Not Exceed Lower of Towing Vehicle Manufacturer’s Rating or
Max Gross
Max Tongue
Body
Panel
Bumper
Fascia
Hitch Shown In Proper Position
Equipment Required:
Wrenches: 13mm, 9/16”
Drill Bits: N
Fastener Kit: 24850F
Hitch type
Max Gross
Trailer WT (LB)
Max Tongue
WT (LB)
Weight Carrying
Ball Mount
2000 (908 Kg)
200 (91 Kg)
Wiring Access Location: PC1 , PC2
Muffler
6
2
1
8
Exhaust
hanger
Drawbar must be used in
the RISE position only.
Drawbar Kit:
3594
Drill Bits: None
Other items: Round file as
needed.
7
6
2
1
4
5
3
8
Use the
one
length
bolt that
works
best.
See Steps 2 & 3
below and Figure 1
Qty. (3)
8mm -1.25 CL10 Flanged Locknut, (1 extra)
Qty. (1)
3/8”-16 x 2” Gr.5 Hex head Bolt (as needed)
Qty. (3)
7/16” Flat Washer (15/16” outside diameter ,1 extra)
Qty. (1)
3/8” Conical Toothed Washer
1
2
6
5
be ow a d gu e
next page for
installation Notes.
See Steps 4 & 5
below and Figure 2
next page for
installation Notes.
1.
Raise hitch into place by turning hitch sideways under vehicle , then carefully raising one end between back of muffler and plastic bumper
fascia. Then raise other end into place. If vehicle is not raised on hoist or ramps be careful not to scratch plastic bumper fascia.
2.
Hang hitch bracket clearance holes over existing 8mm stud/weldnuts located just rear of mufflers on both sides of vehicle. See Figure 1
next page
.
Make sure that 3/4” diameter clearance holes in hitch brackets sit flat against vehicle sheet metal and do not rest against vehicle
weldnuts.
3
Install one 7/16” flat washer (smaller diameter washer) over one of the existing 8mm studs in vehicle and against hitch bracket just hung in
y ( )
(
)
y ( )
Qty. (1)
3/8”-16 x 1-1/2” Gr.5 Hex head Bolt (as needed)
Qty. (1)
3/8” -16 Flanged Locknut
Qty. (1)
3/8”-16 x 1-3/4” Gr.5 Hex head Bolt (as needed)
Qty. (10)
7/16” Heavy Flat Washer (1-1/4” outside diameter).
Use as needed, you may not need all of them.
2
3
7
6
4
8
3.
Install one 7/16 flat washer, (smaller diameter washer), over one of the existing 8mm studs in vehicle and against hitch bracket just hung in
Step 2 above. Then start 8mm flanged locknut on stud and tighten with wrench just enough to keep hitch bracket against vehicle sheet metal.
Note! hitch brackets cannot rest on top of weldnuts on vehicle
.
Existing weldnuts must show through hitch bracket clearance holes.
Install flat washer and locknut on other side of vehicle the same way making sure that hitch brackets are against vehicle sheet metal and not
against weldnuts. As previous tighten locknut just enough to keep hitch in place so that it doesn’t fall against weldnuts.
4.
Raise forward hitch attachment aligning with existing slot in bracket hanging down off bottom of independent suspension crossbeam. It may
be necessary to remove (2) exhaust rubber isolators from hangers to access attachment.
5.
Using heavy flat washers, (larger diameter washers), stack together to make up gap between hitch bracket and vehicle bracket.
Caution! make sure that 3/8” bolt is just long enough to go through flanged locknut and doesn’t bottom out against aluminum
transaxle. See Figure 2 next page
.
You may have to put flat washers under head of bolt to keep bolt from bottoming out. Supplied are (3)
different length 3/8” bolts. Use the one that works best for your particular vehicle so that bolt does not bottom out against aluminum
transaxle but still extends through locknut.
6.
Torque 8mm nuts installed in Step 3 to torque shown below for 8mm locknuts. Torque 3/8” bolt installed in Step 5 to torque shown below
for 3/8” bolt. Reinstall rubber isolators on exhaust if removed.
Tighten 3/8”-16 Gr.5 bolt with torque wrench to 30 Lb.-Ft. (41 N*M) Tighten 8mm locknuts with torque wrench to 27Lb.-Ft. (37 N*M).
z
2009, 2011 Cequent Performance Products
Sheet 1 of 6
24850N
4-12-11
Rev. B
Note: check hitch frequently, making sure all fasteners and ball are properly tightened. If hitch is removed, plug all holes in trunk pan or other body panels to
prevent entry of water and exhaust fumes. A hitch or ball which has been damaged should be removed and replaced. Observe safety precautions when working
beneath a vehicle and wear eye protection. Do not cut access or attachment holes with a torch.
This product complies with safety specifications and requirements for connecting devices and towing systems of the state of New York, V.E.S.C. Regulation V-5
and SAE J684.
Form: F205 Rev A 5-6-05