ATAS Standing Seam Shingle User Manual
Page 3
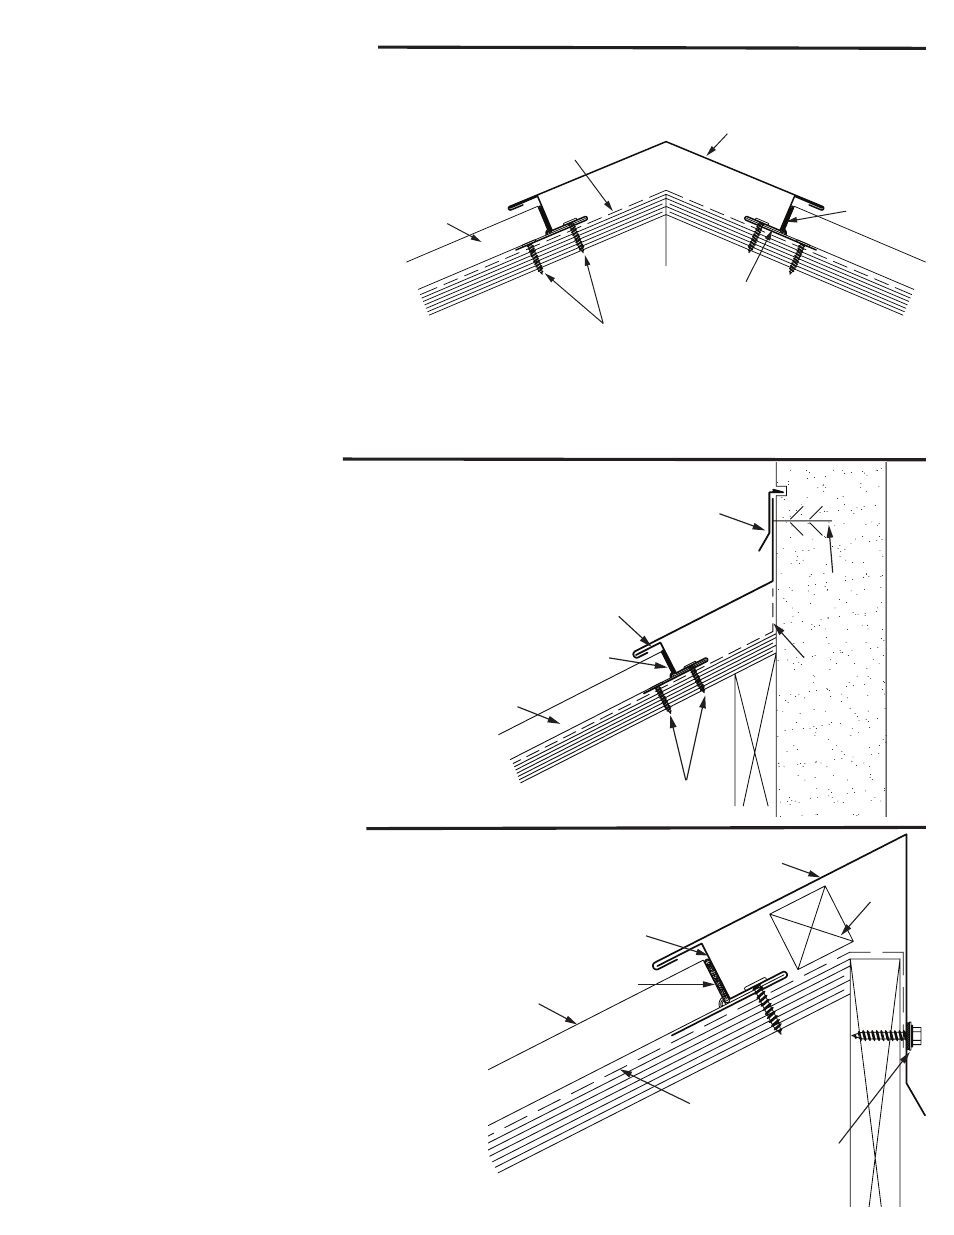
Hip & Ridge Detail
Headwall Detail
Shed Ridge Detail
Hip and ridge applications are handled in the same manner.
1. Install ATA-Guard* over the hip/ridge line.
2. To locate pocket “Z” closure, utilize cap as template and
snap a line. Make sure that “Z” is spaced properly to allow
cap to lock onto pocket “Z”. Tack fasten front leg.
3. Cut shingle to length. Cut formed seams and legs back
11/4” to allow pan of panel to slide into pocket. Fasten
shingle through back leg of “Z” into solid substrate. Use 2
fasteners per panel.
4. Place continuous bead of sealant where the panel
meets the Pocket “Z” Closure.
5. Hook cap on to “Z”, fasten with pop-rivets 12” o.c. Do not
fasten consecutive caps together. Always start with the
lower section and overlap joints 6”, place sealant between
metals.
Ridge caps can accommodate standard ridge venting products.
Refer to venting manufacturer’s instructions and local building
code requirements.
Install ATA-Guard* to the roof and wall transition.
1. To locate pocket “Z” closure, utilize headwall trim as
template and snap a line. Make sure that “Z” is spaced
properly to allow headwall trim to lock into pocket “Z”. Tack
fasten front leg.
2. Cut shingle to length. Cut formed seams and legs back
11/4” to allow pan of panel to slide into pocket. Fasten
shingle through back leg of “Z” into solid substrate. Use 2
fasteners per panel. Hook headwall trim on “Z”, fasten with
pop-rivets and into wall with appropriate fasteners. Do not
fasten consecutive caps together but overlap them with
sealant between the metals.
3. Place continuous bead of sealant where the panel meets
the pocket “Z” Closure.
4. Install counter flashing into reglet over headwall
transition. Seal into reglet with appropriate sealant or place
wall treatment over headwall trim.
1. Install ATA-Guard* over the edge of the peak. Put a 2x2
on top edge for support.
2. To locate “Z” closure, utilize shed ridge cap as template
and snap a line. Make sure that “Z” is spaced properly to
allow shed ridge trim to lock onto “Z”. Tack fasten front leg.
3. Cut shingle to length. Cut formed seams and legs back
1-1/4” to allow pan of panel to slide into pocket. Fasten
shingle through back leg of “Z”. Use 2 fasteners per panel.
Hook shed ridge cap on to “Z”, fasten with pop-rivets 12” o.c.
Do not fasten consecutive caps together but overlap them
with sealant between the metals.
4. Place continuous bead of sealant where the panel meets
the Pocket “Z” Closure.
5. Fasten shed ridge cap onto facade with painted gasketed
screws.
ATA-Guard*
Shingle
#10 x 1” Screw
Sealant
HSA300 Ridge/Hip Cap
HSA930 Pocket
“Z” Closure
HSA930 Pocket
“Z” Closure
ATA-Guard*
Shingle
#10 x 1” Screw
Sealant
Appropriate
Anchor Fastener
Counterflashing
HSA342
Shed Ridge
Trim
ATA-Guard*
Painted Gasketed Screw
Support
Blocking
HSA930 Pocket
“Z” Closure
Sealant
Shingle