Eave detail gable detail valley detail – ATAS Standing Seam Shingle User Manual
Page 2
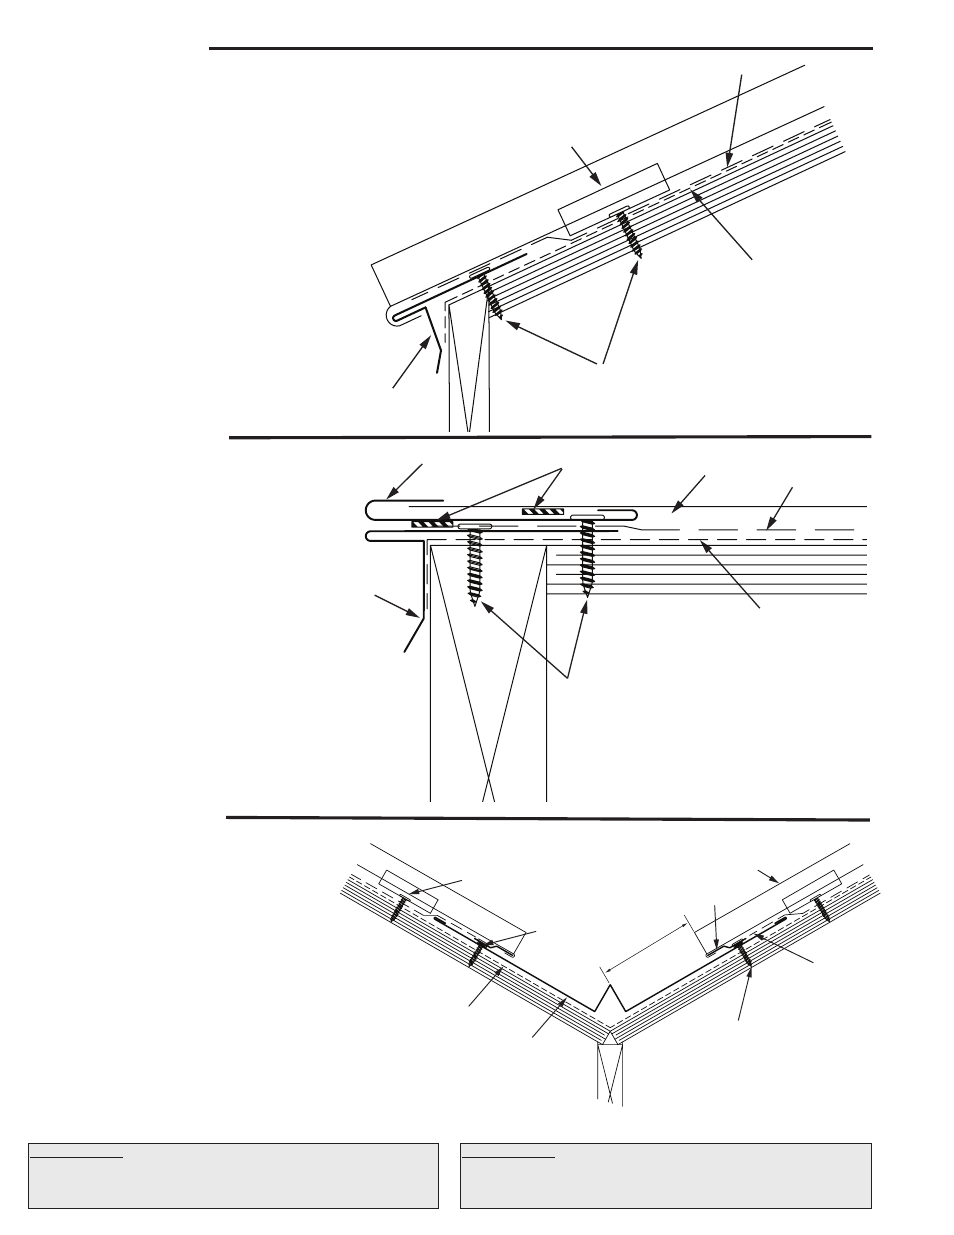
Eave Detail
Gable Detail
Valley Detail
1. In re-roofing applications: cut back and remove
existing shingles and drip edge to be flush with the
eave and gable lines, or as required to install
underlayment.
2. In all applications: apply ATA-Shield** along eave
and up the roof to a point at least 24” beyond outside
face of exterior wall.
3. Install drip edge against fascia trim. Space fasteners
at a maximum of 12” o.c. Overlap drip edge a
minimum of 2”.
4. Place ATA-Guard* on the roof, overlapping drip
edge.
5. Refer to gable and/or valley details as required
before installing panels.
6. Install panel by sliding lower flange over drip edge.
1. Apply drip edge over ATA-Guard* at gable. Make
sure to overlap the drip edge at the eave line. Gable
side on top of eave trim.
2. Apply butyl tape to drip edge. Lay the gable trim
on top of drip edge as shown. Always start with the
lower section and overlap joints a minimum of 3”.
Fasten through butyl tape into solid substrate. Space
fasteners at 12” o.c. max.
3. Cut formed seam from shingle or cut it to width.
(To center panels on roof divide width of roof by 16,
divide leftover by 2 use that number as starting width
for first row of shingles)
4. Install panel by sliding lower flange over drip edge
and slip side into gable trim.
1. Install ATA-Shield** 18” up both sides of the valley
line.
2. Always start with lower section. Install the valley
pan and fasten in conjunction with joggle (see step 3
below). Overlap valley pans at a minimum of 6”. Use
sealant between metals. Install ATA-Guard* 2” over
edge of valley pan.
3. Place joggle cleat on butyl tape 3” from middle of
valley pan and fasten through pan into substrate.
Space fasteners at 6” o.c. max.
4. Cut panel to size and angle, allowing for 1”
fold. Remove 1” from the formed seams on both sides
of panel; bend the panel 1” under to create a lip. Hook
lip into joggle cleat. Fasten panel with clip above
valley pan line.
Underlayments: ATA-Shield** is the recommended self adhesive
underlayment for eaves, sidewall and any critical areas exposed to ice
damming and extensive water run off. Available in 65’-8” x 39 3/8” rolls
(200 sq. ft. per roll).
Underlayments: ATA-Guard* is a polyolefin based, 100% asphalt free,
high strength reinforced roofing underlayment for use beneath
metal roofing on steep slope applications. 1000 sq. ft. per roll at 48”
wide.
Side Seam
Anchor Clip
ATA-Guard*
ATA-Shield**
#10 x 1” Screw
HSA112
Drip Edge
ATA-Guard*
#10 x 1” Screw
Shingle
HSA975 Joggle
Cleat
3”
ATA-Shield**
HSA800
Valley Pan
Butyl Tape
Clip & Fastener
ATA-Guard*
ATA-Shield**
#10 x 1” Screw
HSA112
Drip Edge
Shingle
Butyl Tape
HSA234 Gable
Utility Trim