Eave detail gable detail valley detail, Ata-guard techo tile panel gable trim j-channel – ATAS Techo Tile User Manual
Page 2
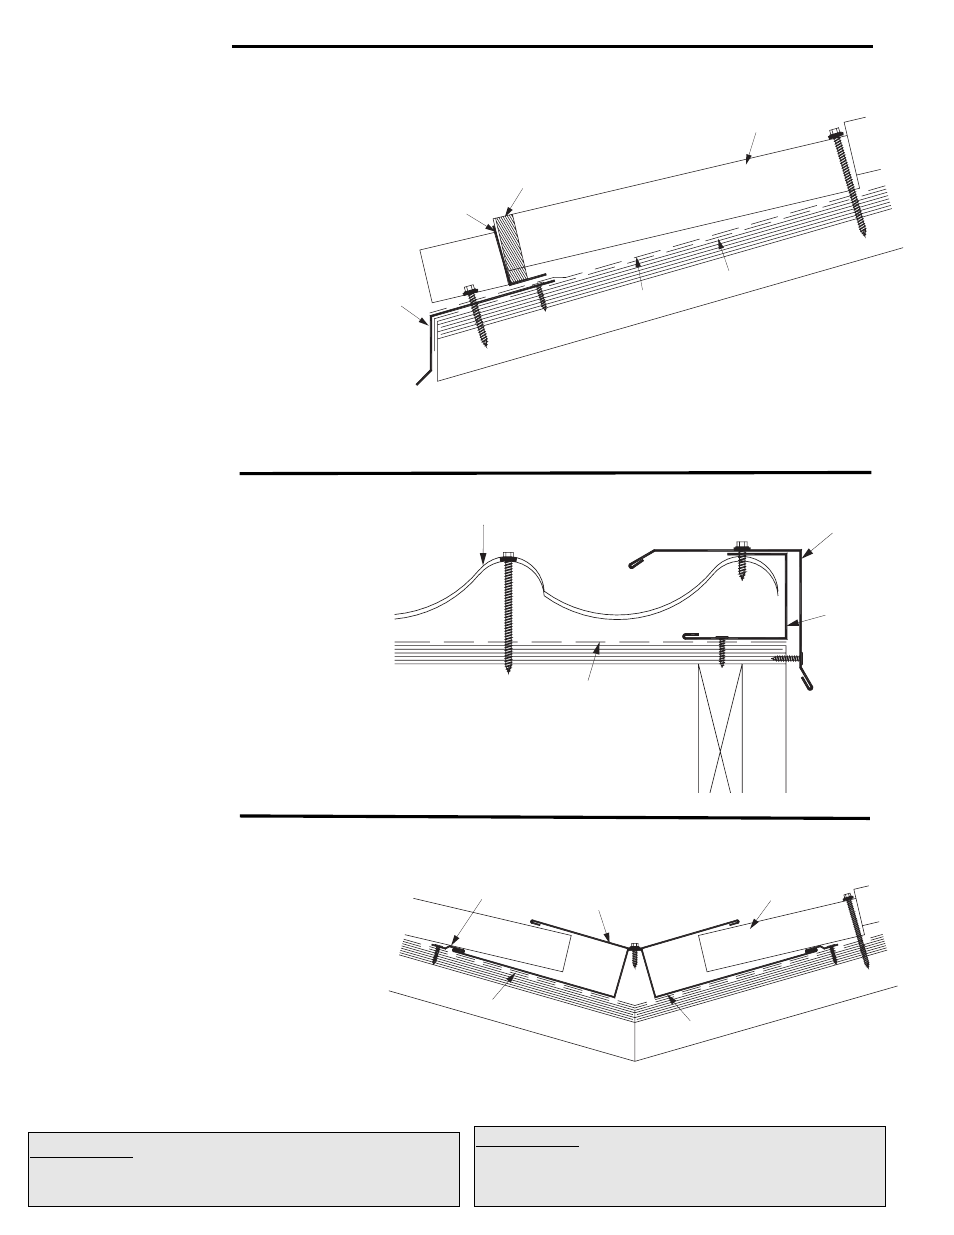
Eave Detail
Gable Detail
Valley Detail
1. In re-roofing applications: cut back and remove
existing shingles and drip edge to be flush with the
eave and gable lines. Apply new eave and gable
trim as detailed.
2. Install ATA-Shield underalyment. Install drip edge.
Install ATA-Guard over drip edge.
3. Install bottom closure angle beyond step,
approximately 4” from edge.
4. Install neoprene strip (optional) behind bottom
angle closure.
5. Fasten panel at low point making sure fasteners
penetrate solid substrate.
1. Install channel flush with gable edge, fasteners
2’ min. o.c. Seal at fastener penetrations.
2.Install first panel or cut last panel to fit and install.
Leave 1/4 - 1/2” space in channel.
3. Place gable trim cap over edge; fasten with
appropriate fasteners.
1. Install ATA-Shield** 19” up both side of the valley line.
2. Install valley sheet, fasten with valley clips
and appropriate fasteners.
3. Cut panel to angle, allow 2” to 3” from center of
valley, depending on length of panel.
4. Install panels on both sides of valley. Locate panel
fastener above valley pan.
5. Install cover (optional) with stitch screws.
Underlayments: ATA-Shield** is the recommended self adhesive
underlayment for eaves, sidewall and any critical areas exposed
to ice damming and extensive water run off.
Available in 65’-8” x 3’ 3-3/8” rolls. (200 sq. ft. per roll).
Underlayments: ATA-Guard* is a polyolefin based, 100% asphalt
free, high strength reinforced roofing underlayment for use on steep
slopes beneath metal roofing. 1000 sq. ft. per roll at 48” wide.
ATA-Guard
Techo Tile Panel
Gable Trim
J-Channel
ATA-Guard
Techo Tile Panel
Valley Clip
Valley Cover
Valley Pan
Eave Trim
Bottom
Closure Angle
Neoprene Closure
ATA-Shield
ATA-Guard
Techo Tile Panel