Installation and connection, Panel mount, Connecting the keypad – Extron Electronics MKP 1200 Keypad User Manual
Page 8: Installing the keypad, Vie w en te r, Attaching the electrical box
MKP 1000/1200 • Installation and Connection
MKP 1000/1200 • Installation and Connection
Installation and Connection
2-3
• For wood, use four #8 to #10 wood or sheet metal screws. A
minimum of 1/2 inch (1.25 cm) of screw threads must penetrate
the wood. If the wood is a 2x4, such as a wall stud, 10-penny or
larger nails may be used.
• For attaching the electrical box to metal, use four #8 to #10 sheet
metal screws (self-tapping) or #8 to #10 machine bolts with
matching nuts.
Panel Mount
The MKP keypads can also be mounted flat on a desk or podium, or on a
control panel or dash board, where the back is protected and does not
require an electrical box. See Figure A-6 in Appendix A for a scaled
cutout template.
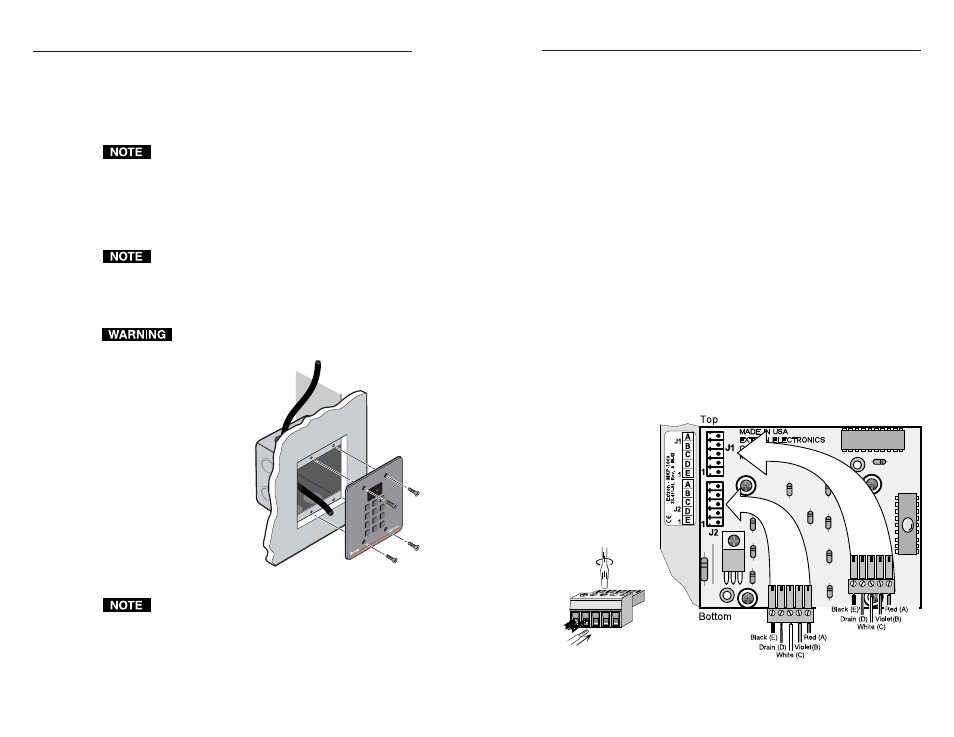
Connecting the Keypad
The MKP keypads can be directly connected to the Matrix 3200/6400
switcher through the switcher’s 5 mm MKP Comm connector pair (see
Figure 2-3). The keypad may be connected to a Matrix 12800 or other
switcher which doesn’t have an MKP connector by interfacing the MCP
1000M (master) remote control panel between the matrix switcher and
the keypad.
Connections on the MKP keypad include two, five-position, 3.5 mm,
receptacles that accept captive screw connectors (also called “terminal
blocks”). The two connectors are the same, with terminals for voltage,
ground and
communication
with the master
switcher (address
0). This allows
for keypads to be
connected in a
daisy chain
configuration, as
shown in Figure
2-5.
Figure 2-2 — Turn the wall plate around to view the
3.5 mm connectors
2-2
VIE
W
EN
TE
R
0
1
2
3
4
5
6
7
8
9
Installing the Keypad
MKP keypads are designed to be used with standard, 2-gang electrical wall
boxes (the MKP 1000 WT uses a wet location rated, 2-gang box), such as
those used for light switches, etc. Figure 2-1 shows how the MKP keypad
can be installed in a wall. This could also be in a desk, a podium, etc.
When installing MKP 1000 WT keypads, you must
install the keypad flush with the front of the electrical
box and run a bead of silicone seal around the front edge
of the box to provide optimum seal.
The procedures provided here assume that the electrical wall boxes and
the cable(s) have been installed for the system. Page 2-7 explains how to
make cables.
The electrical box must be deep enough to accommodate
the electronics on the back of the MKP keypad. See the
specifications on page 1-3 and drawings in Appendix A.
When installing the keypad, the orientation of the unit will be as shown
in Figure 2-1.
Extron provides one electrical box with each MKP
keypad (wet location rated box with MKP
1000 WT). However,
the user may choose
to use a different
box. Because the
tolerances on
electrical
boxes are very
loose, it is
recommended
that you
measure the
actual box that
you plan to use
before making
any precise cuts.
Figure 2-1 — The MKP
keypad mounts in a standard electrical wall box
When installing MKP keypads, you must conform to all
country, state, and local electrical codes.
Attaching the Electrical Box
When installing the electrical box use screws, bolts, or nails, depending
upon the type and thickness of the material to which the box is being
attached.