Installation instructions (continued) – S&B Filters Cold Air Intake Kit - Cotton Filter 75-5039 User Manual
Page 2
15461 Slover Ave., Fontana, CA 92337 - Phone: (909) 947-0015 - Fax: (909) 947-0603 -
Installation Instructions (continued)
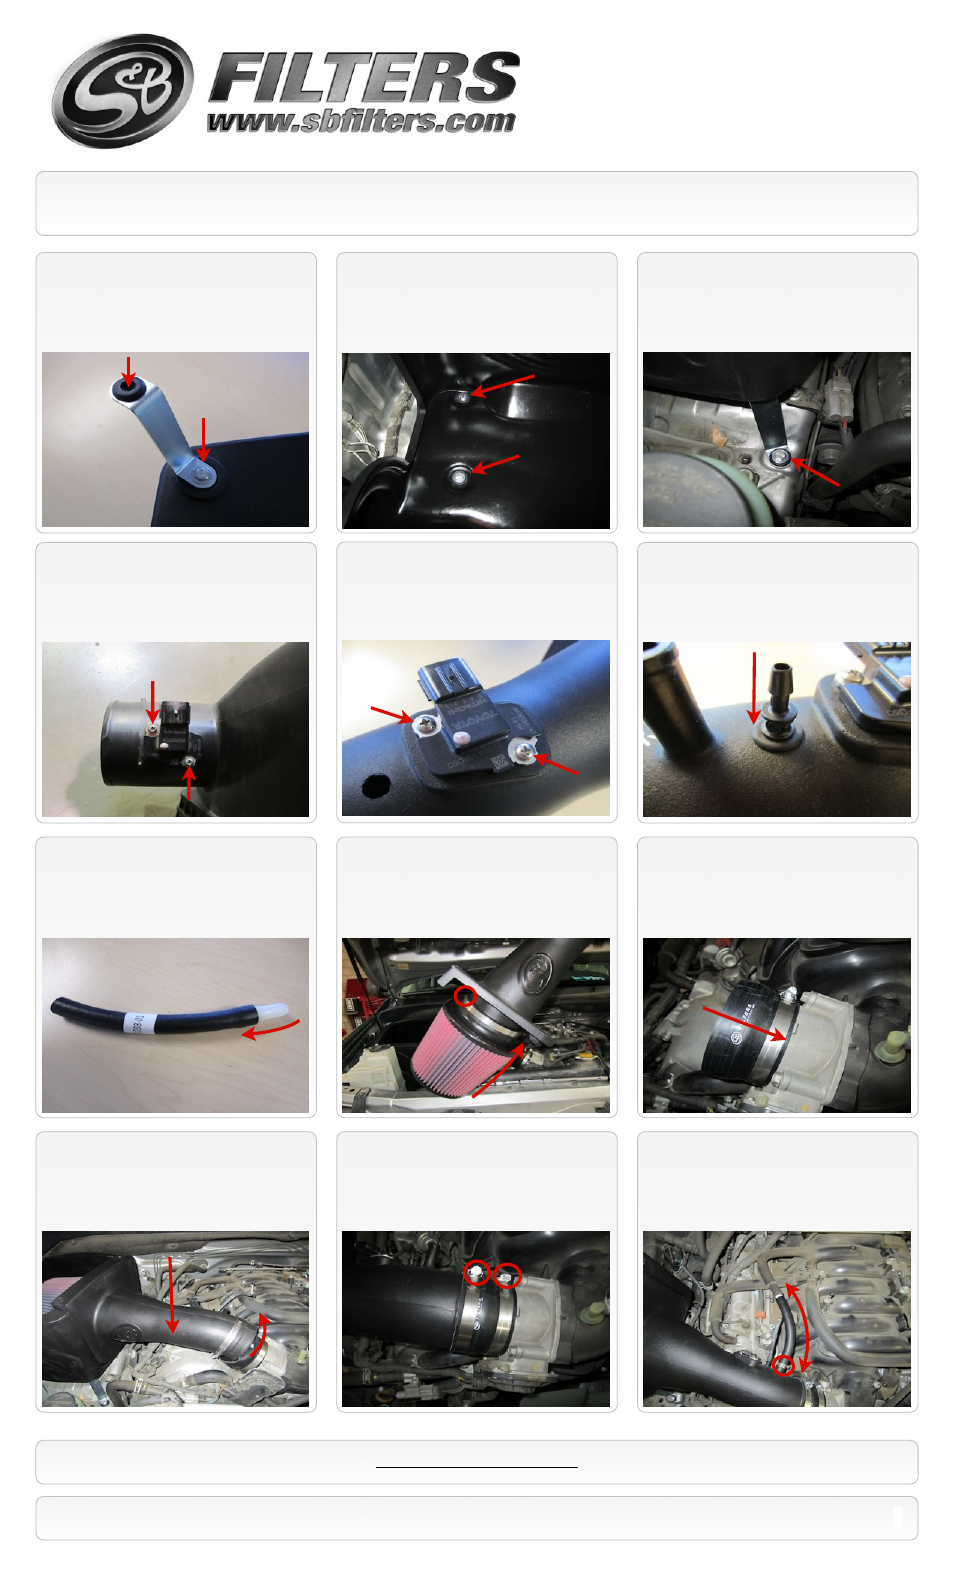
16.
Carefully insert the S&B Filter
(W)
onto
the Intake Tube
(A)
and secure the Hose
Clamp. Note: Position the clamp tightening
screw so it can be accessed through the lid.
13.
With the OE still Secure the MAF sensor
to the Intake Tube
(A)
using the supplied
#8-32 Screws
(S)
. Do not over tighten.
20.
Install the 1/2” Hose mender and hose
extension into the OE crank case vent tube
and reuse the OE clamp. Secure the other
end on the intake tube using the supplied #6
Hose Clamp
(R)
.
14.
Install the Small Grommet
(P)
into the
hole of the Intake Tube
(A)
. Then insert the
large end of the Hose Reducer
(Q)
into the
grommet.
15.
Push the Hose Mender
(O)
into the 1/2”
x 7” Hose
(G)
.
17.
With the #56 Hose Clamp
(H)
in place,
slide the small end of the Silicone Coupler
(X)
over the throttle body. Leave the clamp loose
for now.
2
18.
Slide the #60 Hose Clamp
(I)
over the
intake tube. Push the Intake tube assembly
down onto the lip of the air box and over the
coupler at the same time. Pull the coupler up
and around the end of the tube.
19.
Align the tube and throttle body. Tighten
both hose clamps when you satisfied with the
position.
SEE EXPLODED VIEW ON PAGE 4
P/N: 75-5039 / 75-5039D
10.
Carefully install the air box assembly to
the fender using two of the supplied
M6-1.0x25mm Hex Screws
(L)
and 6mm
Washers
(N)
through the grommets. Leave
hardware loose for now.
9.
Attach the Mounting Bracket
(F)
to the Air
Box
(B)
using the supplied 1/4-20 Hex Screw
(M)
and 1/4” Washer
(N)
. Install the Grommet
(J)
into the large hole of the Mounting Bracket
(F)
.
Apply small amount of thread locker to the screw.
11.
Secure the mounting bracket to the
fender using the remaining M6-1.0x25mm
Hex Screw
(L)
and 6mm Washer
(N)
. With the
fender seal covering the fender opening,
tighten all three screws securing the air box.
12.
Remove the two bolts that secure MAF
sensor from the OE air cleaner housing.