Veris Industries TURBO SERIES Recordal Install User Manual
Page 5

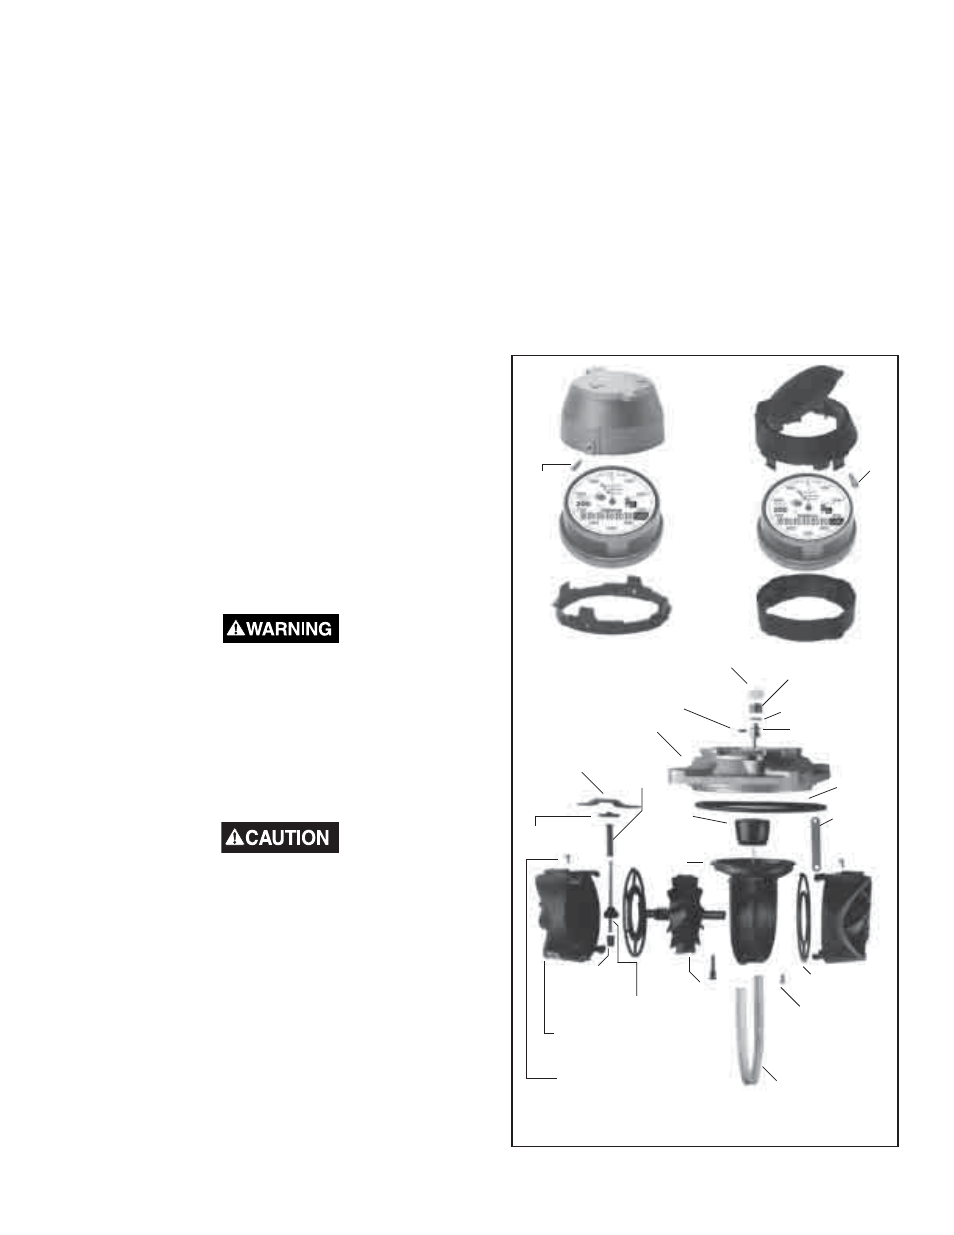
CAGE SET
SCREW
CALIBRATION
RING
CALI-
BRATION
LINKAGE
HEAD
O-RING
CAGE
INSERT
TRANSMISSION
SHAFT GEAR
HOLD DOWN
STRAP
COVER PLATE
CALIBRATION
SHAFT O-RING
CALIBRATION
SHAFT
THRUST WASHER
CALIBRATION
SHAFT LOCK
SCREW
MAGNET
CARRIER
ASSEMBLY
ROTOR
NOSE CONE/
STRAIGHTENING
VANE ASSEMBLY (2)
NOSE CONE
SET SCREW (2)
PROTECTION
TUBE
TRANSMISSION
SHAFT
ASSEMBLY
TRANSMISSION
SHAFT
BOTTOM
BEARING
1. Remove calibration shaft seal plug by puncturing plug in slot
provided and twist/pry plug from hole.
2. Loosen calibration shaft lock screw.
3. Adjust calibration ring with screw driver as follows:
TO INCREASE REGISTRATION. Turn the calibration shaft
clockwise. This will speed up the rotor, increasing registration.
TO DECREASE REGISTRATION. Turn the calibration shaft
counter clockwise. This slows down the rotor, decreasing registration.
NOTE
The total range of the calibration adjustment is about
10%. Tested and calibrated at the factory, the calibra-
tion mechanism will allow for a ±5% adjustment in the
field.
Due to the floating rotor design principle, the calibration
mechanism contains some clearance for proper part fit
resulting in some hysterisis or "deadband" when changing
directions with calibration shaft. Adjustments should be
made in small increments in one direction to avoid need for
counter rotation. If desired setting is exceeded, counter
rotations in small increments should be made, even though
first reverse setting may result in no apparent change.
This is normal, and subsequent changes will cause re-
verse accuracy curve shift.
4. With the calibration shaft turned to the desired setting, tighten the
lock screw while maintaining the calibration shaft position.
5. Retest the meter to confirm the accuracy of the calibration
setting. If the meter is still out of calibration, repeat the procedure.
6. Replace the calibration shaft seal plug with a new one.
Section IV
SERVICING
When the performance of the meter indicates a need for servicing,
refer to the following instructions pertaining to removal, inspection and
installation of service parts and assemblies. With the Recordall
®
Turbo
Series unitized construction, service is simplified with a reduction in
required product maintenance training. Also refer to the illustrated
repair parts list RTS-P-1 for part numbers of replaceable components
for ordering information. If satisfactory repair cannot be achieved,
contact the Utility Division of Badger Meter, Inc.
4-2. REMOVAL OF METER HEAD
Recordall Turbo Series meters can be serviced without removing them
from the line. A typical installation would be equipped with drain and
piping valves. To inspect or replace components of the head assem-
bly, close the upstream and downstream valves. However, if the
installation does not have a drain valve, proceed as follows to relieve
pressure:
Upstream and downstream valves must be closed before
attempting to remove meter head from housing. Failure
to do so can lead to head being "ejected" from housing,
causing personal injury and/or property damage!
a. Loosen each of the head bolts about one and one-half turns.
Do not completely remove the bolts.
b. If the O-ring between the meter head and the housing is secure
and not leaking, pry the measuring element assembly loose by
inserting a screwdriver blade where the head and housing join to-
gether.
Be sure that any water coming out of the meter head
does not spray onto electrical equipment to create a
shock hazard.
c. Allow the meter to drain and relieve internal pressure.
d. When pressure is relieved, remove the head bolts. Lift the
measuring element assembly from the housing.
NOTE
A dummy cover plate is available to close the meter in
the line and continue service while the measuring ele-
ment assembly is being inspected or serviced. (See
illustrated repair parts list RTS-P-1.)
4-3. LOCAL REGISTER AND RTR REMOVAL
The Recordall Turbo Series meter register is easily removable to
facilitate in-line service. Remove the register lid and shroud by
removing the seal screw. The shroud is removed by rotating the
register assembly counter clockwise until it stops. This provides
clearance so it can be lifted off the measuring element assembly (see
Figure 3a and 3b). To reinstall the register, follow the above procedure
in reverse order.
Page 5
4-1. GENERAL
Figure 3a. Register and Measuring
Element Assembly, 1 1/2" - 4"
SEAL
SCREW
SEAL
SCREW
CAGE SEAL
CALIBRATION
SHAFT SEAL
PLUG
