Use the wave dialog box, P.139), Dialog box – KORG XTENDED DEFINITION D32XD User Manual
Page 149: P.139, P.139) to set the location, Reference
139
Counter
Rename
METER
CH
VIEW
MIXER
EFFECT
CD
SYSTEM
MIDI/
SYNC
TEMPO
SONG
TRACK
UNDO
STORE
SCENE
MARK
SCRUB
LOC1/IN
...LOC6
ENTER
MARK
JUMP
REC/PLAY
MODE
Transport
keys
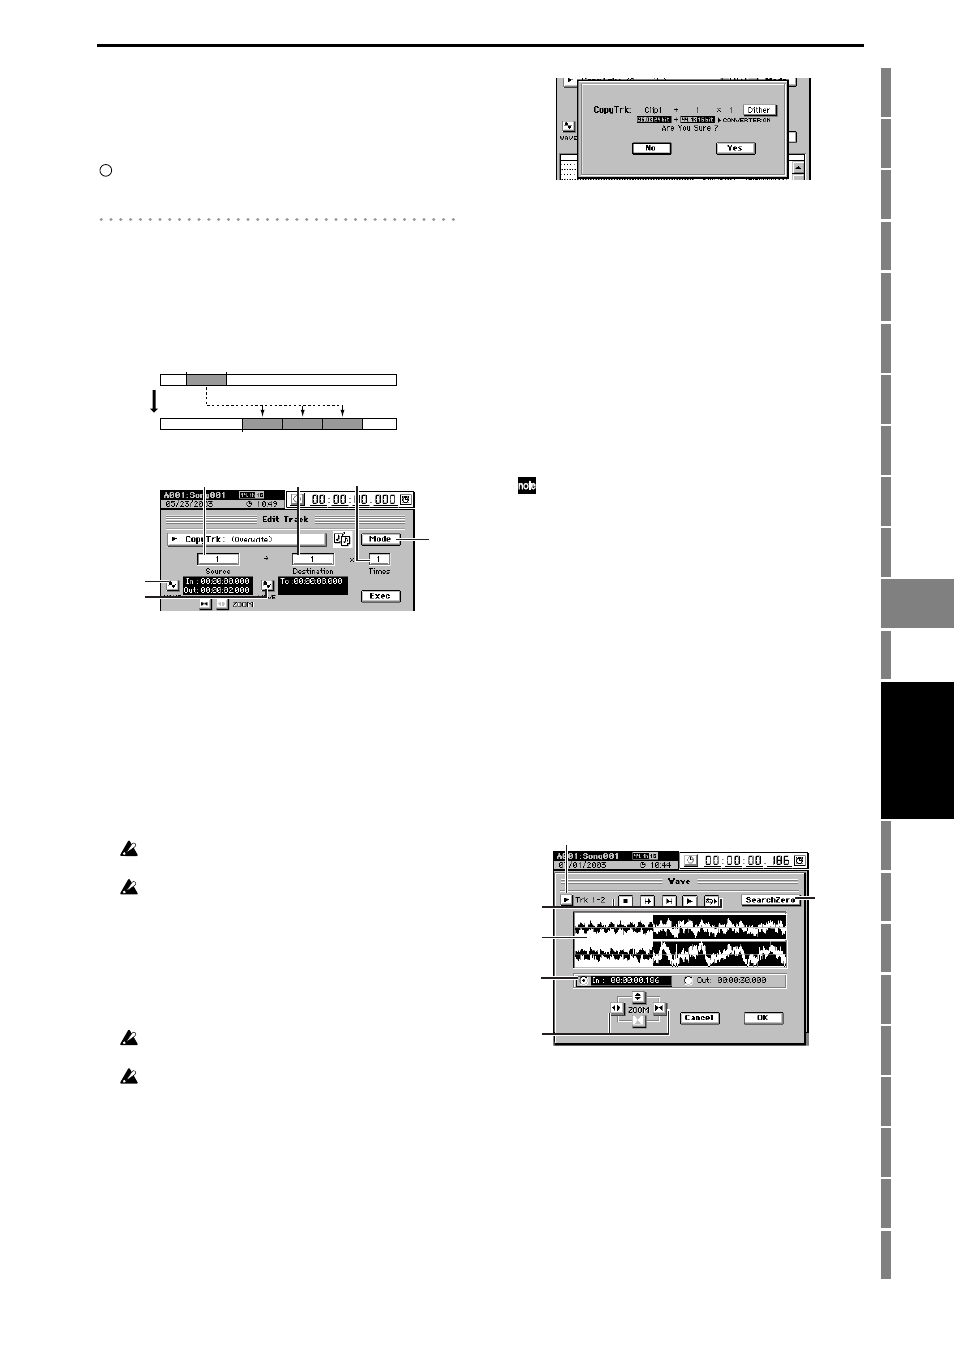
4. Exec.
When you press this button, a dialog box will appear,
allowing you to confirm the editing operation you have
specified. Press the Yes button to execute, or press the No
button to cancel.
Separate explanations are given below for each
editing operation you select in 1. Edit Type.
CopyTrk
This operation copies the audio data in the IN–OUT range of
the copy source track (Source) to the TO location of the copy
destination track (Destination), repeating the specified
number of times.
You can use the clipboard to copy data to a track of a differ-
ent song.
A1. Source
D32XD [1...32, ML, MR, 1-2...31-32,
MST, 1-4...29-32, 1-8...24-32,
1-16, 17-32, 1-32, ALL, Clip#*1]
D16XD [1...16, ML, MR, 1-2...15-16, MST,
1-4...13-16, 1-8...9-16, 1-16, ALL, Clip#*1]
Select the copy source track.
ML
and MR are master track L and R, MST is the master
track, and ALL is tracks 1–16 and the master track.
*1: You can select “Clip#” only if the clipboard contains
data. # indicates the number of tracks in the clipboard.
You can use “Clip#” to copy from a track of a different
song.
For a 96 kHz/24-bit song, you can choose only up to tracks 1–
8.
For D32XD 48 kHz/24-bit or 44.1 kHz/24-bit songs, only
tracks 1-16 can be selected.
A2. Destination
D32XD [1...32, ML, MR, 1-2...31-32,
MST, 1-4...29-32, 1-8...24-32,
1-16, 17-32, 1-32, ALL, Clip]
D16XD [1...16, ML, MR, 1-2...15-16, MST,
1-4...13-16, 1-8...9-16, 1-16, ALL, Clip]
Select the copy destination track.
For a 96 kHz/24-bit song, you can choose only up to tracks 1–
8.
For D32XD 48 kHz/24-bit or 44.1 kHz/24-bit songs, only
tracks 1-16 can be selected.
Using Clip
You can use the clipboard to copy data to a track of a dif-
ferent song.
If you copy between songs that have a different sampling
frequency and/or bit depth, the CopyTrk dialog box will
appear, and the sampling frequency and/or bit depth
will be converted. If the song has a different sampling fre-
quency, conversion will be performed; this will take a cer-
tain amount of time.
2a. Dither
If you turn this button on, dithering will be performed
on the data when the operation is executed. This will
minimize the quantization noise that may occur when
24-bit data is converted to 16-bit data.
A3. Times
[1…99]
Specifies the number of times that the data will be copied.
A4-1. Wave
A4-2. Wave
You can press these buttons to view the waveform of the
track audio.
This allows you to set the editing locations (IN, OUT, TO,
END) more accurately.
Press the A4-1 button if you want to edit IN and OUT, or
press the A4-2 button if you want to edit TO and END.
You will find it convenient to set IN (LOC1), OUT (LOC2),
TO (LOC3), and END (LOC4) to their approximate locations
before you use this function.
A5. Mode
When you press this button, the Copy Mode dialog box
will appear. Select the desired mode and press the OK
button.
OverWrite:
Track data previously at the copy-destination will be
overwritten.
Insert:
The copied data will be inserted, and subsequent track
data will be shifted toward the end of the song.
Wave dialog box
To open this dialog box, press the Source Wave button if
you are setting the “Source” region, or press the Destina-
tion Wave button if you are setting the “Destination”
region.
IN
OUT
TO
SourceTrack
DestTrack
TIMES
A4-1
A5
A1
A2
A3
A4-2
5c
5a
5b
5d
5e
5f
TRACK