3. edit pc file, 4. backup, 3. edit pc file 6-4. backup – KORG XTENDED DEFINITION D32XD User Manual
Page 139: Reference
129
Counter
Rename
METER
CH
VIEW
MIXER
EFFECT
CD
SYSTEM
MIDI/
SYNC
TEMPO
SONG
TRACK
UNDO
STORE
SCENE
MARK
SCRUB
LOC1/IN
...LOC6
ENTER
MARK
JUMP
REC/PLAY
MODE
Transport
keys
6-3. Edit PC File
Here you can view, delete, and rename the folders and files
in the PC drive.
By connecting the D32XD/D16XD’s USB connector to your
personal computer, you can save data from the PC drive onto
your computer.
You can save the following data on the PC drive.
Song data
This is data for each track, mixer settings, and effect set-
tings.
Since this data is in a proprietary Korg format, it cannot
be played back or edited as audio data on any device
other than the D32XD/D16XD, such as a computer. In
order to play this data, you must Restore it into the
D32XD/D16XD.
User data
This is user-editable data such as user effect program
data and compressor program data. Since this data is in a
proprietary Korg format, it cannot be edited on a compu-
ter or other device.
In order to use this data, you must Restore it into the
D32XD/D16XD.
Audio files
Audio files are 44.1/48/96 kHz, 16-bit/24-bit WAV for-
mat data. For details on creating audio files, refer to “2-2.
Exporting an audio file” (
For details regarding limitations on files, refer to “More about
drives and files” (
Do not delete files named “AUTORUN.INF” or “KORG02.ICO
[*KORG01.ICO],”
since these contain settings.
1. File list
This area lists the files.
Upper area: PC folder names (:folder names…)
Lower area: folders/file names
2. Close
Moves to the next higher folder level.
3. Open
If a folder is selected, opens that folder.
4. Rename
Renames a file (
For details regarding limitations on file names, refer to
“More about drives and files” (
5. Delete
Deletes the selected file.
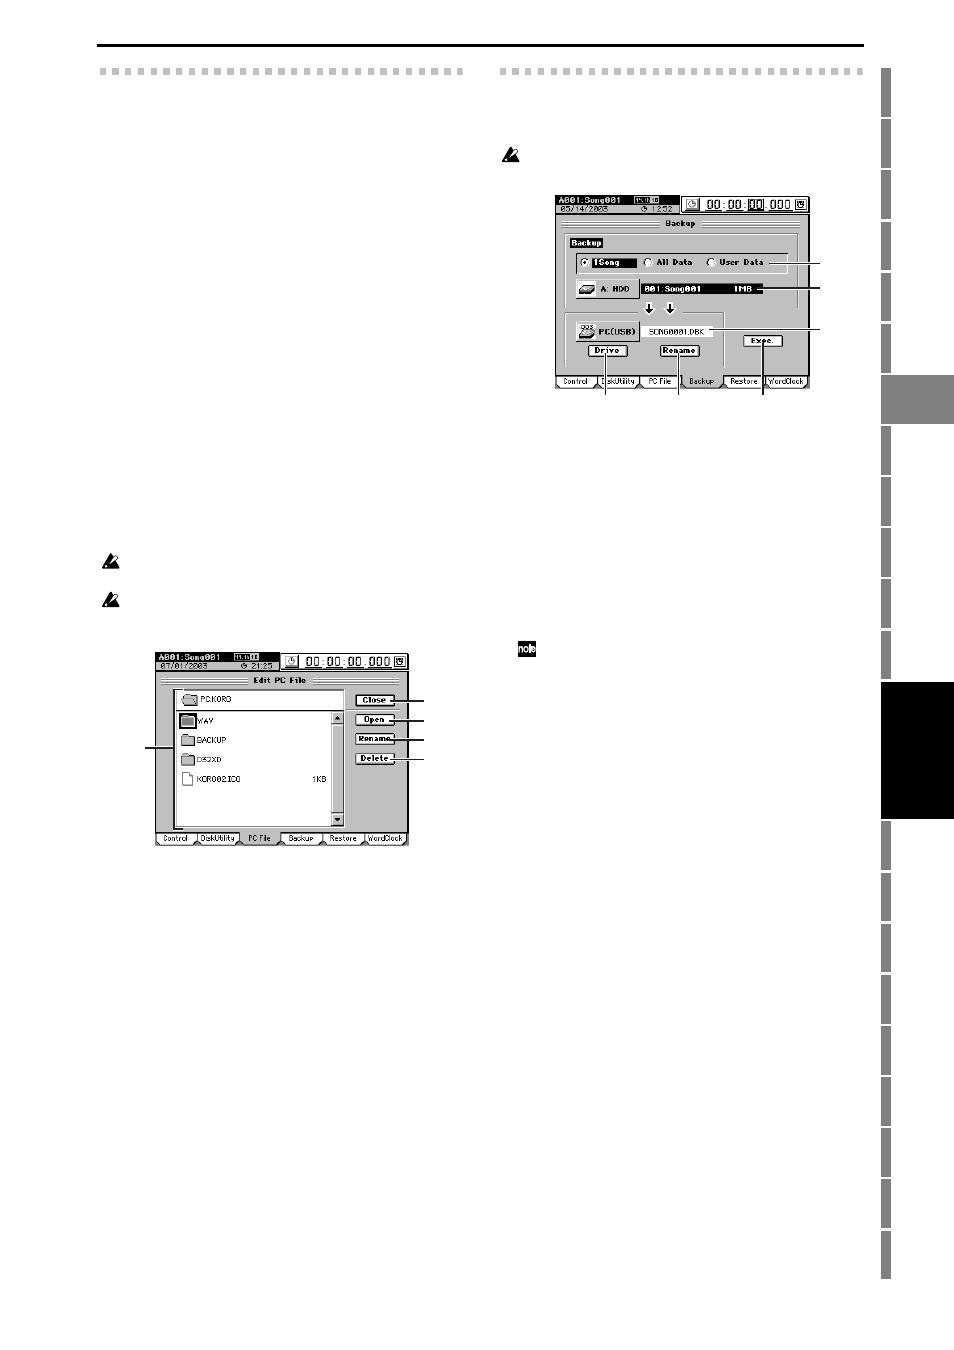
6-4. Backup
This operation saves back-up data to CD-R, CD-RW, or the
PC drive.
For details regarding limitations on files, refer to “More about
drives and files” (
1. Backup
[1Song, All Data, User Data]
Select the type of data that you want to back up.
1Song
From the selected drive, back up the data for one song,
and the user data.
All Data
Back up all song data on the selected drive, the user
data, and the Album CD Project.
User Data
Backup only the user data (user effect programs, user
EQ library, user comp programs)
Song Effect Programs are backed up as song data (1 Song, All
Data); they are not included in User Data.
2. Backup source
This displays the drive etc. for the song you selected in
the SONG, “SelectSong” tab page (
→p.135).
Depending on the contents of the backup, the backup-
source drive, song number, song name, user effect data,
and the size of the backup data will be displayed.
3. Backup destination
This displays the backup-destination drive and the name
of the file in which the data will be saved.
4. Drive
[CD, PC (USB)]
This selects the backup-destination drive. The Select
Drive
dialog box will appear when you press this button.
Use the radio buttons to select a drive, and press the Yes
button.
5. Rename
This lets you rename the backup file. Press this button to
display the Rename dialog box. Edit the file name and
press the OK button.
For details on the allowable file names, refer to “More
about drives and files” (
6. Exec.
This executes the backup.
Press this button and the Backup dialog box will appear,
showing the space required for the backup.
• If you are backing up to the PC drive, check the free
space and press the Yes button.
• If you are backing up to CD, prepare the necessary
number of CD-R/RW media to accommodate the
backup, specify the writing speed, and press the Yes
button.
2
3
4
5
1
1
6
2
3
5
4
SYSTEM