Tr-s section, Front panel – Roland DJ-505 2-Channel, 4-Deck DJ Controller for Serato DJ User Manual
Page 8
8
Panel Descriptions
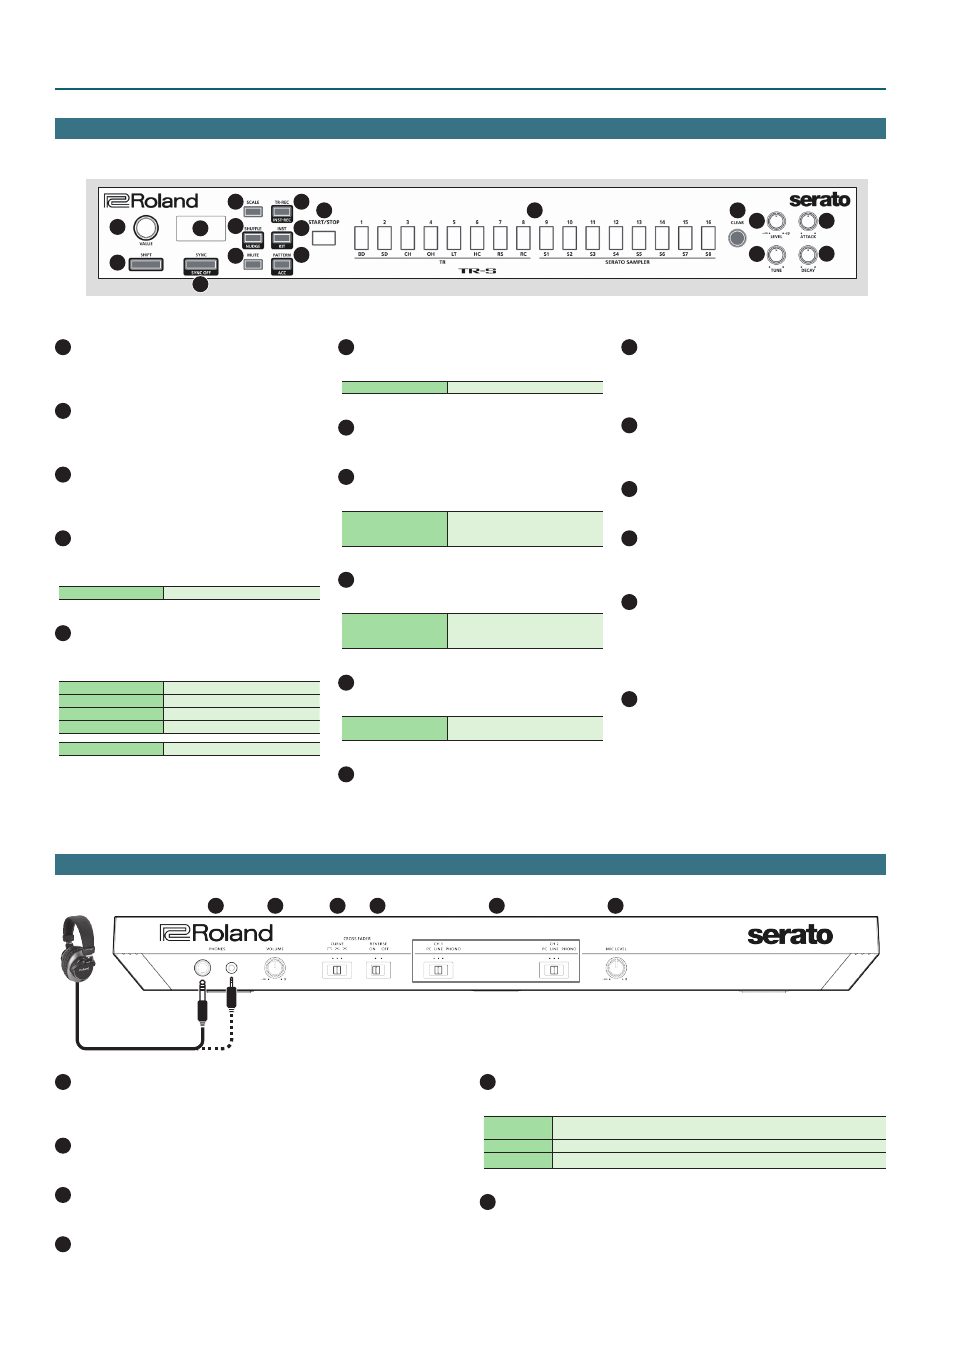
TR-S Section
This is a 16-step sequencer. You can create rhythm tracks using sounds of the Roland TR-808 rhythm machine etc. or samples in Serato DJ.
1
2
3
4
5
6
7
8
9
10
11
12
13
14
15
16
17
1
[VALUE] knob
Changes the value of settings such as tempo,
pattern scale, or shuffle.
2
[SHIFT] button
You can recall other functions by holding down
this button and pressing another button.
3
Display
This shows various information depending on
the operation.
4
[SYNC] button
Synchronizes the tempo of the rhythm to the
tempo of Serato DJ.
[SHIFT] + [SYNC]
Disables tempo synchronization.
5
[SCALE] button
Selects one of the following choices as the time
value of one step.
8th note triplet (
¯
)
Three steps will be one beat.
16th note triplet (
´
)
Six steps will be one beat.
16th note (
˜
)
Four steps will be one beat.
32nd note (
`
)
Eight steps will be one beat.
[SHIFT] + [SCALE]
Specifies the last step.
6
[SHUFFLE] button
Adjusts shuffle (rhythmic swing).
[SHIFT] + [SHUFFLE]
Sets the nudge setting.
7
[MUTE] button
Mutes the selected instrument.
8
[TR-REC] button
Lets you step-record a pattern.
[SHIFT] + [TR-REC]
Lets you realtime-record a pattern
using the performance pads
(INST-REC).
9
[INST] button
Select the instruments when using TR-REC.
[SHIFT] + [INST]
Sets the kit for instruments, or
switches the sample bank in
Serato DJ.
10
[PATTERN] button
Lets you select rhythm patterns 1–16.
[SHIFT] + [PATTERN]
Adds an accent to the step when
using TR-REC.
11
[START/STOP] button
Plays/stops the pattern.
12
TR-S pads [1]–[16]
Use these buttons to turn steps on/off, to select
patterns/instruments, or to assign samples of Serato DJ
as instruments.
13
[CLEAR] button
Deletes the content recorded by TR-REC for a
specific instrument, or deletes the pattern.
14
[LEVEL] knob
Adjusts the volume of the selected instrument.
15
[TUNE] knob
Adjusts the tuning (pitch) of the selected
instrument.
16
[ATTACK] knob
Adjusts the strength of the attack for the
selected instrument.
* This has no effect for some instruments, or
when a sample is selected in Serato DJ.
17
[DECAY] knob
Adjusts the length of the decay for the selected
instrument.
* This has no effect when a sample is selected
in Serato DJ.
Front Panel
Headphones
1
2
3
4
5
6
1
[PHONES] jacks
Connect headphones here.
Stereo 1/4” (Ø 6.3 mm) and stereo 1/8” (Ø 3.5 mm) plugs are supported.
2
[VOLUME] knob
Adjusts the volume of the headphones.
3
[CROSS FADER] switch
Switches the response curve of the cross fader.
4
[REVERSE] switch
Reverses the left/right operation of the cross fader.
5
[CH 1], [CH 2] switches
Select the input source for each channel.
PC
The sound loaded into the Serato DJ deck is the source.
Select this if you’re using DVS.
LINE
The line level input is the source.
PHONO
The phono level (MM type cartridge) input is the source.
6
[MIC LEVEL] knob
Adjusts the output volume of the mic.