Backing up or restoring tr-s data, Using the dj-505 in stand-alone mode – Roland DJ-505 2-Channel, 4-Deck DJ Controller for Serato DJ User Manual
Page 21
21
Operating the DJ-505
Synchronizing the TR-S Tempo with the Serato DJ Tempo
If you press the TR-S [SYNC] button, the tempo of the TR-S is synchronized
with the tempo of the song that’s loaded into the deck.
The tempo shown in Serato DJ’s virtual deck will be the same as the tempo
shown in the TR-S display.
Backing Up or Restoring TR-S Data
Backup
Here’s how to back up all patterns and instrument settings of the TR-S to
your computer.
1
While holding down the TR/SAMPLER [CUE] button, turn on the
power.
TR-S pads [1]–[16] and performance pads blink green.
2
Use a USB cable to connect the DJ-505 to your computer.
TR-S pads [1]–[16] and performance pads light green.
3
On your computer, open the “Roland” drive.
4
Open the “BACKUP” folder, and copy all files from dj_prm_kit1.
prm through dj_prm_kit12.prm and dj_prm_ptn1.prm through
dj_prm_ptn16.prm to your computer.
5
When copying is completed, operate your computer to eject
the “Roland” drive.
6
Disconnect the USB cable.
TR-S pads [1]–[16] and performance pads return to blinking green.
7
Turn off the power.
Restore
Here’s how to restore the backed-up TR-S data from your computer to the
DJ-505.
1
While holding down the TR/SAMPLER [CUE] button, turn on the
power.
TR-S pads [1]–[16] and performance pads blink green.
2
Use a USB cable to connect the DJ-505 to your computer.
TR-S pads [1]–[16] and performance pads light green.
3
On your computer, open the “Roland” drive.
4
Copy the backup files into the “Roland” drive’s “RESTORE”
folder.
5
When copying is completed, operate your computer to eject
the “Roland” drive.
6
Disconnect the USB cable.
7
Wait until the TR-S pads [1]–[16] and performance pads
blinking green.
NOTE
Never turn off the power until the TR-S pads and performance pads
blinking green.
8
Turn off the power.
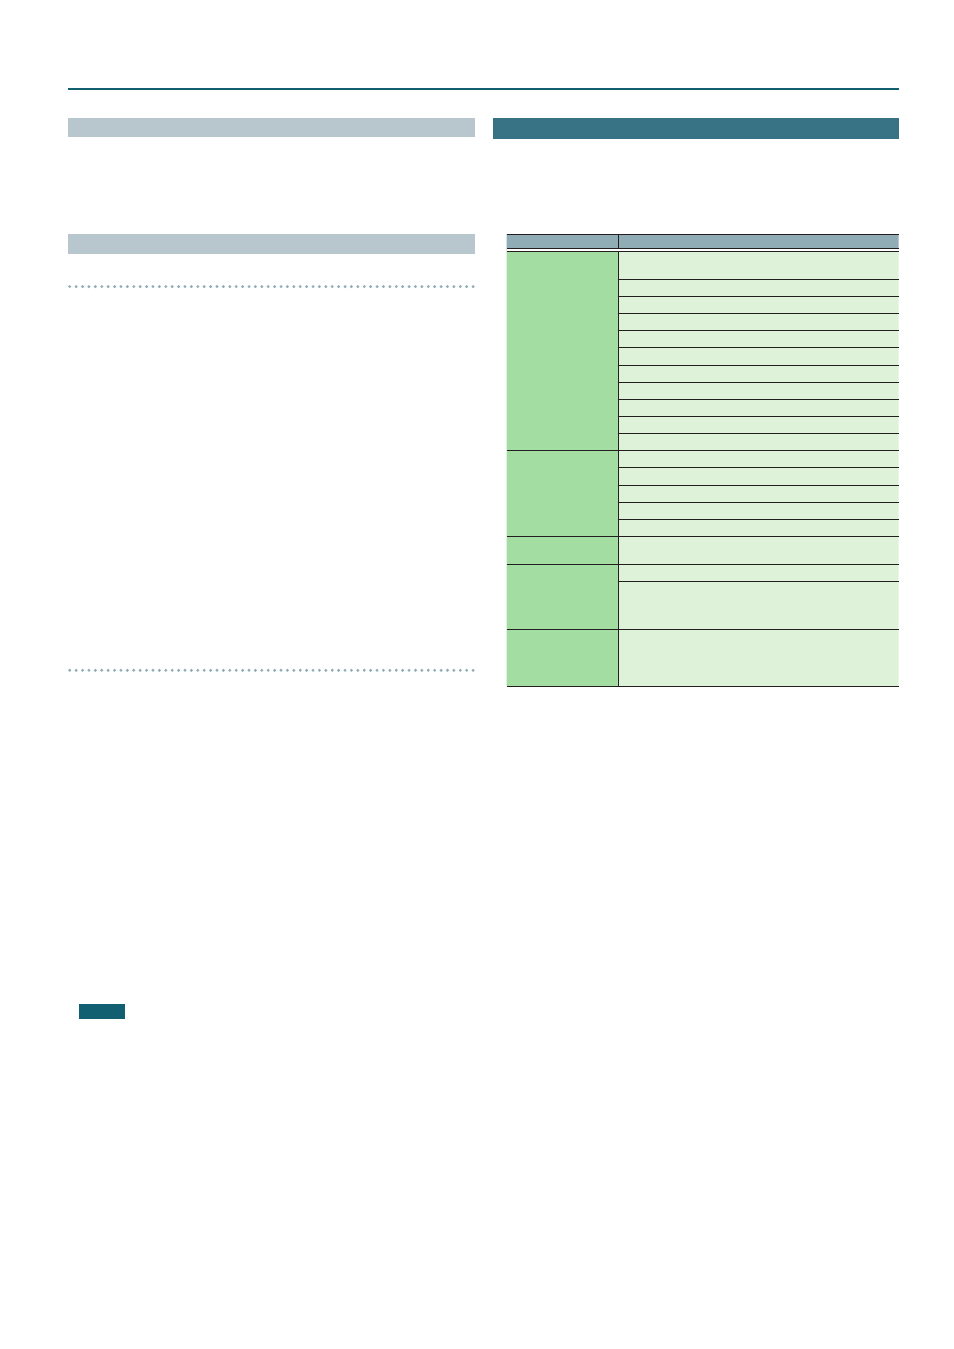
Using the DJ-505 in Stand-Alone Mode
You can use the DJ-505 when it is not connected to Serato DJ (when Serato DJ
is not running).
In stand-alone mode, you can use the following functions in each section
of the DJ-505.
Section
Available functions
Mixer section
[TRIM] knobs
* Does not work if the [CH 1] or [CH 2] switch is set to “PC.”
[HI], [MID], [LOW] knobs
[FILTER] knobs
Channel [CUE] buttons
Channel faders
[MASTER LEVEL] knob
[BOOTH LEVEL] knob
[MIXING] knob
[TR/SAMPLER LEVEL] knob
TR/SAMPLER [CUE] button
Cross fader
Front panel
[CROSS FADER CURVE] switch
[CROSS FADER REVERSE] switch
[CH 1], [CH 2] switches
[VOLUME] knob
[MIC LEVEL] knob
TR-S section
All functionality can be used except for Serato Sampler playback
and the [SYNC] button.
Deck section
A MIDI message is transmitted when you operate a button/knob.
Performance pads
* With the default settings, the unit is in TR mode. You can switch
to another mode, but in modes other than TR mode, pressing a
button or pad only transmits MIDI messages.
Others
5
When you move (press) a top panel controller (except for the
controllers of the TR-S section), MIDI messages are transmitted.
5
MIDI messages are transmitted from the PC port. Only MIDI
messages for synchronization are transmitted from the MIDI OUT
connector.