Parts names /各部の名称 – MINOURA Porteur Rack KCL-3F User Manual
Page 3
4.
ステーを前フォークのクラウン部(三つ又の付け根部)にある
孔に仮止めします。(図 E)
もしお使いになる自転車の前フォークに取り付け用の孔がな
い場合は、前ブレーキ(キャリパーブレーキ)をいったん分
解して、その軸に共締めすることになります。
ただし重要保安部品であるブレーキの分解はとても繊細です
ので、必ず整備士資格のあるショップにお任せください。
もし個人で取り付けた場合、そのことによる一切の不具合に
ついて弊社ではその責任を負いかねます。
5.
キャリアが水平になるようにステーの突き出し長さと曲げ角度
を調節してから、キャリア本体側の M6x15 キャップボルトを
しっかりと締め付けて固定します。(図 E)
(締付けトルク:5 N.m)
!
!
前フォークは前後を M6 平ワッシャで挟みます。
またボルトとステーとの間にも平ワッシャを挟むのを忘れな
いでください。
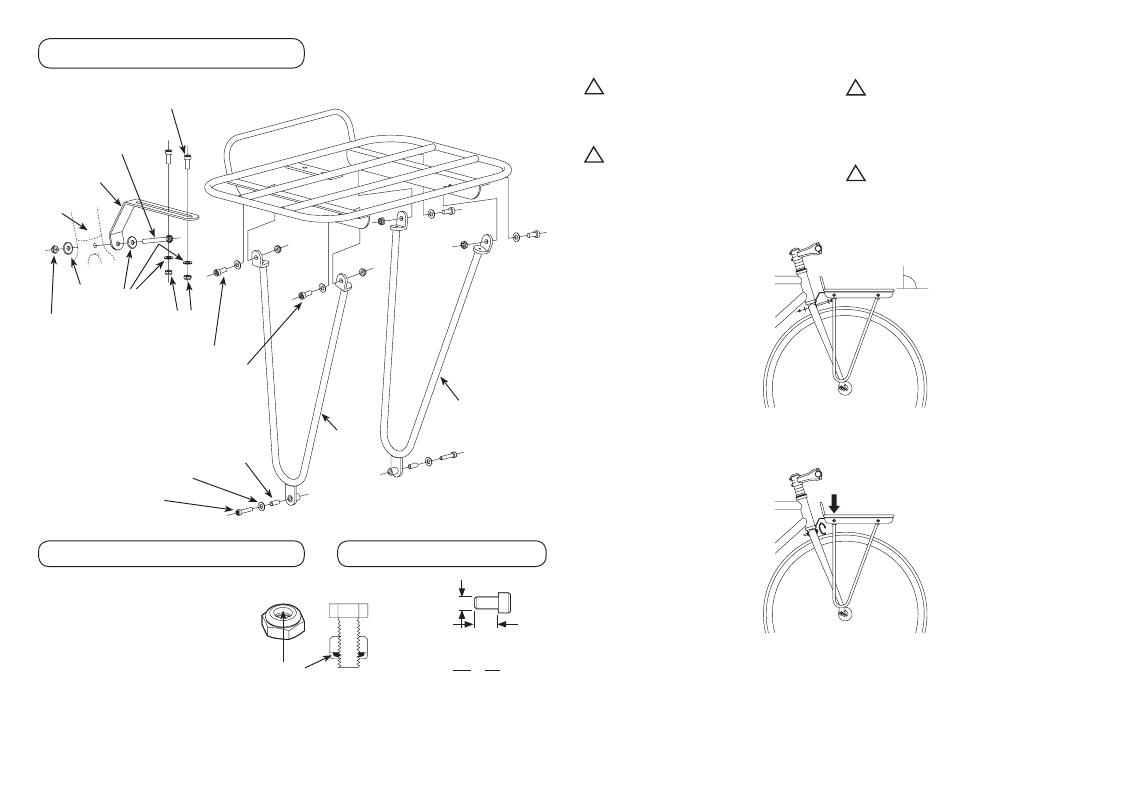
4.
Temporally install the Mount Stay to the hole on the fork crown
(the shoulder part of the front fork). (Fig. E)
5.
Adjust the length and bent angle of the Mount Stay to make the
rack level, then tighten the M6x15 cap screws firmly. (Fig. E)
[Tighetining Torque : 5 N.m]
You may have to disassemble the front brake (caliper
brake) to set the stay to the brake pivot bolt if your fork
doesn't have the hole.
Ask a certified professional to help if needed. Minoura is not
responsible for any result caused by improper installation.
!
!
Put two M6 washers in front and behind the front fork.
Do not miss the washer between the bolt and the Mount
Stay.
Diameter 径
Length 長さ
Ex. 例)
M6 x 35
Diameter 径
Length 長さ
Nylon nuts are used and have a soft plastic ring that keeps
them from loosening.
It's normal to feel some resistance when tightening. Make
sure to tighten all the way.
Nylon nut is not designed to repeat loosening &
tightening so often.
ナットにはナイロンナットといって内側に樹脂製の
リングを持つ緩み止め機能のあるものを採用しています。
ボルトのネジ山が樹脂リングを圧縮する摩擦抵抗が
緩み止め効果になります。
途中で締め込みが固くなるのは異常ではありません。
それを越えて最後まで締めてください。
締め付けにはスパナが必要です。
ナイロンナットは何度も繰り返して締め直すことには
向いていません。
- 5 -
- 2 -
Cap Screw M6x15
キャップボルト M6x15
< Torque:5 N.m >
Hex Bolt
M6x35 or M6x55
六角ボルト
M6x35 または M6x55
< Torque:5 N.m >
Cap Screw M6x15
M6 Washer (Small)
M6 Nut
キャップボルト M6x15
M6 平ワッシャ(小)
M6 ナット
< Torque:5 N.m >
Cap Screw M5x25
キャップボルト M5x25
< Torque:3 N.m >
Left Side Leg
左脚
Right Side Leg
右脚
Mount Stay
取り付けステー
M6 Washer (Large)
M6 平ワッシャ ( 大 )
M6 Nut
M6 ナット
M6 Nut
M6 ナット
Copper Sleeve
銅パイプ
M5 Washer
M5 平ワッシャ
Front Fork
前フォーク
Parts Names /各部の名称
Plastic Ring
樹脂リング
Bolt Size Spec /ボルトサイズ表記
About Nylon Nut /ナイロンナットについて
6.
Tighten the hex head bolt and nut on the fork crown fimrly while
pushing the rack downward to make the gap zero between the
Mount Stay and the hex bolt. It will increase the rack stability at
maximum level. (Fig. F)
[Tighetining Torque : 5 N.m]
6.
キャリアを下向きに押し付けて取り付けステー上の孔とボルト
とのがたを取り去った状態で、フォーク取り付けの六角ボルト
とナットとをしっかりと締め付けて固定します。(図 F)
(締付けトルク:5 N.m)
90°
(Fig. E /図 E)
(Fig. F /図 F)
7.
最後に、すべてのボルトががたつきなく取り付けられているか
どうかを確認してください。
7.
Finally, check all bolts and nuts are fimrly tightened.