Before assembling, 組み立ての前に, How to assemble kingcarrier /キャリアの取り付け方 – MINOURA Porteur Rack KCL-3F User Manual
Page 2
Before Assembling /
組み立ての前に
For 700c Road & CrossBike
700c ロード・クロスバイク用
For MTB, 650c Road
MTB・650c ロード用
Q/R Mount Bracket /クイック取付金具
Required Tools
必要な工具
1 x M5 Hex Wrench
1 x M5 六角レンチ
1 x M6 Hex Wrench
1 x M6 六角レンチ
2 x 10mm Spanner
2 x 10mm スパナ
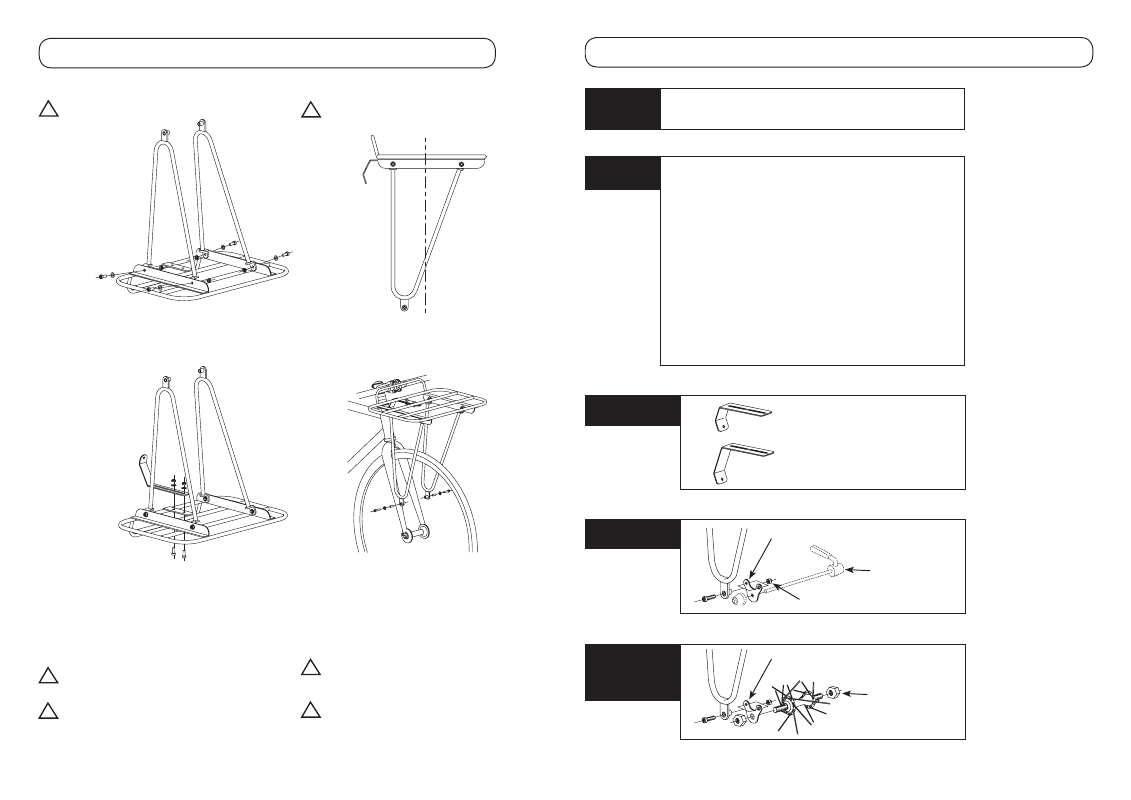
1.
Assemble the Legs to the inside of the under frame. (Fig. A)
1.
左右の脚をキャリア本体下枠の内側に取り付けます。(図 A)
1 x Rack Body
1 xキャリア本体
1 x Right Side Leg
1 x右脚
1 x Left Side Leg
1 x左脚
1 x Mount Stay (for 700c)
1 x取り付けステー(700c 用)
1 x Mount Stay (for 650c/26")
1 x取り付けステー(650c/26" 用)
2 x Axle Mount Bracket
2 xアクスル取り付け用金具
1 x Hex Bolt M6x35
1 x六角ボルト M6x35
1 x Hex Bolt M6x55
1 x六角ボルト M6x55
6 x Cap Screw M6x15
6 xキャップボルト M6x15
2 x Cap Screw M5x25
2 xキャップボルト M5x25
5 x M6 Washer (Large)
5 x M6 平ワッシャ(大)
4 x M6 Washer (Small)
4 x M6 平ワッシャ(小)
2 x M5 Washer
2 x M5 平ワッシャ
7 x M6 Nut
7 x M6 ナット
2 x M5 Nut
2 x M5 ナット
2 x Copper Sleeve
2 x銅パイプカラー
Parts List
部品明細
Check to make sure there
are no missing parts before
assembling.
組み立て前にすべての部品が
揃っているかどうかをお確かめ
ください。
Cap Screw means the bolt
with cylindrical head with hex
shaped hole on top.
キャップボルトとは、円筒形の
頭に六角形の穴があけられてい
るもののことです。
Mount Stay Difference
取り付けステーの違い
2.
キングキャリアには2つの異なったサイズの取り付けステーが
付属しています。装着する自転車に合わせて適する方を選んで
ください。
ステーをキャリア下部に M6x15 キャップボルト・M6 平ワッシャ
(大)・M6 ナットとで仮止めします。(図 C)
クイック共締め金具には2つの孔があります。
通常は後ろ側になる方の孔は泥よけなどを取り付けるための
もので、キャリアは前側の方の孔に装着します。
脚は左右対称ではありません。V字型をした脚はわずかに
傾いた形をしています。V脚下部の取付金具部分が後ろ寄
りになる方向で取り付けてください。(図 B)
!
!
2.
The kit comes with two different sized Mount Stays. Choose the
appropriate one to your bike's wheel size.
Attach the Mount Stay underneath the rack frame with M6x15
cap screws, M6 washers (large) and M6 nuts. Tighten temporally.
(Fig. C)
Note: The legs are not symmetric. The bracket on the
bottom is opposite of the center.
(Fig. B)
The bracket has two holes. The rear hole is in case you want
to use a mudguard. The front hole is for installing the rack.
!
!
Q/R Mount Bracket
クイック取付金具
Choose appropriate one to your
bike wheel size.
お使いの自転車のホイールサイ
ズに合わせて、適合する方を使
用します。
Use this bracket (incuded) for
mounting the rack if your front
fork doesn't have the braze-on
on its end and features quick
release skewer.
先端にキャリア取り付け用のダ
ボ孔がない前フォークでクイッ
ク式の場合には、この金具を前
輪クイックに共締めしてキャリ
アを取り付けます。
M5 Nut / M5 ナット
Quick Release Skewer
クイックレリーズ
!
もし前フォークのダボ孔のネジサイズが M5 ではなく M6
だった場合には、先端のパイプには銅パイプは使用しません。
使用するのは M5 の場合のみです。
また M6 だった場合の取り付けボルト (M6x25) は添付され
ておりません。ご自身でご用意ください。
The included copper sleeve is only for use if you use the
included M5 bolt. An M6 bolt can be used without the
copper sleeve.
M6 bolt (suitable size is M6x25) is not included.
!
How To Assemble KingCarrier /キャリアの取り付け方
- 3 -
- 4 -
Axle Mount Bracket
(Option)
ハブナット取付金具
(別売)
Use this optional bracket for
mounting the rack if your front
fork doesn't have the braze-on
on its end and features fixing
nut type hub.
先端にキャリア取り付け用のダ
ボ孔がない前フォークでハブ
ナット式の場合に、この金具を
前輪車軸に通してキャリアを取
り付けます。
Nut Type Hub
ナット固定式ハブ
Axle Mount Bracket /ハブナット取付金具
3.
Install the Legs to the threaded hole on the front fork.
Insert the copper sleeve into the tube on the bracket, then screw
the M5x25 cap screw to the hole through the copper sleeve.
(Fig. D)
[Tightening Toruque : 3 N.m]
If there is no threaded hole on the front fork, use the supplied
Axle Mount Bracket to mount the rack on the front wheel quick
skewer axle.
3.
脚を前フォーク上にあるダボ孔に取り付けます。
脚先のパイプに銅パイプを挿入してから M5x25 キャップボルト
を差し込み、そしてダボ孔にねじ込みます。(図 D)
(締付けトルク:3 N.m)
もし前フォークにダボ孔がない場合は、添付のクイック共締め
金具を使用して前輪クイックレリーズのシャフトに取り付け場
所を作ってそこにねじ込み、反対側からナットで止めます
。
(Fig. A /図 A)
(Fig. B /図 B)
(Fig. C /図 C)
(Fig. D /図 D)
< Backside /後ろ側>
< Foreside /前側>
Foreside
/前側
Backside
/後ろ側