Airaid 400-141-1 User Manual
Installation instructions, Component identification
Installation Instructions
For Part Numbers:
400-141-1
700-445 Airaid Oiled Media Filter
401-141-1
701-445 SynthaMax Dry Media Filter - Red
402-141-1
702-445 SynthaMax Dry Media Filter - Black
403-141-1
703-445 SynthaMax Dry Media Filter - Blue
2005-08 Ford F-150 4.2L V6
2004-08 Ford F-150 4.6L V8
*Does Not Fit Heritage Body*
*Does Not Fit Vehicles Built After Jan 1, 2007*
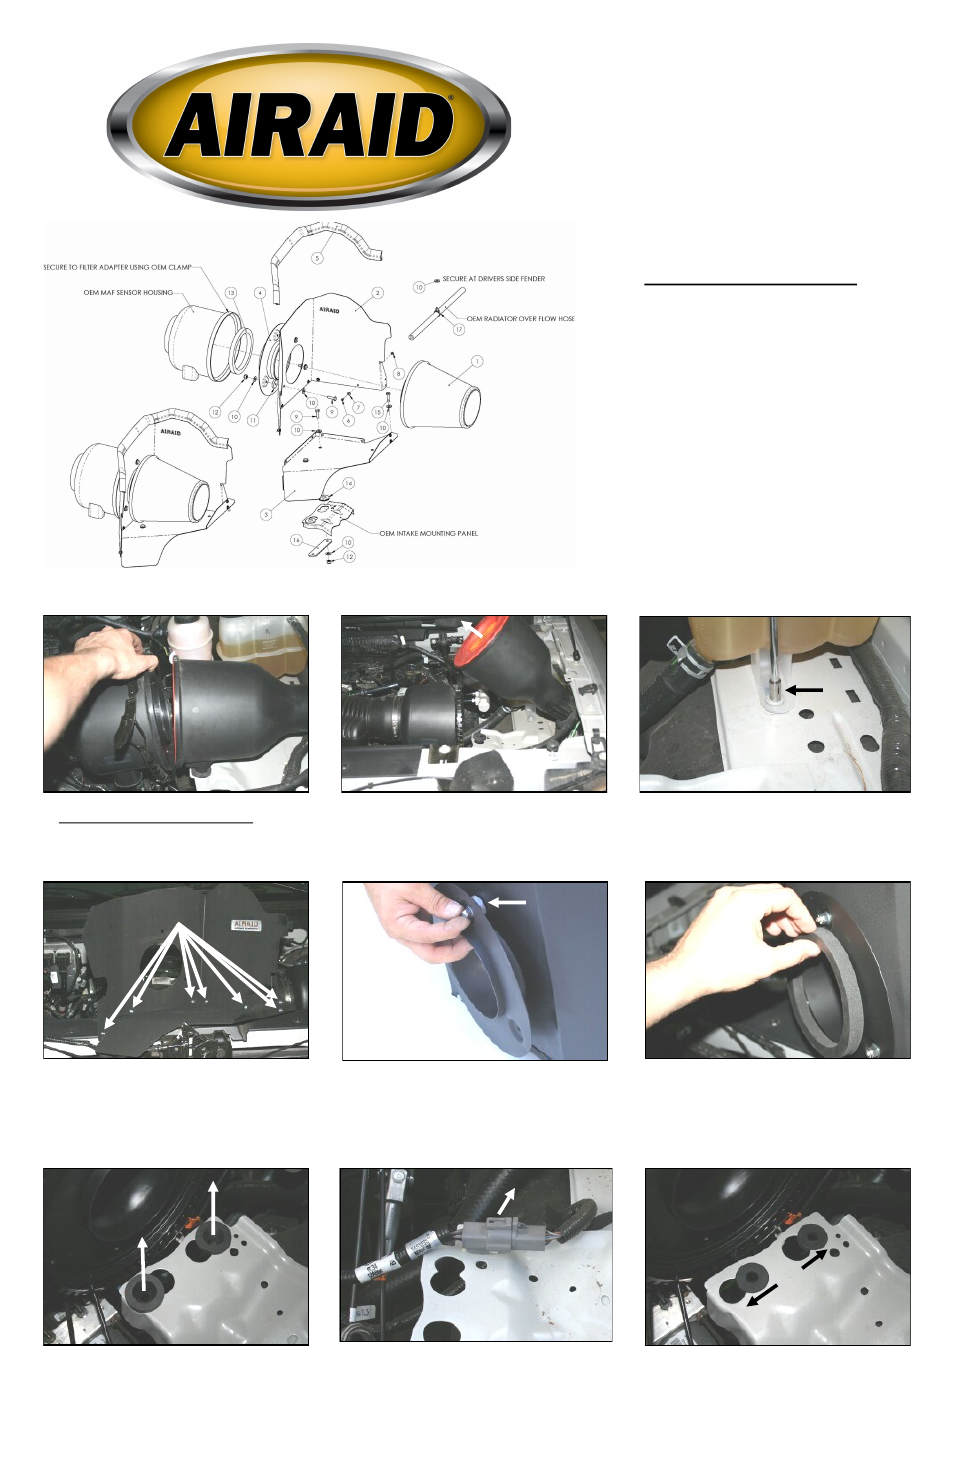
Component Identification
1.
Airaid Premium Filter
1
2. MAF Panel
1
3. Bottom Panel
1
4. Filter Adapter
1
5. Weather Strip 24 3/4”
1
6.
6 - 32 x 5/16” Screw
7
7.
#6 Flat Washer
7
8.
6-32 Keps Nut
7
9.
¼ - 20 x 7/8” Bolt
5
10.
¼” Flat Washer
12
11.
Bushing
3
12.
¼ - 20 Locknut
5
13.
Gasket 4.5”
1
14.
Rubber Grommet
2
15.
M6 - 1 x 25 Hex Bolt
1
16.
Long/Narrow Bracket
1
17.
Black Plastic Hose Mount 1
4. Assemble the Airaid Cool Air Dam (CAD) panels
(#2, #3) using seven 6-32 x 5/16” screws (#6), #6 flat
washers (#7), and 6-32 keps nuts (#8).
5. Insert three ¼-20 x 7/8” bolts (#9), and ¼” flat
washers (#10) through the CAD. Place one bushing
(#11) at each hole between the CAD and the filter
adapter (#4). Next, secure the assembly using three
¼” flat washers (#10), and ¼-20 nuts (#12).
6. Install the supplied gasket (#13) onto the filter
adapter.
2. Remove the factory air filter and airbox from the
vehicle. Pull straight up on the airbox, to release it
from the grommets, and then remove the airbox inlet
from the drivers side fender.
3. Using a 5/16” socket, ratchet and extension, remove
one bolt from the factory coolant reservoir mount.
1. Disconnect the negative battery cable.
Unclip the factory airbox from the factory Mass Air
Flow (MAF) sensor housing.
7. Remove the two factory grommets from the facto-
ry airbox mounting plate.
9. Slip two rubber grommets (#14) into the large
holes in the factory airbox mounting plate, and then
slide them sideways into the small holes as shown.
8. 4.2L Engine Only: Using a flat blade scr ewdr iv-
er, carefully pry the MAF sensor wiring harness con-
nector from the holes in the airbox mounting plate (do
not disconnect it). Move the harness towards the fire-
wall to allow room for the CAD to mount.
Bushing
Full color instructions can be viewed on our web site at Airaid.com. Use the Product Search function to find your part number, and click View Details.