Installing track – Harken 1807, 1807HL System A Battcars: built before 2005 User Manual
Page 8
8
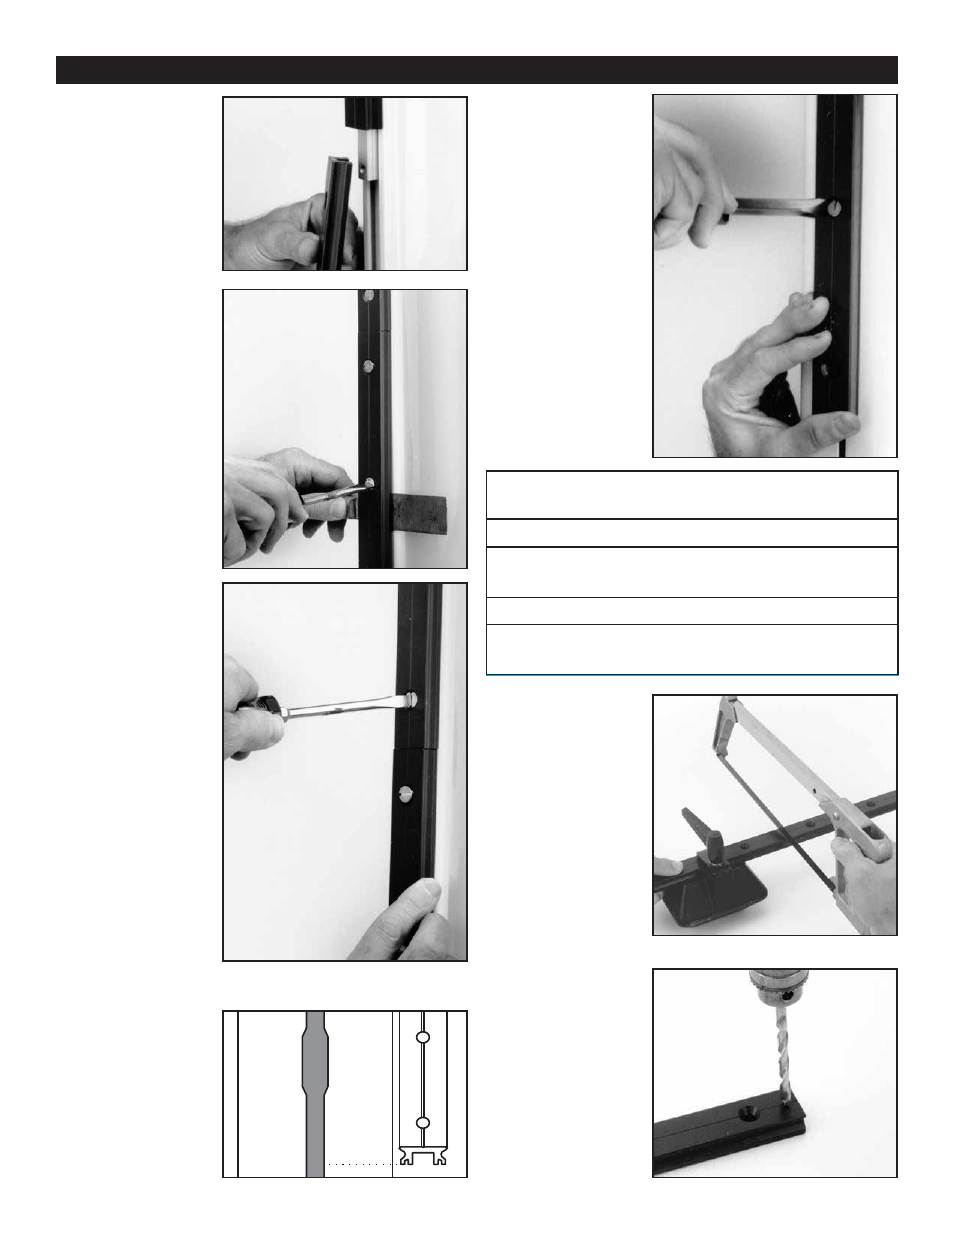
Installing Track
Hold a full-length track
piece up to the mast and
loosely install the top
screw.
Warning! Do not let
tracks drop, severe inju-
ry can result if the upper
track(s) drop down.
Use a putty knife to slide
the next slugs and con-
nector slug in place and
loosely install the
5
/
8
"
(16 mm) screws.
7
Slide tracks up far
enough to fit the
next track.
Mast up: hold upper
tracks, loosen screw that
holds the tracks in place
and slide track up.
Loosen screw enough so
the track will slide up the
mast.
Securely tighten the
new bottom screw.
8
Repeat until all full
length tracks are
installed.
Do not install the 2
5
/
8
"
(67 mm) connector
slugs at this time.
Note: If the bottom full
length track blocks the
feeder gap, load slugs for
the bottom track before
installing the full length
track.
Slip slugs below the gap.
Begin with 1
1
/
4
" (32 mm)
end stop slug, followed
by four
3
/
4
" (19 mm)
mounting slugs, and the
2
5
/
8
" (67 mm) connector
slug on top.
9
Push tracks up so the
17
3
/
4
" (451 mm) to
19
3
/
4
" (502 mm) bottom
track will fit below. See
step 10. The rubber end
stop extends
1
/
4
" (6 mm)
below the bottom of the
track.
Do not install the bottom
track yet.
10
Refer to the chart
below to find your
bottom track length.
From the track that is
remaining, measure from
the anodized end and cut
the track.
Round your track length to the nearest 1" (25 mm). Make
bottom track 17
3
/
4
" (451 mm) if not listed below
Make bottom track 18
3
/
4
" (476 mm) if length is listed below
28'6"
(8.687 m)
35'3"
(10.744 m)
42'
(12.802 m)
48'9"
(14.859 m)
55'5"
(16.891 m)
Make bottom track 19
3
/
4
" (502 mm) if length is listed below
28'7"
(8.712 m)
35'4"
(10.770 m)
42'1"
(12.827 m)
48'10"
(14.884 m)
55'6"
(16.916 m)
11
Drill two
13
/
64
"
(5.5 mm) holes in
the cut end of the track
centered at
5
/
16
" (8 mm)
and 1
1
/
16
" (27 mm) from
the track end.
12
Check the fit of the
bottom track, but
do not install it. See
step 13.
Securely tighten those
screws that you can reach
from your mounting posi-
tion. Go to the top of the
mast and come down
securely tightening all
screws.
- 1792, 1792HL System A Battcars: built before 2005 1777 System A Battcars: built before 2005 1825, 1825HL System A Battcars: built before 2005 1894, 1894HL System A Battcars: built before 2005 1901, 1901HL System A Battcars: built before 2005 1944, 1944HL System A Battcars: built before 2005 1976,1976HL System A Battcars: built before 2005 1977, 1977HL System A Battcars: built before 2005 1802 System A Battcars: built before 2005 1803 System A Battcars: built before 2005 1823 System A Battcars: built before 2005 1805 System A Battcars: built before 2005 1806 System A Battcars: built before 2005 1824 System A Battcars: built before 2005 1800 System A Battcars: built before 2005 2720 System A Battcars: built before 2005 1793, 1793HL System B Battcars: built before 2005 1794HL System B Battcars: built before 2005 1826, 1826HL System B Battcars: built before 2005 1895, 1895HL System B Battcars: built before 2005 1902, 1902HL System B Battcars: built before 2005 1946, 1946HL System B Battcars: built before 2005 1978, 1978HL System B Battcars: built before 2005 1979, 1979HL System B Battcars: built before 2005 1980, 1980HL System B Battcars: built before 2005 1810 System B Battcars: built before 2005 1811 System B Battcars: built before 2005 1813 System B Battcars: built before 2005 1814 System B Battcars: built before 2005 1808 System B Battcars: built before 2005 1616 System B Battcars: built before 2005