Harken 1807, 1807HL System A Battcars: built before 2005 User Manual
Page 18
18
1
Determine which side of sail to mount battens. Note: The recepta-
cle is primarily designed for starboard side installation but may
also be installed on the port side so the adjusting screw is towards
the top.
Port or starboard batten location is a matter of preference, but may
be influenced, for instance, by the location of a storm trysail track
along one side of the mast.
Note: the batten is aligned close to the slide centerline.
2
Slide batten into sail and center it in the batten pocket. Remove all
other parts from the batten receptacle. Place receptacle over bat-
ten and align it so the front of the receptacle is snug up against the
aft edge of the boltrope and the receptacle axis is parallel to the bat-
ten.
Note: For flat battens less than 1
5
/
8
" (41 mm) wide, the receptacle
should be positioned so that one edge of the batten is flush against
the batten adjustment screw retainer housing.
With the receptacle correctly positioned, mark and punch 6 holes for
the 5 mm receptacle mounting screws and two holes (same diame-
ter) for the Phillips head screws that hold the nosepiece into the
receptacle.
Note: the 1901 receptacle is intended primarily for use on sails with
battens exactly perpendicular to the luff. However, if the upper bat-
tens have a slight incline, the receptacle can be inclined slightly.
3
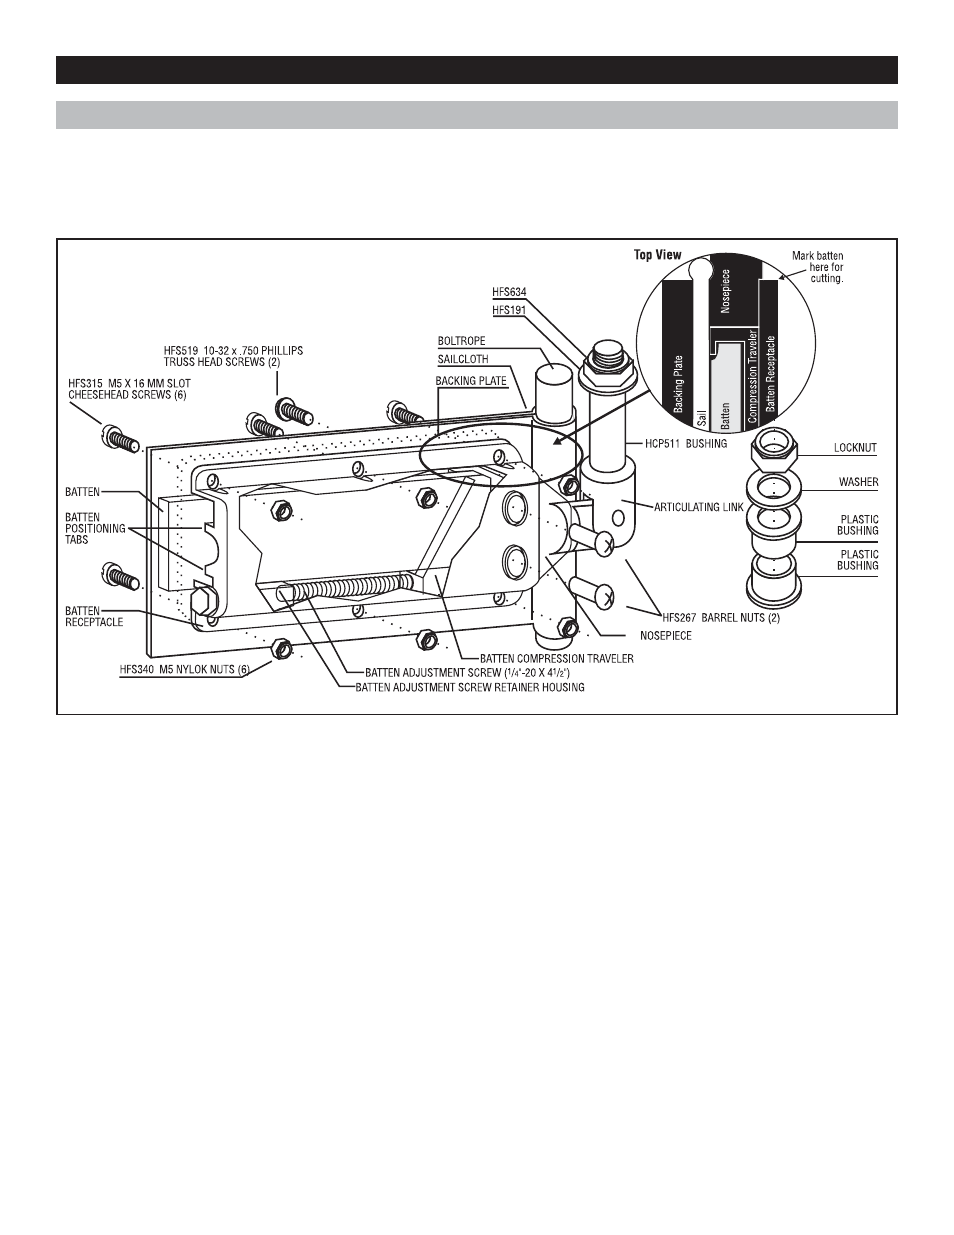
Remove batten. Using the six M5 x 16 mm screws and M5
Nylock nuts, sandwich the sail between the backing plate and the
batten receptacle. The screw heads must be on the backing plate
side and the nuts on the receptacle side. (See Diagram I). Tighten
screws securely.
4
Insert the batten through the foreword end of the receptacle and
push it as far aft into the leech end of the batten pocket as possi-
ble. With a pencil, mark the batten at the forward end of the recepta-
cle. Pull the batten out of the receptacle a slight distance and cut it
off approximately
3
/
4
" (19 mm) aft of the pencil mark to allow room
for the nose piece and batten compression traveler.
Flat Battens: Use a saw and file to shape the front of the batten as
shown in the top view in Diagram I. This assures that the batten will
snug itself over against the sail when the batten compression travel-
er is tightened.
5
Install the batten compression traveler and batten adjustment
screw with flat washers.
Note: Position the washer so it is held away from the sail by the two
small bosses on the aft side of the batten receptacle.
Tighten the traveler approximately
3
/
8
" (9 mm) after it contacts the
batten to make room for the nose piece. Slide the nose piece into the
receptacle and secure with the barrel nuts and Phillips head screws
as shown above. Use a small amount of blue Loctite on the threads
of the screws.
6
To adjust the batten compression (cloth tension) use a
7
/
16
"
(76 mm) extension. Usually some adjustment will be required
after the first sail.
Assembling 1901 Harken Battcar with Adjustable Round or Flat Battslide
®
Receptacle
Flat Battens: The 1901 receptacle fits flat battens up to 1
5
/
8
" (41 mm) wide and up to
3
/
16
" (5 mm) thick. To use thicker battens, up to
3
/
8
" (9.5 mm),
use a coarse file or Shurform plane to reduce the height of the batten positioning tabs (see Diagram I). Do not plane the tabs down too much;
they should hold the batten snugly against the sail.
Round Battens: The 1901 receptacle fits round battens
1
/
2
" (12 mm) in diameter. To use smaller diameter battens, sleeve the front of the batten to
1
/
2
" (12 mm).
Sailmaker’s Instructions
DIAGRAM I: 1901
- 1792, 1792HL System A Battcars: built before 2005 1777 System A Battcars: built before 2005 1825, 1825HL System A Battcars: built before 2005 1894, 1894HL System A Battcars: built before 2005 1901, 1901HL System A Battcars: built before 2005 1944, 1944HL System A Battcars: built before 2005 1976,1976HL System A Battcars: built before 2005 1977, 1977HL System A Battcars: built before 2005 1802 System A Battcars: built before 2005 1803 System A Battcars: built before 2005 1823 System A Battcars: built before 2005 1805 System A Battcars: built before 2005 1806 System A Battcars: built before 2005 1824 System A Battcars: built before 2005 1800 System A Battcars: built before 2005 2720 System A Battcars: built before 2005 1793, 1793HL System B Battcars: built before 2005 1794HL System B Battcars: built before 2005 1826, 1826HL System B Battcars: built before 2005 1895, 1895HL System B Battcars: built before 2005 1902, 1902HL System B Battcars: built before 2005 1946, 1946HL System B Battcars: built before 2005 1978, 1978HL System B Battcars: built before 2005 1979, 1979HL System B Battcars: built before 2005 1980, 1980HL System B Battcars: built before 2005 1810 System B Battcars: built before 2005 1811 System B Battcars: built before 2005 1813 System B Battcars: built before 2005 1814 System B Battcars: built before 2005 1808 System B Battcars: built before 2005 1616 System B Battcars: built before 2005